This category is related to website creation, design, and optimization. It includes comparisons of web development platforms, design principles, insights into CMS, and trends in web design, underscoring the impact of good design on website performance and user experience.
With the ever-growing trends in e-commerce, businesses are constantly seeking efficient and innovative ways to establish their online presence. One approach that has gained significant attention is the concept of Shopify clone websites. These platforms offer a unique opportunity to replicate the success and functionality of the renowned Shopify e-commerce platform.
Whether you’re an entrepreneur looking to establish a new online store or an established brand exploring new avenues, understanding the intricacies of Shopify clone websites can provide you with a competitive edge.
It doesn’t matter if you’re crafting an online store from scratch or considering the advantages of an established E-commerce framework duplication; join us as we delve into the intricate universe of Shopify clone websites. Let’s explore the journey of turning a vision into a reality and uncovering the possibilities that lie ahead.
What is a Shopify Clone Website
A Shopify clone website refers to a platform that emulates the core features and functionalities of the renowned Shopify e-commerce platform. It involves replicating the design, layout, and even the user experience to create a virtual duplicate of the original. This emulation extends beyond mere aesthetics, encompassing the intricate mechanisms that power an online store—payment gateways, product listings, shopping carts, and more.
The Purpose & Advantages
The primary purpose of a copying Shopify website is to offer businesses, both new and established, a streamlined path to establishing their online presence. Here are some compelling reasons why this approach is gaining traction:
Cost-effective Shopify duplication: Crafting an e-commerce platform from scratch demands considerable financial investment. A Shopify clone website drastically reduces these costs by providing a ready-made framework that can be customized to align with your brand.
Quicker setup with Shopify clones: Time is often of the essence in the digital arena. Building a website from the ground up can be time-consuming, delaying your business’s entry into the market. A duplicate Shopify store expedites the setup process, enabling you to launch your online store more rapidly.
Established Framework: Shopify’s success is a testament to its robust framework. By adopting a clone website, you inherit a tested and proven architecture that underpins numerous successful online ventures.
User-friendly Shopify replicas: Duplicate Shopify stores aim to replicate the user-friendly interface that Shopify is renowned for. This ensures that visitors to your store encounter a familiar and intuitive browsing and shopping experience.
Customizability: While the foundation may be pre-built, a Shopify clone website provides ample room for customization. Tailor the design, add your branding elements, and configure the features that resonate with your business.
Established framework for online stores: A clone website isn’t limited to mirroring an existing brand. It can serve as a canvas for experimentation, allowing you to test new strategies and ideas without affecting your primary business.
How To Clone Shopify Store: Step-by-Step Guide
Turning your vision of a Shopify clone site into reality requires a systematic approach. In this section, we’ll walk you through the essential steps involved in crafting your online masterpiece.
1. Planning Your Clone Website
A solid foundation is critical to a successful project. Before you dive into the technical aspects, consider the following:
Emphasizing Clear Objectives and Design Vision
Your objectives are at the heart of your Shopify clone website. Are you aiming for a seamless online shopping experience, a platform for experimentation, or something unique? Define your goals to guide your decisions throughout the process.
Outlining Features, Design, and Functionality
Start by outlining the features you want on your clone website. Will it include a blog section, interactive product galleries, or social media integrations? Lay out the design elements and functionality you envision, ensuring they align with your brand’s identity and the preferences of your target audience.
2. Selecting the Right Platform
The platform you choose will be the canvas on which your clone website is built. Consider the following when making your selection:
Highlighting Available Platforms for Duplicating Shopify Sites
Several platforms offer the tools and features necessary to create Shopify clone websites. Explore your options, keeping factors like ease of use, support, and customization capabilities in mind.
Importance of Compatibility and Features
The platform you choose should seamlessly integrate with your clone website’s vision. Ensure that the platform supports the features you’ve outlined and provides the flexibility to scale as your business grows.
3. Choosing a Suitable Theme
Themes play a pivotal role in replicating the design aesthetics of Shopify. Here’s how to navigate this aspect:
Understanding the Role of Themes in Replicating Shopify Design
Themes form the visual backbone of your clone website. They determine the layout, colour scheme, typography, and overall look and feel. Selecting a suitable theme sets the stage for a compelling user experience.
Selecting or Customizing a Theme According to Your Vision
You have two options: choose a pre-designed theme that closely resembles your vision or customize an existing theme to align perfectly with your brand identity. Whichever path you choose, ensure that the theme captures the essence of your online store.
4. Clone Shopify Theme
With your theme selected, it’s time to infuse it with your brand’s personality. Here’s how:
Breaking Down the Customization Process
Customize colour schemes and typography to match your branding.
Incorporate your logo and other brand elements seamlessly.
Tailor the layout to highlight your products and improve user navigation.
Emphasizing Branding and User Experience
Consistency is key. Your clone website should be an extension of your brand. Prioritize branding elements that resonate with your audience and ensure that the user experience is intuitive and engaging.
5. Importing Products & Content
Your clone website’s success hinges on the products you offer and the content you share. Here’s how to get started:
Providing Step-by-Step Instructions for Importing Products and Content
Access the product import section in your chosen platform.
Prepare your product data, including images, descriptions, and prices.
Follow the platform’s instructions to upload your products.
Highlighting the Need for Accurate Product Information
Ensure that your product information is accurate and detailed. Clear descriptions and high-quality images enhance the user experience and contribute to higher conversion rates.
6. Testing Your Clone Website
Before the grand launch, rigorous testing is a must. Here’s why and how:
Explaining the Significance of Testing for Functionality and User Experience
Thorough testing ensures that your clone website functions seamlessly across devices and browsers. It also guarantees that users can navigate, shop, and complete transactions without hiccups.
Mentioning Common Areas to Test
Navigation: Ensure that menus, links, and buttons work as intended.
Checkout Process: Test the entire checkout journey, from adding items to completing payments.
7. Launching Your Clone Website
The culmination of your efforts is the launch of your clone website. Here’s how to make it a success:
Discussing the Final Steps Before Launching: Perform a final review to catch any overlooked issues or errors. Ensure that all links are functional, images are optimized, and content is accurate.
Highlighting the Importance of Double-Checking: Thoroughness is key. Double-check all elements of your clone website to provide a polished and seamless experience to your visitors from the moment they land on your site.
How To Clone A Website Design: Pro Tips
Creating a Shopify clone website is just the beginning of your online journey. To ensure your website’s success, it’s crucial to focus on optimization. Optimization enhances performance, user experience, and even search engine visibility. Here are some suggestions to guide you in the process:
Optimizing a Shopify Clone for Speed
Optimize images: Compress images without compromising quality to reduce loading times.
Minimize plugins: Only use essential plugins to avoid unnecessary code and slowdowns.
Enable browser caching: Utilize browser caching to store elements of your website, reducing load times for returning visitors.
Implement Responsive Design
Ensure responsiveness: Your clone website should adapt seamlessly to different screen sizes and devices.
Mobile-friendly navigation: Optimize menus and navigation for smooth mobile browsing.
Streamline User Navigation
Intuitive menus: Design menus that are easy to navigate, allowing users to find products effortlessly.
Clear calls to action: Place prominent buttons for actions like “Shop Now” or “Add to Cart.”
Enhancing User Experience on Cloned Shopify Platforms
Fast checkout process: Simplify the checkout process with minimal steps and clear instructions.
High-quality visuals: Use high-resolution images to showcase your products effectively.
Customer reviews: Incorporate customer reviews to build trust and credibility.
SEO for Shopify Clone Websites
Keyword optimization: Use relevant keywords naturally in product descriptions, titles, and content.
Meta tags and descriptions: Craft compelling meta titles and descriptions for better search engine visibility.
Clean URL structure: Ensure that your URLs are clear and descriptive.
Monitoring and Analyzing Clone Website Performance
Utilize analytics tools: Monitor website traffic, user behaviour, and conversion rates.
Regular updates: Based on analytics, make necessary adjustments to improve user engagement and conversion.
Provide Excellent Customer Support
Live chat: Offer a live chat option to assist customers in real time.
FAQ section: Create a comprehensive FAQ section to address common queries.
Test Across Devices
Cross-device testing: Ensure your clone website functions seamlessly on various devices and browsers.
User feedback: Gather user feedback to identify areas for improvement.
Frequently Asked Questions
1. Can You Copy Products from one Shopify Store to Another?
Yes, you can clone a Shopify website, but it’s essential to understand the nuances involved. Cloning typically consists of replicating the design, layout, and functionality of a Shopify store. This can be achieved by creating a new website with similar features and aesthetics.
2. How Do I Copy a Shopify Store Link?
Copying a Shopify store link is simple. Please navigate to the desired page on the store, copy the URL from your browser’s address bar, and share it wherever needed.
3. How Do I Clone a Shopify Theme?
To clone a Shopify theme, you’ll need access to the theme’s code. Duplicate the theme in your Shopify admin, make the necessary customizations, and save it as a new theme. This ensures you maintain the original melody while experimenting with changes.
4. Can Shopify Restore a Website?
Yes, Shopify can restore your website to a previous version. Shopify stores backups of your store’s data, allowing you to revert to an earlier state if needed. This feature is handy if you encounter issues during development.
5. How Long Does a Shopify Domain Last?
A Shopify domain lasts for one year after purchase. It’s essential to renew your domain before it expires to avoid any disruptions to your online store.
6. How to Make a Website Like Shopify from Scratch
Creating an e-commerce website from scratch requires expertise in web development, design, and e-commerce functionalities. Consider hiring professionals or using platforms that offer extensive customization options.
In the world of branding and design, the concept of logo simplification holds a remarkable influence over how companies present themselves to their audiences. The logo serves as the visual medium for this identity, expressing the brand’s core attributes in a single image. However, as brands evolve and expand, complex and cluttered logos can diminish their identities.
Simplifying a logo in design is a challenging task. Still, standing out from others that align with the target audience is necessary.
In the blog post, we look at the significance of logo simplification, how it fits into modern branding strategies, and the array of advantages it brings.
What is Logo Simplification?
Logo simplification is refining a brand’s identity into a visual masterpiece communicating volumes with a glance. It’s a symphony of design, psychology, and intention, carefully made to sound profoundly and quickly.
Why Logo Simplification Matters in Modern Branding
This is where the power of simplification of the logo emerges. A simplified logo redesigns the essence of a brand into a clean, concise symbol that’s instantly recognizable, memorable and versatile. It conveys the brand’s values at a glance. It’s about making an image that speaks to all without affecting the viewer, leaving a lasting connection in seconds.
How to Simplifying Your Logo in Easy Steps
We’ll provide you with a comprehensive guide to redesigning a logo that keeps your company’s identity intact.
1. What to Keep and What to Discard
The first step in the process is a critical evaluation of your current logo design. This entails a thorough analysis to identify elements that can be plainer without compromising your brand’s essence.
Know the importance of equity as you analyze each design element objectively.
Identify components that strongly go with the firm’s identity, ensuring they remain integral even after simplification.
2. Conceptualizing the Simplified Logo Iterations
With a clear understanding of your logo’s core elements, it’s time to explore creative possibilities for simplification. This involves ideas and concepts to breathe new life into your logo while maintaining its recognizability.
Engage in brainstorming sessions to generate ideas that align with your business’s vision and goals.
Translate your concepts into visual representations through sketches and digital mock-ups that display the potential of each idea.
3. Collaborating with Design Professionals
The input of design professionals and stakeholders is invaluable at this stage. Collaboration ensures that your simplified logo aligns with your brand’s identity while benefiting from multiple perspectives.
Seek feedback from designexperts, brand managers, and other relevant stakeholders to gain diverse insights.
Utilize the feedback received to refine your logo iterations, ensuring that each version is a step closer to the perfect clear symbol.
4. Finalizing Your Streamlined Logo
Test your logo’s adaptability across various sizes and platforms to check its visibility and impact in diverse contexts. Learn from common mistakesbrands make during simplification, ensuring you sidestep potential pitfalls.
What Benefits Companies Get from Streamlined Logos
Firstly, a minimal logo enhances brand recall. When a symbol is clutter-free and visually straightforward, it becomes easier for customers to remember and connect with the firm. This simplicity also translates seamlessly across various platforms, ensuring consistency in a multi-channel world.
Secondly, a simplified mark can adapt to different sizes and contexts. Whether on a business card, a website banner, or a billboard, the sign remains distinct and impactful. This adaptability ensures that the brand maintains a strong presence across various mediums.
Moreover, a minimalist logo show modernism and professionalism. In a world where trends evolve rapidly, a simplified logo appears timeless, avoiding the risk of becoming outdated quickly. It aligns with contemporary design sensibilities while maintaining the brand’s heritage and values.
Techniques to Simplify Logo
When it comes to logo simplification, mastering the art involves strategic techniques combining design principles, visual psychology, and brand essence. Let’s explore the essential techniques to transform a complex logo into a streamlined emblem that resonates with your audience.
Analyzing Your Current Logo Design
Before embarking on the journey of simplification, it’s crucial to understand the intricate elements of your current logo. This involves a comprehensive analysis to identify aspects that can be simplified while retaining the brand’s identity.
Pinpoint intricate details, redundant elements, or complex shapes that could be streamlined without losing the essence of the logo. Evaluate the logo’s overall composition. Are there elements that contribute to visual clutter? Simplifying doesn’t mean eliminating everything but rather focusing on what truly matters.
Minimalism in Logo Design – Less is More
Minimalism is a guiding principle in logo design that centres on simplicity and clarity. By embracing minimalistic design principles, you can create a logo that communicates a powerful message with the fewest possible elements.
Simplify shapes, lines, and forms while retaining the fundamental traits that make your logo recognizable. Strive to clarify the logo’s core elements, eliminating extraneous details that don’t contribute to the overall brand message.
Iconography and Symbolism – Crafting a Distinctive Mark
Icons and symbols are pivotal in logo design, often acting as visual shorthand for the brand’s identity. Simplifying these elements requires a delicate balance between recognition and refinement.
Explore how icons and symbols can encapsulate the essence of your brand, enabling quick recognition and connection. Analyze your current icons or logos. Can they be simplified while still conveying the intended message? Enhance their clarity and impact through thoughtful refinement.
Colour Palette Rationalization for Visual Impact
Colours evoke emotions and shape perceptions, making them crucial to logo design. In simplification, rationalizing the colour palette is essential for maintaining consistency and visual impact.
Narrow your colour palette to a harmonious selection that reflects your brand’s personality and resonates with your target audience. Consider the psychological effects of colours. Choose hues that align with your brand’s messaging and evoke the desired emotional responses.
Typography Refinement
Typography plays a vital role in conveying your brand’s tone and message. Refining typography ensures that your logo remains legible and contemporary in the context of logo simplification. Opt for easily readable fonts, especially at smaller sizes.
The typeface selection should match the brand’s personality and convey its intended message. Modernize your logo’s typography by making subtle adjustments to spacing, letterforms, or stylization while maintaining a timeless appeal.
Conclusion
Simplifying logos is an integral aspect of design to maintain its identification, memorizing and differentiation. It’s an impact that creates a long-lasting feel and imprints in people’s minds.
With the help of simple steps and tips, you can make an impactful, enduring and outstanding logo that speaks to your customers.
Embarking on the journey of selecting an app builder can be a perplexing task. Amidst the myriad of options, you seek affordability, user-friendliness, and a perfect fit for your business aspirations. So, how do you untangle this web of choices and find your ideal match?
In the realm of app creation, the landscape is undergoing a transformation thanks to the rise of no-code development. This revolution empowers not only seasoned developers but also businesses of all sizes, granting them the prowess to craft robust web and mobile applications – all without the need for any coding expertise.
In the vibrant and ever-evolving landscape of app development, where innovation fuels digital transformation, two names stand out prominently: Adalo and Bubble. If you’ve delved into the dynamic realm of No Code, you’re no stranger to the two heavyweights that command attention and curiosity.
As we embark on this journey of exploration, we uncover the intricacies that set Adalo and Bubble apart, guiding you through a realm where no-code solutions shape the future.
Explore a comparison of Adalo vs Bubble—two powerful no-code platforms. Make informed decisions on app development with this comprehensive analysis.
Differentiating No-Code and Low-Code
Before delving into the intricacies of Adalo and Bubble, it’s essential to grasp the fundamental difference between no-code and low-code development approaches. While both empower non-developers to create applications, they operate on a spectrum of complexity.
No-code platforms like Bubble and Adalo require minimal to no coding knowledge, focusing on visual interfaces and pre-built components.
On the other hand, low-code platforms provide a balance, offering some coding capabilities for those seeking customization while still reducing the coding burden.
What is Adalo
In the universe of app creation, Adalo shines as a beacon of simplicity and possibility. It’s an environment where apps are crafted with ease without compromising quality. Adalo empowers creators to tackle their app-building journey without getting entangled in complex codes.
Source: Adalo
What is Bubble
In the realm of app development, where lines of code once dictated possibilities, Bubble emerges as a transformative force. It’s not just a platform; it’s a canvas where ideas come to life without the constraints of coding. Bubble redefines the landscape of creation by being a robust no-code platform that empowers dreamers and visionaries to craft complex, functional applications.
Source: Bubble
Adalo Pros
User-Friendly Interface: Adalo boasts a highly intuitive drag-and-drop interface, making app creation accessible even to those without coding knowledge.
Rapid Prototyping: Its quick prototyping capabilities enable the swift creation of functional prototypes, aiding in iterative development.
No-Code Simplicity: Adalo’s no-code nature empowers users to develop apps without relying on complex coding, catering to a wider audience.
Cross-Platform Compatibility: Adalo supports both web and mobile app development, allowing creators to target multiple platforms seamlessly.
Adalo Cons
Limited Customization: While suitable for rapid development, Adalo’s simplicity might limit customization options for intricate features.
Scalability Concerns: Adalo’s scalability might be a concern for larger projects, potentially requiring migration to a more scalable platform.
Learning Curve: Despite its user-friendliness, mastering Adalo’s features might still require a learning curve, particularly for complex projects.
Dependency on Platform: Apps built on Adalo are hosted on its platform, which could lead to potential limitations in terms of control and hosting options.
Pros Of Bubble
Versatile Feature Set: Bubble offers a wide array of tools and features, catering to various app types and industries, from simple apps to complex web applications.
Robust Automation: Bubble’s automation capabilities enable the creation of intricate workflows, enhancing user interactions and app functionality.
Powerful UI Design: Bubble’s UI design capabilities allow for highly customizable and visually appealing user interfaces.
Extensive Integration: With its support for APIs and plugins, Bubble allows seamless integration with external services, expanding app capabilities.
Cons Of Bubble
Learning Curve: Bubble’s extensive features and customization options can lead to a steeper learning curve, especially for beginners.
Mixed No-Code and Low-Code: While primarily a no-code platform, Bubble introduces some coding elements, which might be overwhelming for users seeking simplicity.
Pricing Complexity: Bubble’s pricing structure can be intricate, and the cost might increase as you add advanced features or scale your app.
Scalability Management: While Bubble is scalable, managing scalability effectively requires understanding its architecture and optimization techniques.
Welcome to a discourse that goes beyond the surface-level comparison. This isn’t just about putting one against the other; it’s about understanding the nuances that make each platform a potential game-changer. What’s even more intriguing is that our journey isn’t limited to mere facts and figures; it’s enriched by a distinct perspective – the affiliate perspective.
Adalo’s Approach To UI & UX
Adalo, known for its user-friendly interface, crafts a space where creators wield the power to design stunning UIs without breaking a sweat. The drag-and-drop interface becomes an artistic canvas, where elements align harmoniously to create an aesthetic experience. Adalo’s simplicity doesn’t compromise creativity; it enhances it.
Bubble’s Mastery of UI & UX
Bubble empowers creators to dive deep into UI design, allowing for meticulous customization. Its UI capabilities enable the creation of visually engaging and dynamic interfaces that elevate the user’s digital encounter.
Source: Bubble
Adalo vs. Bubble: Features and Functionality
Adalo steps onto the stage with a toolkit designed for simplicity and swiftness. The rapid prototyping capabilities of Adalo allow creators to transform ideas into functional prototypes and MVPs with remarkable speed.
Bubble’s allure lies in its blend of visual design and coding capabilities, granting creators the power to craft apps that go beyond the ordinary. Its automation tools allow for the creation of intricate workflows, enhancing user interactions and app efficiency.
Adalo’s Canvas of Customization
Adalo emerges as a canvas where customization and simplicity coexist. Adalo embraces those who seek swift and straightforward customization, ideal for rapid prototyping and bringing ideas to life swiftly.
Bubble’s Realm of Flexibility
Bubble’s spectrum of functionality extends from no-code simplicity to low-code customization, making it a playground for creators with varying technical backgrounds. Its visual design capabilities, coupled with coding options, grant users the ability to craft apps that mirror their exact visions.
Adalo’s User-Friendly Learning Curve
Adalo beckons beginners with its gentle learning curve, designed to empower even those without coding knowledge. For those venturing into the world of digital creation, Adalo serves as a welcoming guide, allowing swift prototyping and tangible results without a steep technical learning curve. While its simplicity aids initial steps, mastering more advanced functionalities might take time.
Bubble’s Learning Curve
While its visual interface caters to no-code enthusiasts, Bubble’s extensive feature set and customization options can lead to a steeper learning curve, especially for those without coding experience. As creators delve deeper into Bubble’s capabilities, they embark on a learning odyssey that offers immense rewards in terms of customization but requires dedication to grasp its nuances.
Adalo’s Pricing Structure
Bubble’s Pricing
Adalo’s Approach to Performance
Adalo steps onto the stage with a focus on simplicity and speed. While this streamlined process aids in rapid development, it’s essential to assess how this simplicity translates into app performance as the project scales. Smaller to medium-sized apps might thrive on Adalo’s framework, offering responsive performance and smooth interactions.
Bubble’s Emphasis on Speed and Scalability
Bubble’s focus on scalability and speed lies at the core of its architecture. It’s designed to handle apps of varying complexity, from simple prototypes to intricate, feature-rich applications. Bubble’s scalability ensures that as your user base grows, your app’s performance remains steadfast, delivering responsive interactions and minimizing delays.
Adalo’s Collaborative Community
The collaborative nature of Adalo’s community ensures that as you embark on your app-building journey, you’re never alone. However, as Adalo’s community expands, it’s essential to assess whether the scale of support matches your project’s needs.
Bubble’s Supportive Network
Whether you’re a no-code enthusiast or a seasoned developer, Bubble’s network ensures that you have access to a wealth of knowledge and insights. But remember, the breadth of Bubble’s community might present a learning curve as you navigate its extensive resources.
Adalo’s Versatility and Use Cases
Adalo enters the spotlight as a versatile canvas catering to a spectrum of use cases. It’s a playground for those who seek quick results, enabling entrepreneurs, small businesses, and individuals to transform their ideas into functional digital experiences.
Bubble’s Range of Suitability
Its range of suitability is expansive, encompassing use cases that span from small startups to large-scale businesses, from e-commerce platforms to social networking sites. Bubble’s flexibility allows creators to craft apps that cater to specific needs, leveraging both no-code elements and custom-coded features.
Adalo’s Approach to Scalability
Adalo’s scalability might be a consideration, especially for those with aspirations of exponential growth. Assessing whether Adalo’s architecture aligns with your long-term vision is vital.
Bubble’s Embrace of Growth
Bubble provides the flexibility to scale. From startups to enterprises, Bubble’s infrastructure ensures that as your user base expands, your app’s performance and responsiveness remain steadfast.
Adalo’s Path to Deployment
With its user-friendly interface, deploying apps becomes an accessible endeavor. Creators can publish their creations swiftly, making their digital visions accessible to users across platforms. Adalo’s streamlined deployment suits those who seek quick results and immediate user engagement.
Bubble’s Comprehensive Publishing
Bubble provides a range of options for deployment, from web apps to native mobile apps, allowing creators to tailor the user experience to various platforms. The flexibility in deployment aligns with Bubble’s ethos of customization, catering to creators who desire a tailored presence across different channels.
Adalo’s Ecosystem of Simplicity
Adalo steps onto the stage with an ecosystem rooted in simplicity and accessibility. Tutorials, forums, and user-generated content cultivate an environment where collaboration and guidance thrive. This ecosystem caters to those who seek quick results and value a community that supports their journey.
Conclusion
As you stand at the precipice of choice, let the words linger – this isn’t about which platform is “better”; it’s about which platform aligns with your vision. Your aspirations, project goals, and intended audience serve as the North Star, guiding you toward the path that resonates with your journey.
In today’s digital age, websites have become the lifeblood of businesses and individuals alike. They serve as virtual storefronts, connecting us with the world and showcasing our ideas, products, and services. But creating a website was a daunting task requiring coding expertise, making it a challenging endeavor for those who still need to gain technical backgrounds.
Fortunately, the advent of website builders with AI capabilities has revolutionized how we create websites. These platforms empower individuals and businesses to design and develop professional websites without extensive coding knowledge. Among the top contenders in this realm are Framer and Webflow, each offering a unique set of features and targeting different user groups.
Framer
Framer is a cutting-edge design and prototyping tool for designers and UI/UX professionals. It’s a robust platform that allows users to transform static mockups into interactive and animated prototypes. Its seamless integration with popular design tools like Photoshop and Figma sets Framer apart, making the design process smoother than ever.
Moreover, Framer takes advantage of AI technology to enhance its offerings. It claims to generate an actual website from a raw idea in just a matter of seconds. The more details you provide, the better the output it produces. This tech makes Framer an enticing choice for designers looking to bring their concepts to life quickly.
Webflow
On the other hand, Webflow is a complete website builder that strikes a perfect balance between visual design ease and code flexibility. It caters to designers and developers, allowing them to build and design websites in ideal sync. Webflow’s drag-and-drop editor and customizable templates enable users to create visually stunning websites effortlessly.
Webflow also boasts advanced AI capabilities that are gradually being explored and implemented. The platform teases AI features like personalized assistance, content generation, and SEO settings auto-generation, promising an even more streamlined website creation process. Additionally, Webflow offers robust security features to protect websites and user data.
Framer vs Webflow – Who Wins the UI/UX Platform
Before starting a project on any of the above tools, compare them to decide which will help in your workflow. In this way, you will be able to handle the platform working smoothly.
Pricing
Framer:
Framer offers a tiered pricing structure to meet different user groups.
It starts with a free plan, allowing users to explore the platform’s capabilities without cost. However, the free Plan has limitations, making it suitable for individual projects or personal use.
For those seeking more advanced features and functionalities, it offers two site plans for launching on a custom domain:
Basic Plan ($15/month): Ideal for personal sites, it includes 10,000 monthly visitors and 100 CMS items.
Pro Plan ($25/month): Suited for commercial sites, it provides 100,000 monthly visitors and 1000 CMS items.
In addition to these site plans, Framer offers two dedicated business pricing plans for startups and established businesses. However, the available information must provide specific details on these business plans.
Webflow:
Webflow, too, has a tier pricing structure, providing options for individuals, teams, and agencies. It also has a free plan for users to test the platform’s functionalities and get started with basic projects.
For more advanced features and added benefits, it offers the following paid plans:
Lite Plan ($16/month): Suitable for freelancers and individuals, offering enhanced design and development tools and client billing features.
Pro Plan ($35/month): It is for designers and small teams, providing additional features like enhanced project collaboration and client account access.
Team Plan ($35/user/month): Designed for larger teams, it enables efficient collaboration with features such as team libraries and shared projects.
Enterprise Plan (custom pricing): It is tailored for larger organizations and agencies with specific requirements, offering personalized solutions and support.
Customer Support with Quick Response Times
Webflow:
Webflow prioritizes customer satisfaction by offering responsive and efficient email support. Users can email the Webflow support team to address their inquiries, concerns, or technical issues. One standout feature of Webflow’s asset is its commitment to quick response times, ensuring users receive timely assistance to keep their projects on track.
Framer:
It provides multiple avenues for customer support, ensuring that users can seek help through various channels. The platform offers a ticket system, allowing users to submit their support requests, which are then addressed by the Framer support team in an organized and structured manner.
Additionally, Framer has an active Discord community where users can engage with other designers, share insights, and seek help from the Framer community. This community-driven support fosters a collaborative environment, making it easier for users to find solutions and tips from experienced peers.
Like Webflow, Framer offers email support to address user inquiries and provide personalized assistance.
Usability and User-Friendliness
Webflow takes pride in its user-friendly interface, making it accessible to beginners and experienced designers. The platform offers a visually intuitive design interface that allows users to create stunning websites without coding knowledge. With Webflow’s drag-and-drop editor, elements can be easily added, resized, and customized, streamlining the design process.
One of the benefits of Webflow is its vast collection of pre-built templates. These templates are starting points for various websites, enabling users to kickstart their projects with professionally designed layouts. The templates are fully customizable, allowing designers to personalize them according to their preferences and brand identity.
Framer also excels in usability with its sleek and modern interface. The platform boasts an interactive design canvas that empowers designers to craft intricate animations and prototypes. This canvas allows for real-time interactions, making it easier to visualize and fine-tune the designs to perfection.
Moreover, Framer goes beyond mere prototyping and offers design-to-code capabilities. This feature allows designers to turn their designs into functional code without needing external development assistance. It bridges the gap between design and development, providing a more efficient workflow for designers and ensuring the final output matches the original design vision.
The Learning Centers and Tutorial Videos Provided by Webflow and Framer
Both Webflow and Framer understand the importance of empowering users with knowledge and skills to maximize the potential of their platforms. As such, both platforms offer learning centers with tutorial videos that cover various aspects of using their tools effectively.
Webflow Learning Center: Webflow’s learning center is a comprehensive resource with a wide range of tutorial videos, articles, and guides. These resources cater to users at different levels, from beginners to advanced designers and developers. The tutorial videos cover primary website building, responsive design, and advanced interactions, helping users enhance their skills and knowledge.
Framer Learning Center: Framer’s learning center also provides a wealth of educational content, enabling users to make the most out of the platform’s features. The tutorial videos guide users through creating interactive prototypes, utilizing Framer’s AI capabilities, and making the most of design-to-code functionalities.
SEO and Hosting Performance
Webflow
Webflow is well-known for its comprehensive SEO tools, empowering users to optimize their websites for search engines. From customizable meta tags to friendly URLs, Webflow offers a range of features that allow users to fine-tune their website’s SEO settings to improve search engine rankings.
Additionally, Webflow’s websites are designed with performance in mind. The platform’s hosting infrastructure ensures fast and reliable website loading times, which is crucial for user satisfaction and SEO rankings. With Webflow’s focus on website performance, users can rest assured that their websites will deliver visitors a smooth and seamless experience.
Framer
Framer also offers hosting services for websites created on its platform. While specific details about Framer’s hosting features are not available in the provided information, it is essential to consider the implications of hosting on website speed.
When hosting with Framer, assessing factors such as server performance, data centers, and content delivery networks (CDNs) to ensure optimal website speed is essential.
Design Flexibility and Animation
The creation of stunning and responsive designs is smooth with the visual design interface without coding knowledge on Webflow. The user can easily customize the elements with the drag-and-drop editor. At the same time, developers can fine-tune and customize the website’s code using a code editor.
Besides, Framer excels in animation and interaction capabilities, setting it apart as a powerhouse for prototyping and creating interactive designs. The platform’s animation focus allows designers to bring their creations to life with fluid and lifelike transitions. From simple hover effects to complex interactive elements, Framer’s animation tools provide a wide range of possibilities for designers to explore.
Real World Experiences with Webflow and Framer
To analyze the realistic results with Framer and Webflow, we turn to Trustpilot, Reddit, and Product Hunt. On these community forums, people from different businesses share their feedback and reviews.
Every user talks about the strengths and weaknesses of both tools. All the responses were unbiased. Where some of them were in favor of Framer others spoke about negative or limited functions. Many have great experiences with Webflow while few suggest migrating to other platforms or built own.
Clicking on the above links, you can view the comments.
Who Should Use the Platform
Webflow’s versatile nature makes it an attractive option for various user groups.
Designers with little to no coding experience find Webflow’s visual design interface and drag-and-drop editor appealing. They can build attractive websites without touching a single line of code.
For developers, Webflow’s code editor provides code customization making it a preferred choice for those who seek more technical control over their projects.
Furthermore, Webflow’s hosting and security features appeal to businesses and individuals looking for an all-in-one website-building solution.
While for designers and UI/UX professionals, Framer is the best for interactivity, animation, and prototyping. It is an excellent choice for creating natural and interactive prototypes, especially for mobile apps and websites. Framer’s AI implementation may also appeal to users seeking automated website generation from a single prompt.
Webflow vs Framer – Deciding Which Platform Best Suits Your Business
Choosing between Webflow and Framer involves understanding your needs, priorities, and goals for your website building or prototyping project.
It is good to note the below points:
Design Flexibility: If you prefer design flexibility and a balance between simplicity and code-level control, Webflow’s visible design interface and code editor offer a versatile solution.
Interactivity and Prototyping: If you focus on creating catching and animated prototypes with realistic relations, Framer fulfills the criteria.
Technical Expertise: Evaluate your team’s technical expertise. Webflow’s user-friendly interface is good for both starters and skilled designers. At the same time, Framer may require a steeper learning curve and appeal more to designers with a background in no-code-based tools.
Project Scope: View the scope of your project. Webflow is a complete website builder suitable for various purposes, while Framer’s strength lies in advanced prototyping.
Budget: Review the pricing options of both platforms and pick the one that aligns with your budget and requirements.
Feedback and Reviews: Research customer reviews and feedback from users who have used both platforms to gain insights into their experiences and satisfaction levels.
As we wrap up this article, we encourage readers to study Framer and Webflow to gain hands-on experience with each platform. While we have presented an overview of their features and capabilities, your specific needs and goals will ultimately drive your decision.
If you want an all-in-one design and development solution then Webflow is here to go. In contrast, if your project demands prototypes, animated designs, and more, Framer is for you. Embrace the power of these platforms to craft remarkable websites or immersive prototypes that leave a lasting impact on your audience.
We will discuss the WordPress excerpts and focus on the powerful “get excerpt” function. If you’re a WordPress user or developer, understanding how to utilize this function effectively can significantly enhance your content display and improve the overall user experience on your website.
WordPress, one of the most popular content management systems (CMS), provides a range of built-in functions to manipulate and display content. The “get excerpt” function is a valuable tool that allows you to extract a concise summary or snippet from your posts or pages.
This guide will teach all knowledge and methods to a beginner or skilled user looking to optimize excerpts.
WordPress generates excerpts based on the first few lines of your content by default.
This article will provide instructions from steps to tips and best practices for customizing the excerpt length. You will also know about showing excerpts on your website, enhancing them with “Read More” links, and studying advanced techniques for modifying snippets. Additionally, we will highlight plugins and tools that can simplify working with WordPress excerpts.
What is Excerpt in WordPress?
Excerpts act as concise summaries of your content, providing a glimpse into what visitors can expect when they explore further. They are teasers that entice readers to click and engage with your posts or pages.
Why WordPress Excerpts are Essential?
Here’s why excerpts are crucial for content display and user experience:
Improved readability
By presenting a condensed version of your content, excerpts make it easier for visitors to scan through your website and quickly assess the relevance and appeal of each post. The overall readability of your website enhances.
Clarity and focus
Excerpts allow you to distill your content’s main points or highlights, ensuring your message is clear and focused. Instead of overwhelming visitors with a lengthy post, you can capture their attention with a concise and compelling excerpt.
Time-saving for users
In today’s fast-paced digital landscape, users appreciate efficiency and quick access to information. Excerpts provide a convenient way for them to preview multiple posts or pages without reading each one. This time-saving aspect improves the user experience and encourages them to explore more content.
Benefits of Adding Excerpts on WordPress Websites
Using excerpts in your WordPress website offers several benefits that can positively impact user engagement and overall site performance.
Here are some advantages of incorporating excerpts:
Engaging and enticing
Well-crafted excerpts serve as hooks that capture the attention of your visitors. They provide a glimpse into the content, arousing curiosity and encouraging them to delve deeper into your posts or pages.
Enhancing navigation
Excerpts can improve the navigational experience for users by providing a structured and organized overview of your content. They allow visitors to quickly identify relevant topics or articles of interest, guiding them to your website’s most valuable and relevant information.
SEO optimization
Excerpts are crucial in search engine optimization (SEO) by providing concise, keyword-rich snippets that search engines can understand and index. When optimized correctly, excerpts can improve search rankings and increase search engine results page (SERPs) visibility.
Consistent design and layout
It lets you maintain a consistent design and layout across your website, especially when displaying content in grids or lists. By providing a standardized summary format, excerpts create a cohesive visual experience that enhances your website’s aesthetics and professionalism.
How WordPress Generates Default Excerpts
WordPress uses a predefined method to generate excerpts when you don’t specify a custom excerpt. By default, it takes the first 55 words from your post content and appends an ellipsis ([…]) at the end. It automatically strips HTML tags and shortcodes from the content to create a plain text excerpt.
It’s important to note that the word count of the excerpt can be modified using filters and functions, allowing you to adjust the length according to your preference.
Limitations and Drawbacks of Default Excerpts
While the default excerpt functionality in WordPress provides a quick way to create excerpts, it has a few limitations and drawbacks that may not be ideal for all scenarios:
Lack of customization: Default excerpts provide little control over the generated excerpt’s length, content, or formatting. Suppose you display a specific portion of your content as an excerpt or want to style the section differently. In that case, the default functionality may need to be revised.
Incomplete or irrelevant information: Depending on the structure of your content, the default excerpt may only sometimes capture the most informative or attention-grabbing parts. It could result in excerpts that need to accurately represent the essence of the content, potentially leading to confusion or disinterest for readers.
Insufficient context: With a fixed word count, default excerpts may trim your content to remove crucial context or break sentences abruptly. It can affect the overall flow and readability of the excerpt, potentially deterring users from exploring further.
Demonstrating Default Excerpts in Action
Let’s look at how default excerpts appear on a WordPress website.
Suppose you have a blog post titled “The Best Travel Destinations for Adventure Seekers.” If you haven’t specified a custom excerpt, WordPress will generate a default excerpt by extracting the first 55 words:
Lorem ipsum dolor sit amet, consectetur adipiscing elit. Sed vehicula euismod consequat. Cras venenatis purus id felis vestibulum commodo. Nullam in semper mauris, non interdum justo. Integer suscipit ultrices sem, et tincidunt dui rutrum ac. Curabitur sollicitudin lacinia arcu sed iaculis. Vivamus eget nibh a mi faucibus fringilla.
As you can see, the default excerpt is a truncated version of the initial content, providing a brief preview of the post.
While default excerpts can be a starting point, customizing and utilizing WordPress’s “get excerpt,” function allows for greater control and flexibility.
Customizing the Excerpt Length in WordPress
The length of an excerpt plays a significant role in how your content is displayed on your WordPress website.
Excerpt length refers to the number of words or characters in the excerpt.
The length you choose can affect your website’s user experience, readability, and overall aesthetics. A well-balanced excerpt length provides enough information to engage readers while encouraging them to click and explore the full content.
A shorter excerpt length may offer a concise preview, enticing users to click for more details. On the other hand, a more extended excerpt can provide more context and information upfront, reducing the need for users to click through to the full content. The optimal excerpt length will depend on your website’s design, content type, and target audience.
Methods to Modify the Excerpt Length
WordPress offers multiple methods to modify the default excerpt length.
Two common approaches are utilizing the
excerpt_length’ filter
Manually adjusting the size with code snippets.
1. Utilizing the ‘excerpt_length’ Filter
WordPress provides a filter called ‘excerpt_length’ that allows you to modify the excerpt length using a few lines of code. You can add this code to your theme’s functions.php file or use a custom plugin to apply the filter.
Here’s an example:
function custom_excerpt_length($length) { return 50; // Adjust the number to your desired excerpt length } add_filter(‘excerpt_length’, ‘custom_excerpt_length’);
2. Manually Adjusting the Excerpt Length with Code Snippets
Suppose you prefer more control over individual snippets. In that case, you can manually adjust the length using code snippets directly within your WordPress templates or a custom plugin. This method allows you to define a different excerpt length for specific posts or pages.
Here’s an example using the ‘wp_trim_words’ function:
$excerpt = wp_trim_words(get_the_excerpt(), 50); // Adjust the number to your desired excerpt length echo $excerpt;
In this code snippet, we used the ‘wp_trim_words’ function to trim the excerpt to 50 words.
Steps to Custom Snippets in WordPress
The ‘excerpt_length’ filter method is here:
1. Access your WordPress theme’s functions.php file or use a custom plugin editor.
2. Add the following code snippet at the end of the file or within the appropriate section:
function custom_excerpt_length($length) { return 50; // Adjust the number to your desired excerpt length } add_filter(‘excerpt_length’, ‘custom_excerpt_length’);
3. Save the file or publish the changes.
Following these steps, you have successfully changed the excerpt length to 50 words. Feel free to adjust the number as per your preference.
Remember, customizing the excerpt length allows you to optimize the display of your content and provide users with a more tailored and engaging experience. Choose an excerpt length that aligns with your website’s design, content goals, and target audience.
Displaying the Post Excerpt on Your WordPress Website
WordPress provides multiple ways to display post excerpts, depending on your specific needs and the theme you use. The primary method involves using the ‘the_excerpt’ function, which outputs the post excerpt defined for each post.
Let’s dive into the details of this function and how you can customize the excerpt output.
1. Adding the ‘the_excerpt’ function
The ‘the_excerpt’ function is a built-in WordPress function that allows you to display the post excerpt within your theme templates. To use it, include the following code snippet in your template files:
<?php the_excerpt(); ?>
By default, this function will output the excerpt defined for each WordPress editor post. However, you can further customize the excerpt output using additional parameters.
2. Customizing the Excerpt Output Using Parameters
The ‘the_excerpt’ function provides several optional parameters that allow you to customize the excerpt output. Here are a few commonly used parameters:
Length: You can specify the excerpt size using the ‘excerpt_length’ parameter.
For example, to limit the excerpt to 30 words, you would use:
<?php the_excerpt(30); ?>
More Link: You can add a “Read More” link after the excerpt using the ‘excerpt_more’ parameter.
Custom Excerpt: If you want to display a custom excerpt instead of the one generated by WordPress, use the ‘excerpt’ parameter.
For example:
<?php the_excerpt(‘This is a custom excerpt.’); ?>
Utilizing these parameters allows you to tailor the excerpt output to suit your requirements and design preferences.
How to integrate Excerpts into Different Templates
Integrating excerpts into different templates lets you control where and how they are displayed on your WordPress website. Depending on your theme, you can incorporate excerpts in various templates such as index.php, single.php, archive.php, or custom page templates.
For example, in the index.php template, you can display excerpts for multiple posts in a list format. Using the ‘the_excerpt’ function within the loop, you can output the post excerpts alongside their titles and other relevant information.
In the single.php template, you can display the full post content instead of excerpts. In such cases, you can exclude the ‘the_excerpt’ function and use the ‘the_content’ function to display the complete post content.
Enhancing the Excerpt with Read More Links
‘Read More’ links are essential for user engagement as they provide a clear call to action, encouraging visitors to click and read the full content. We will cover both manual methods using code snippets and plugins/tools that simplify the process.
Why Adding ‘Read More Links is Vital for User Engagement
‘Read More’ links are crucial in enhancing user engagement on your WordPress website. Here’s why they are essential:
Clear call-to-action: ‘Read More’ links indicate to users that more content is available beyond the excerpt. They encourage visitors to take action and explore further, increasing their likelihood of engaging with your full posts or pages.
Improved user experience: By including ‘Read More’ links, you enhance the user experience by allowing visitors to quickly and easily access the complete content if they are interested. It eliminates ambiguity and seamlessly transitions from the excerpt to the full post or page.
Increased page views: When users click on ‘Read More’ links, it leads them to the complete content, resulting in higher page views impacting your website’s metrics and engagement.
How to Add ‘Read More’ Links to Post Excerpts
Different methods exist to add ‘Read More’ links to post excerpts in WordPress.
Two popular approaches are:
Manual mode by code snippets
Utilizing plugins/tools.
1. Manual method using code snippets
To manually add ‘Read More links to your post excerpts, follow these steps:
1. Locate the template file (index.php or archive.php) where you want to display the excerpts.
2. Look for the code that outputs the excerpt, typically using the ‘the_excerpt’ function. It may look like this:
<?php the_excerpt(); ?>
3. Replace the above code with the following code snippet, which adds the ‘Read More link after the excerpt:
4. Customize the ‘read-more’ class to match your website’s styling. You can add CSS styles to this class to control the appearance of the ‘Read More’ link.
2. Plugins and tools for simplifying the process
Alternatively, you can utilize plugins and tools to simplify adding ‘Read More’ links. Some popular options include:
Advanced Excerpt Plugin: This plugin provides extensive control over excerpts, including the ability to add ‘Read More’ links with customizable text and styling options.
Page Links To Plugin: Although primarily designed for pages, this plugin can redirect ‘Read More’ links to custom URLs, such as specific sections within a post or external landing pages.
Themes with built-in ‘Read More’ support: Some WordPress themes have built-in support for ‘Read More’ links. Check your theme’s documentation or options to see if this feature is available.
Choose a method that suits your needs and enhances the overall user experience on your WordPress website.
Advanced Techniques for Modifying Excerpts in WordPress
These techniques allow you to control how excerpts are indicate and create a more personalized and engaging experience for your website visitors.
1. Customizing the Excerpt Content And Appearance
You can use various techniques in WordPress. Here are a few examples:
Manual Excerpt: Instead of relying on automatic excerpt generation, you can manually create custom excerpts for your posts. In the WordPress editor, locate the “Excerpt” box below the content editor and enter your desired excerpt text. This edit gives you complete control over the excerpt content.
Filtering Excerpt Content: WordPress provides filters like ‘get_the_excerpt’ and ‘wp_trim_excerpt’ that allow you to modify the excerpt content programmatically. You can add code snippets to your theme’s functions.php file or use a custom plugin to apply the filters and manipulate the excerpt text before it is displayed.
Shortcodes and Embeds: You can use shortcodes or embeds within your post content to add dynamic elements or functionality to your excerpts. For example, you can include a shortcode that displays related posts or a video embedded within the excerpt to provide a more decadent preview of the content.
2. Adding HTML Elements or Formatting to Excerpts
If you want to enhance the visual appeal of your excerpts, you can add HTML elements or apply formatting.
Here’s how you can achieve this:
HTML Tags: You can include HTML tags within the excerpt content to apply formatting such as bold, italic, headings, or links.
For example, you can use <strong> to make certain words or phrases stand out or <a> tags to link to relevant pages or resources.
CSS Classes and Styles: By adding CSS classes or inline styles to HTML elements within the excerpt, you can customize the appearance of the text, change the font size, adjust margins or paddings, and more. You will get greater flexibility in styling the excerpts to match your website’s design.
3. Incorporating Dynamic Elements or Variables in Excerpts
You can incorporate active elements or variables to make your passages more dynamic and personalized.
Here’s an example:
Custom Variables or Meta Data: If custom fields or metadata are associated with your posts, you can include them in the excerpts. It can help display additional information like author name, post category, or a specific data point related to the post content.
Conditional Logic: By utilizing conditional statements within the code that generates the excerpt, you can dynamically display different content based on specific conditions.
For example, you can show an additional section for posts within a specific category or a unique message for articles that meet particular criteria.
Plugins and Tools for Working with WordPress Excerpts
These plugins offer additional working and optimization options beyond the default WordPress settings.
Advanced Excerpt Plugin
The Advanced Excerpt plugin is a powerful tool for managing and customizing your WordPress excerpts. It provides an array of features to enhance your excerpt display, including:
Customizable Read More Links: The plugin allows you to customize the “Read More” link text, appearance, and placement within your excerpts.
Excerpt Length Control: You can set specific excerpt lengths for different areas of your website, such as archives, category pages, or search results.
HTML Tags and Formatting: The plugin enables you to include HTML tags and formatting within your excerpts to style and structure the content.
Excerpt Removal: You can remove or turn off excerpts if you prefer to display the full content instead.
Follow these steps to deploy it:
Install and activate the Advanced Excerpt plugin from the WordPress repository.
Go to the plugin’s settings page, usually under your WordPress dashboard’s “Settings” or “Excerpt” section.
Customize the plugin’s settings according to your requirements. Adjust the excerpt length, configure the Read More link options, and enable any additional features you wish to utilize.
Save the settings and visit your website to see the changes in action.
Excerpt Enhancer Plugin
The Excerpt Enhancer plugin offers advanced control over your WordPress excerpts, allowing you to fine-tune their appearance and behavior.
Key features of this plugin include:
Excerpt Length Management: You can set different excerpt lengths for various areas of your website, giving you granular control over the display.
Custom Read More Text: The plugin allows you to customize the text of the “Read More” link and style it to match your website’s design.
Auto Generation of Excerpts: You can automatically generate excerpts for posts that don’t have a manual snippet defined.
Truncation Options: The plugin offers options for controlling the truncation of long words, adding ellipses, or preventing orphan words in your excerpts.
Begin with:
Install and activate the Excerpt Enhancer plugin from the WordPress repository.
Access the plugin’s settings, typically under your WordPress admin panel’s “Settings” or “Excerpt” section.
Configure the settings based on your preferences. Adjust the excerpt lengths, customize the “Read More” link, and enable desired features or options.
Save the settings and review the changes on your website.
Common Issues with Excerpts in WordPress
Excerpt length not displaying correctly: If your snippets do not show the desired length, it could be due to conflicting code or a theme-related issue. In such cases, check if any plugins or custom code snippets are interfering with the default excerpt functionality—Disable plugins one by one to identify the conflicting ones.
Additionally, ensure that your theme supports excerpts and that the appropriate template files are being used.
Excerpt content not matching the desired text: If the excerpt content is not accurately representing the intended text, the reason could be manually entered excerpts, content formatting issues, or conflicts with plugins or theme functions.
Ensure you have not manually entered a custom excerpt for the specific post. Check for formatting inconsistencies or unwanted HTML tags that may alter the excerpt content. Disable plugins temporarily to see if any of them are causing conflicts.
Solutions
Manually adjust the excerpt
Change excerpt length
Check for conflicting code or plugins
What You Can DO to Fix the Trouble Still Occurs
Clear cache: If a caching plugin or server-side caching is enabled, clear the cache after changing your excerpt settings. So, the updated excerpts are displayed correctly on the front end.
Review theme compatibility: Some themes may have specific settings or functions that affect the display of excerpts. Check your theme documentation or contact the developer for guidelines or troubleshooting steps related to the post section.
Debugging mode: Enable WordPress debug mode to identify any potential errors or warnings related to excerpts. This mode can help pinpoint the source of the issue and guide you toward a solution.
Community support: Contact the WordPress community forums, support groups, or relevant online communities for assistance. Other WordPress users and developers may have encountered similar issues. They can provide insights or solutions to help troubleshoot your excerpt-related problems.
Best Practices for Optimizing Excerpts for SEO
Excerpts optimization for search engines is crucial for improving your content’s visibility and click-through rates in search engine results pages (SERPs).
Importance of Better Excerpts for Search Engines
Well-made excerpts can concisely summarise your content, entice users to click through, and enhance the overall user experience.
Here’s why it is crucial:
Improved visibility: Optimized excerpts that effectively highlight the main points of your content are more likely to attract the attention of search engine users. When your excerpts are relevant and engaging, they can increase the chances of your content appearing prominently in search results.
Higher click-through rates: A well-crafted excerpt that accurately reflects the content and entices users can lead to higher click-through rates. When search engine users find the excerpt appealing and relevant to their search query, they are likelier to click through to your website.
Enhanced user experience: Optimized excerpts preview what users can expect from your content, helping them decide whether to visit your website. You can improve the user experience and increase engagement by offering a clear and concise summary.
SEO-friendly Approaches for Crafting Compelling Excerpts
Focus on relevance: Craft excerpts that accurately reflect the content of your posts or pages. Ensure that the fragment of information indicates what users can expect to find if they click through to your website.
Keep it concise: Aim for brief excerpts that capture the essence of your content without being overly lengthy. Most search engines indicate only a limited number of characters in the search results, so it’s essential to make your excerpt concise and compelling within those limitations.
Incorporate keywords: Include relevant keywords within your excerpts. Choose keywords that align with the content and search intent to improve the chances of your content being ranked for those specific terms.
Avoid duplicate content: Ensure each Excerpt is unique and distinct from other excerpts on your website. Search engines value unique content; the same post section can negatively impact your SEO efforts.
Guidance for Adding Keywords and Relevant Content in Excerpts
Here are some ideas:
Research keywords: Conduct keyword research to identify the terms and phrases relevant to your content and have a significant search volume. Use these keywords strategically within your excerpts to improve their visibility in search results.
Natural integration: Integrate keywords naturally within your excerpts, ensuring they fit contextually and don’t disrupt the text’s overall readability. Avoid keyword stuffing, which can be penalized by search engines.
Highlight unique selling points: Identify your content’s unique aspects or value propositions and incorporate them in your excerpts to differentiate your content from competitors and attract users with specific interests.
Consider user intent: Understand the meaning behind user searches and align your excerpts accordingly. Craft excerpts that address specific user needs or queries to improve their relevance and appeal.
Conclusion
The WordPress get excerpt function offers tremendous potential boosting content display and user experience. Implement the techniques discussed in this article, stay updated with the latest trends, and continuously refine your excerpt strategies to ensure your content stands out in the digital landscape.
Increase your content impressions today with better excerpts and unlock the full potential of your WordPress website!
“Webflow vs Wix” is a compelling topic that brings into focus two leading website builders, each vying for the attention of users seeking an intuitive and powerful platform to create their online presence.
These two prominent website builders gained immense popularity among website creators. Both these platforms have garnered a reputation for their ease of use, design flexibility, and comprehensive features. In this article, we will delve into a comprehensive comparison of Webflow vs Wix to help you make an informed decision when choosing the right website builder for your needs.
Let’s embark on the journey of exploration to discover Webflow vs Wix, which reigns supreme in the realm of website creation.
Understanding Webflow and Wix
Website builders have revolutionized the way individuals and businesses create and manage their online presence. Among the leading website builders in the market, Webflow and Wix have emerged as popular choices for website creation. Let’s explore what sets these platforms apart and what features they offer.
Webflow
Webflow is a professional website builder that empowers users to create visually stunning and highly customized websites. It offers a unique blend of design control and development capabilities, making it a go-to platform for designers, agencies, and creative professionals.
With Webflow, users can leverage a powerful visual editor and a flexible CMS to build websites tailored to their specific needs. Some key features of Webflow include:
Intuitive drag-and-drop interface for effortless design and layout customization.
Advanced styling options with CSS control for precise design adjustments.
Robust hosting and content management system (CMS) for seamless website management.
Ability to create complex interactions and animations without coding.
Extensive e-commerce functionality to set up online stores and manage product inventory.
Wix
Wix is a user-friendly website builder that caters to a broad range of users, from small business owners to bloggers and creatives. It offers an all-in-one solution, providing a simple and intuitive platform for website creation and management.
It offers a vast selection of templates and features that empower users to build visually appealing websites without any coding knowledge. Some key features of Wix include:
Extensive collection of pre-designed templates covering various industries and niches.
Easy-to-use drag-and-drop editor for effortless customization and layout adjustments.
App Market with numerous third-party integrations to enhance website functionality.
E-commerce capabilities for creating online stores with payment and inventory management.
Mobile-friendly templates and tools for optimizing websites on different devices.
Advantages of Using Website Builders for Non-Technical Users
Website builders like Webflow and Wix have become invaluable tools for individuals and businesses without technical expertise. Here are some advantages of using website builders:
User-Friendly Interfaces: Website builders offer intuitive interfaces with drag-and-drop functionality, allowing users to create and customize websites easily.
No Coding Required: Website builders eliminate the need for coding knowledge, enabling non-technical users to design and launch professional websites.
Time and Cost Efficiency: Building a website from scratch can be time-consuming and expensive. Website builders provide pre-designed templates, saving both time and money.
Customization Options: Website builders offer a range of customization options, allowing users to tailor their websites to their unique brand identity and requirements.
Choosing the Right Website Builder for Your Specific Needs
It’s crucial to select the right website builder that aligns with your specific needs and goals. Consider the following factors when making your choice:
Design Flexibility: Evaluate the design capabilities of each platform to ensure it provides the level of customization and flexibility required for your website.
Features and Functionality: Assess the features and tools offered by each website builder, such as e-commerce functionality, SEO optimization, and content management systems.
Ease of Use: Consider the user-friendliness of the platform and whether it suits your comfort level and skill set.
Scalability: Determine if the website builder can accommodate your future growth and scalability needs.
24/7 phone support, community forum, VIP plans include priority support
Email support available Monday - Friday only
Responsiveness
Less
More
SEO-Friendly Option
Less
Great
Level of customization
Depend on templates
Fully
Comparing Webflow and Wix
Ease of Use and Design Flexibility
One of the key aspects to consider when comparing Webflow and Wix is their ease of use and design flexibility. Let’s delve into these factors to understand how these platforms cater to users with varying levels of technical expertise.
User-friendly Interfaces and Drag-and-Drop Functionality
Both Webflow and Wix provide user-friendly interfaces that simplify the website-building process. They offer intuitive drag-and-drop functionality, allowing users to effortlessly arrange and customize elements on their web pages.
Webflow’s interface focuses on providing a more robust set of tools and controls, which may require a slightly steeper learning curve for users unfamiliar with web design concepts. However, once users become familiar with its interface, they can take advantage of its advanced customization options and design precision.
Wix, on the other hand, excels in providing an intuitive and beginner-friendly interface. Its drag-and-drop editor is extremely user-friendly, allowing users to quickly design and modify their websites without any technical hurdles. Wix’s interface is designed to simplify the website creation process, making it an excellent choice for users who prefer a straightforward and user-friendly experience.
Source: Wix
Customization Options and Design Flexibility
When it comes to customization options and design flexibility, both Webflow and Wix offer ample opportunities to tailor your website to your specific needs and preferences.
Webflow provides a high level of design control, allowing users to create unique and visually appealing websites. Its powerful visual editor offers granular control over layout, styling, and animations. Users can modify CSS properties, create complex interactions, and build responsive designs that adapt to different screen sizes. This level of customization flexibility is particularly beneficial for designers and developers who desire more control over the design process.
Source: Webflow
Wix also provides a wide range of customization options through its drag-and-drop editor. Users can choose from an extensive collection of templates and easily modify elements such as text, images, and colors. Wix offers a variety of design tools and features, including access to its Wix Code platform for advanced customization using JavaScript and APIs. While it may not provide the same level of control as Webflow in terms of code-level customization, it offers an abundance of options for creating visually appealing websites.
Source: Wix
Availability of Pre-designed Templates and Themes
Both Webflow and Wix offer pre-designed templates and themes to kick-start your website creation process. These templates cater to various industries and niches, providing a solid foundation for your website design.
Webflow offers a curated selection of modern and visually striking templates, suitable for a range of businesses and personal projects. These templates can be fully customized to match your brand identity and desired design aesthetics. However, it’s important to note that Webflow’s templates may require more design expertise to fully utilize their potential and customize them to your specific needs.
Source: Webflow
Wix boasts an extensive library of professionally designed templates, covering a wide array of industries. These templates are highly customizable and provide a great starting point for users who prefer simplicity and convenience. With Wix, users can easily personalize templates with their own content and branding elements, giving them the freedom to create a unique website without extensive design skills.
User Experience and Learning Curve
The user experience and learning curve of a website builder can significantly impact your website creation journey. Webflow and Wix cater to different user experiences, providing options for various skill levels.
Webflow, with its more advanced design capabilities, may require a bit more time to grasp for users who are new to web design concepts. However, its comprehensive documentation, tutorials, and active community support contribute to a smoother learning curve. Once users become familiar with Webflow’s interface and design workflow, they can leverage its powerful features to create stunning websites.
Wix, with its user-friendly interface and simplified drag-and-drop editor, offers a more intuitive and beginner-friendly experience. Its straightforward interface allows users to quickly grasp the basics of website building, making it an excellent choice for users with limited technical knowledge or those who prefer a seamless and hassle-free website creation process.
Website Development Capabilities
When comparing Webflow and Wix, it’s important to assess their website development capabilities. These include aspects such as responsive design, HTML/CSS coding options, content management systems (CMS), e-commerce functionality, and SEO optimization tools.
Let’s explore how Webflow and Wix perform in these areas:
Responsive Design and Mobile Optimization
In today’s mobile-centric world, having a responsive website that adapts seamlessly to different screen sizes is crucial. Both Webflow and Wix prioritize responsive design and provide tools to optimize websites for mobile devices.
Webflow offers responsive design capabilities as a core feature. Users can create dynamic layouts that adjust automatically to different screen sizes, ensuring a consistent and engaging user experience across devices. Its visual editor allows users to preview and fine-tune the responsiveness of their websites, making it easier to create mobile-friendly designs.
Wix also offers responsive templates and a mobile editor that enables users to customize and optimize their websites for mobile devices. With its drag-and-drop editor, users can easily adjust the layout and elements to ensure a visually appealing and functional experience on smartphones and tablets.
Integration of HTML/CSS Coding and Advanced Customization Options
For users with coding knowledge or those seeking more advanced customization options, the ability to integrate HTML/CSS coding is essential. It allows for greater control over the design and functionality of the website.
Webflow stands out in this regard, offering the flexibility to integrate custom HTML/CSS code directly into the website. This opens up endless possibilities for advanced customization and tailored functionality. Users can leverage their coding skills to create unique interactions, implement custom designs, and incorporate external libraries or APIs.
Source: Webflow
Wix, while not as code-friendly as Webflow, provides some level of HTML/CSS customization through its Wix Code platform. Users can utilize JavaScript and APIs to extend the functionality of their websites and add custom features. However, it’s worth noting that Wix may not offer the same level of code-level customization as Webflow.
Source: Wix
Content Management Systems (CMS) and Ease of Content Updates
A robust CMS simplifies the process of managing and updating website content. Both Webflow and Wix offer content management capabilities, albeit with some differences.
Webflow has a built-in CMS that allows users to create and manage dynamic content. It provides a structured approach to content organization, making it easier to update and maintain websites with a large volume of content. Webflow’s CMS also allows for collaboration, enabling multiple users to contribute and edit content simultaneously.
Wix also offers a user-friendly CMS that streamlines content updates. Its intuitive editor allows users to make changes to text, images, and other elements directly on the page. Wix’s CMS provides a seamless content editing experience, particularly suited for small to medium-sized websites.
Source: Wix
E-commerce Functionality and Online Store Features
For users looking to sell products or services online, e-commerce functionality is a critical consideration. Both Webflow and Wix offer e-commerce capabilities but with varying degrees of depth and customization.
Webflow provides robust e-commerce functionality, allowing users to build and manage online stores. It offers features such as product listings, shopping cart functionality, secure payment gateways, and inventory management. Webflow’s e-commerce capabilities provide flexibility and customization options, making it suitable for businesses with unique requirements.
Source: Webflow
Wix also offers comprehensive e-commerce features, providing users with the tools to create and manage online stores. It includes features like product catalogs, secure payment options, inventory tracking, and order management. Wix’s e-commerce platform caters to small and medium-sized businesses, providing a user-friendly interface to set up and run an online store.
Source: Wix
SEO Optimization Tools and Capabilities
Having a website that is optimized for search engines is vital for online visibility. Both Webflow and Wix offer SEO optimization tools and features to improve search engine rankings.
Webflow provides extensive SEO options, including the ability to customize meta tags, URLs, and alt text for images. It offers advanced SEO settings and integrations, allowing users to optimize their websites for better search engine indexing. Additionally, Webflow generates clean and semantic HTML code, which contributes to better SEO performance.
Source: Webflow
Wix also offers SEO capabilities, including the ability to customize meta tags, headings, and URLs. It provides built-in SEO tools that guide users in optimizing their websites, such as keyword suggestions and SEO-friendly page structures. Wix’s platform ensures that the essential SEO elements are in place to enhance visibility on search engines.
Source: Wix
Performance and Hosting
The performance and hosting capabilities of a website builder can significantly impact the website’s speed, user experience, and overall reliability. Let’s compare Webflow and Wix in terms of performance, hosting options, and their influence on loading times and user experience.
Website Speed and Performance Comparison
Website speed plays a crucial role in user satisfaction and search engine rankings. Both Webflow and Wix strive to provide optimal performance, but there are some differences to consider.
Webflow is known for its performance optimization features, such as automatic image compression, lazy loading, and code minification. These optimizations help reduce file sizes and improve page loading times. Additionally, Webflow’s clean and efficient code output contributes to faster performance.
Source: Webflow
Wix, too, focuses on delivering fast-loading websites. Its platform employs a content delivery network (CDN) that ensures your website’s content is delivered swiftly to visitors across the globe. Wix also automatically optimizes images and caches content to enhance performance.
Source: Wix
Hosting Options and Server Reliability
Hosting is a critical aspect of website management, and the hosting options provided by Webflow and Wix differ in their approach.
Webflow offers fully managed hosting, meaning that your website is hosted on Webflow’s servers. Webflow takes care of server management, security updates, and backups, allowing users to focus on website creation and design. This ensures a seamless hosting experience, and users can rely on Webflow’s infrastructure for server reliability.
Wix, on the other hand, also provides hosting services as an integral part of its platform. With Wix, your website is hosted on Wix’s servers, and they handle all the technical aspects of hosting, including server maintenance and security updates. Its hosting infrastructure is designed to ensure high availability and reliable performance.
Impact of Website Builder Choice on Loading Times and User Experience
The choice of website builder can have an impact on loading times and user experience. Factors such as code efficiency, optimization features, and server infrastructure contribute to this aspect.
Webflow‘s focus on clean and efficient code output, along with its performance optimization features, can contribute to faster loading times. Additionally, Webflow’s ability to customize code allows for fine-tuning and optimization of critical elements, resulting in an improved user experience.
Wix prioritizes ease of use and simplicity, which may come with some trade-offs in terms of code efficiency. While Wix does implement various optimizations and utilizes a CDN, the platform’s drag-and-drop functionality and wide range of features can result in slightly longer loading times compared to Webflow.
Pricing and Plans
When comparing Webflow and Wix, it’s essential to consider their pricing structures, available plans, and the value for money they offer. Let’s explore the pricing options, free plans or trials, and scalability of each platform.
Comparison of Pricing Structures and Available Plans
Webflow and Wix offer different pricing structures with varying plans to cater to different user needs. Here’s an overview of their pricing options:
Webflow
Webflow offers a tiered pricing structure with plans designed for different user requirements. The plans include:
Basic: This plan is suitable for personal projects and small websites.
CMS: This plan provides additional features for content-driven websites.
Business: Geared towards businesses and e-commerce websites, this plan offers advanced features.
Enterprise: Customized plans for large-scale businesses and enterprises.
Source: Webflow
Wix
Wix also provides a tiered pricing structure with plans tailored to different user needs. The plans include:
Free: Wix offers a free plan with limited features and Wix branding.
Combo: This plan is suitable for personal websites or small businesses.
Unlimited: Geared towards entrepreneurs and freelancers, this plan offers more features and increased storage.
Pro: This plan is designed for complete online branding and includes additional tools and features.
VIP: Wix’s premium plan, offers priority support and additional perks.
Source: Wix
Free Plan or Trial Offerings
Both Webflow and Wix provide options for users to explore their platforms before committing to a paid plan.
Webflow offers a free plan that allows users to create and publish websites with some limitations. This plan is suitable for testing the platform and getting familiar with its features and capabilities. However, it does come with Webflow branding and certain restrictions.
Wix also offers a free plan that enables users to create websites with basic features. While the free plan includes Wix branding and has limitations, it provides an opportunity to experience the platform and its capabilities.
Value for Money and Scalability
The value for money and scalability of a website builder depends on the specific needs and goals of the user.
Webflow is known for providing advanced design capabilities and customization options. If you require extensive design control and have complex website requirements, the features offered by Webflow may justify the investment. Its scalable plans allow for growth and expansion, accommodating the needs of small businesses to large enterprises.
Wix, on the other hand, focuses on user-friendliness and ease of use. It offers a wide range of features and templates, making it suitable for beginners and users who prefer a simplified website-building process. Wix’s plans are designed to cater to different budgets and can provide value for small businesses or individuals with limited technical expertise.
Webflow vs Wix: Case Studies and Real-World Examples
To illustrate the capabilities and versatility of Webflow and Wix, let’s explore some real-world examples of successful websites built using each platform. These case studies span different industries and use cases, highlighting the strengths and possibilities offered by Webflow and Wix.
Webflow Case Studies
a) Nelson Cash (https://www.nelsoncash.com/): Nelson Cash is a design studio that created its website using Webflow. The site showcases their portfolio of work and demonstrates the visual appeal and design flexibility that Webflow offers. With its clean layout, interactive elements, and smooth animations, the website reflects the studio’s creativity and attention to detail.
b) Freelancer (https://www.freelancer.com/): Freelancer is a global freelancing and crowdsourcing marketplace that leverages the power of Webflow for their website. The site features a user-friendly interface, seamless navigation, and effective call-to-action elements. Webflow’s ability to handle high traffic volumes and provide a visually appealing user experience makes it an ideal choice for platforms like Freelancer.
Wix Case Studies
a) Cookly (https://www.cookly.me/): Cookly is an online marketplace for cooking classes around the world. Their website, built with Wix, showcases the diversity of culinary experiences available. The site is visually engaging, with vibrant images, clear categorization, and an intuitive booking system. Wix’s e-commerce functionality and flexibility allow Cookly to offer a seamless booking and payment experience for its customers.
b) National Parks Arts Foundation (https://www.nationalparksartsfoundation.org/): The National Parks Arts Foundation is a nonprofit organization that promotes artist-in-residence programs in national parks. Their website, developed on Wix, effectively communicates their mission and features stunning visuals of national parks and artwork created by resident artists. Wix’s drag-and-drop interface and template options allow the organization to create an informative and visually appealing platform.
Customer Support and Additional Features
When considering Webflow and Wix as website builders, it’s crucial to assess the customer support options, availability of third-party integrations and add-ons, as well as any unique features or benefits offered by each platform.
Customer Support
Let’s delve into these aspects to provide a comprehensive comparison.
Webflow
Webflow offers several avenues for customer support, ensuring users have access to assistance when needed. Their support options include:
Help Center: Webflow’s extensive Help Center consists of articles, tutorials, and guides covering various topics, from getting started to advanced customization.
Community Forum: The Webflow Community Forum is a vibrant hub where users can ask questions, seek advice, and engage with other Webflow users and experts.
Email Support: Webflow provides email support to address specific queries and technical issues that users may encounter.
Wix
Wix also offers multiple customer support channels to assist users throughout their website-building journey. The support options include:
Help Center: Wix’s Help Center contains a vast knowledge base, FAQs, and step-by-step tutorials to guide users through different aspects of website creation.
Community Forum: The Wix Community Forum enables users to connect with other Wix users, share experiences, and seek advice on website development.
Phone Support: Wix offers phone support to users subscribed to their premium plans, allowing direct interaction with support agents for immediate assistance.
Third-Party Integrations and Add-ons
Webflow
Webflow allows users to integrate their websites with various third-party services and tools to enhance functionality and streamline workflows. Some popular integrations include:
E-commerce Platforms: Webflow integrates with popular e-commerce platforms like Shopify and Foxy.io, enabling seamless online store management.
Analytics and Tracking: Webflow supports integrations with Google Analytics and Facebook Pixel to track website performance and visitor behavior.
Marketing Tools: Users can integrate Webflow with marketing automation platforms like Mailchimp and HubSpot for effective marketing campaigns.
Wix
Wix offers a wide range of third-party integrations and add-ons to extend the functionality of websites. Users can integrate with:
E-commerce Solutions: Wix integrates with leading e-commerce platforms like Ecwid and PayPal for smooth online store operations.
Marketing and CRM Tools: Wix supports integrations with email marketing services like Mailchimp and CRM platforms like Salesforce to streamline customer interactions.
Social Media: Users can integrate their Wix websites with social media platforms such as Facebook, Instagram, and Twitter to enhance online presence and engagement.
Unique Features and Benefits
Webflow
Webflow distinguishes itself with several unique features and benefits:
Advanced Design and Interactions: Webflow offers a visual design canvas, allowing users to create highly customized and visually appealing websites. It provides an extensive range of interactions and animations to create engaging user experiences.
CMS Capabilities: Webflow’s CMS functionality enables users to build dynamic content-driven websites with ease, making them suitable for blogs, portfolios, and news websites.
Hosting and Performance:Webflow provides reliable hosting and ensures optimized website performance, offering fast loading times and global CDN (Content Delivery Network) for improved user experience.
Wix
Wix, too, has its own set of unique features and benefits:
Artificial Design Intelligence (ADI): Wix ADI automatically generates a personalized website design based on user inputs and preferences, making it an excellent choice for those seeking a quick and effortless website setup.
Wix App Market: The Wix App Market offers a wide array of apps and extensions, allowing users to enhance their websites with additional functionality and features.
Mobile Editor: Wix’s mobile editor enables users to customize the mobile version of their websites, ensuring a seamless and optimized experience for mobile visitors.
Conclusion
In considering Webflow vs Wix, it’s important to recognize that both platforms have their strengths and cater to different user preferences.
Remember, the right website builder will empower you to create a professional website that reflects your brand and engages your audience effectively. Whether you choose Webflow or Wix, both platforms offer powerful tools to bring your vision to life.
Webflow vs Squarespace: Two giants in the realm of website builders, each competing for the top spot. If you’re on a search to establish your online presence, these two platforms are likely on your radar. Webflow and Squarespace offer intuitive drag-and-drop interfaces, stunning templates, and powerful features to help you bring your website to life. But which one is the better choice?
In today’s digital age, having a strong online presence is vital for individuals and businesses alike. A well-designed and functional website is the keystone of establishing and showcasing your brand, products, or services to a global audience.
Whether you’re a small business owner, a creative professional, or an entrepreneur looking to establish your online presence, this comparison will serve as a valuable resource in evaluating the offerings of Webflow and Squarespace side by side.
Discover the ease of use, design, e-commerce, and pricing between Webflow vs Squarespace in this comprehensive comparison.
Yes, for US, Canada, EU and Australia (via TaxJar)
No, although you can connect TaxJar to your store
Real-time shipping rates
No, these need to be manually set
Yes, on its highest plan (Advance) for US stores
Customer accounts
No
Yes
Blogging
Complex CMS that lets you create highly customized blog templates
Schedule, publish and organize blog posts with categories and tags
Bandwidth
1 GB to 400 GB of bandwidth depending on your plan
Unlimited bandwidth on all plans
Customer Support
Email support available Monday through Friday only
24/7 support via email, social media or live chat (no phone support)
Templates
Over 400 templates, only 40 are free to use
Over 100 free templates
What is Webflow
Webflow is a powerful and versatile website builder that offers a unique blend of design control and code-level customization. It stands out for its visually intuitive interface and the ability to create complex and highly customizable websites without the need for extensive coding knowledge. Here are some
Key Features and Strengths of Webflow:
Design Control: Webflow allows users to design websites with pixel-perfect precision. Its drag-and-drop interface, coupled with the ability to manipulate every element, enables users to achieve highly customized and visually stunning designs.
Code-Level Customization: With Webflow, users have the freedom to dive into the code and fine-tune their website to meet specific requirements. This feature is particularly attractive to web designers and developers who desire greater control and flexibility.
Responsive Design: Webflow makes it easy to create responsive websites that adapt seamlessly across different devices and screen sizes. This ensures a consistent user experience for visitors, regardless of the device they use.
Hosting and CMS: Webflow provides integrated hosting services and a robust content management system (CMS). This combination streamlines the website management process, allowing users to update and publish content with ease.
What is Squarespace
Squarespace is a popular website builder known for its elegant templates, user-friendly interface, and comprehensive feature set. It caters to a wide range of users, from individuals and small businesses to larger enterprises.
Here are the Key Features of Squarespace:
Beautiful Templates: Squarespace offers a stunning collection of professionally designed templates. These templates are visually appealing and provide a solid foundation for users to build their websites quickly.
User-Friendly Interface: Squarespace prides itself on its user-friendly interface, making it accessible to users with little to no technical expertise. Its intuitive drag-and-drop functionality allows for easy customization and content arrangement.
All-in-One Platform: Squarespace is an all-in-one solution that provides integrated hosting, domain registration, and a feature-rich CMS. This eliminates the need for users to manage multiple services or third-party integrations.
E-commerce Functionality: Squarespace offers robust e-commerce capabilities, making it an ideal choice for online businesses. Users can easily set up online stores, manage inventory, process payments, and track orders, all within the Squarespace platform.
Webflow vs Squarespace: A Comprehensive Comparison
Ease of Use and Design
1. User Interface and Website Creation Process
When it comes to the user interface and website creation process, Webflow and Squarespace offer different approaches, catering to users with varying levels of technical expertise and design preferences.
Webflow:
Webflow provides a robust and feature-rich interface that offers extensive design control.
It combines a visual drag-and-drop editor with the ability to manipulate the underlying code, giving users unparalleled flexibility.
The interface is intuitive, allowing users to easily add and customize elements, create interactions, and design complex layouts.
Webflow’s interface is best suited for users who desire granular control over design details and have the willingness to explore the intricacies of web development.
Squarespace:
Squarespace takes a more simplified and user-friendly approach to its interface.
It offers an intuitive, beginner-friendly design editor that allows users to create visually appealing websites without delving into code.
The interface features a seamless drag-and-drop functionality, making it easy to add and arrange elements on the page.
Squarespace’s user interface is ideal for users who prefer a more streamlined and straightforward website creation process.
Source: Squarespace
2. Templates and Themes
Both Webflow and Squarespace offer a wide selection of templates and themes to help users kickstart their website design. Here’s a closer look at what each platform has to offer:
Webflow:
Webflow boasts a diverse range of professionally designed templates, catering to various industries and design aesthetics.
These templates serve as a starting point for users, providing a solid foundation for their websites.
With Webflow, users have the freedom to customize every aspect of the template, from layout and typography to color schemes and animations.
This level of customization enables users to create unique and visually stunning websites that align with their brand or personal style.
Source: Webflow
Squarespace:
Squarespace is renowned for its collection of beautifully designed templates, reflecting contemporary design trends. The templates are curated and showcase high-quality design elements.
While Squarespace templates are less customizable compared to Webflow, they still provide users with enough flexibility to create visually appealing websites that suit their needs.
Squarespace’s templates are known for their clean and modern aesthetics, making them a popular choice for individuals and businesses looking for a polished and professional look.
Webflow provides a robust content management system (CMS) that offers flexibility and control over website content. It allows users to easily create and manage various content types, including blog posts, pages, and collections. The CMS features a user-friendly interface that simplifies content creation and organization.
Squarespace:
Squarespace also offers a powerful and user-friendly content management system. It provides intuitive tools for creating and organizing content, making it easy for users to update their websites regularly. Squarespace’s CMS includes features like blogging capabilities, content scheduling, and multimedia management.
Source: Squarespace
Webflow vs Squarespace: Who Wins?
In terms of SEO optimization, both offer a range of built-in tools and features to improve website visibility. Users can customize meta tags, optimize headings, and generate search engine-friendly URLs. Squarespace also provides options for adding alt tags to images, which helps with image SEO. The platform ensures that websites built on Squarespace are well-optimized for search engines.
2. E-commerce Functionality
For users looking to create online stores, evaluating the e-commerce capabilities of Webflow and Squarespace is essential.
Webflow:
Webflow has robust e-commerce functionality that allows users to create and manage online stores effectively. It offers features like product catalog management, inventory tracking, and order management. Webflow also integrates with popular payment gateways, enabling users to process payments securely.
Furthermore, the platform provides flexibility for customization, allowing users to design unique product pages and checkout experiences.
Source: Webflow
Squarespace:
Squarespace is well-regarded for its e-commerce capabilities. It offers a comprehensive set of features for setting up and managing online stores. Users can create product listings, manage inventory, and handle order fulfillment seamlessly.
Source: Squarespace
Squarespace also provides a range of payment options, including integrations with popular payment gateways. The platform includes marketing tools like abandoned cart recovery, discount code creation, and email campaign integration, empowering users to promote their online stores effectively.
Pricing and Support
1. Pricing Plans and Options
When considering website builders, understanding the pricing structures and available plans is crucial. Let’s compare the pricing options of Webflow and Squarespace, including subscription plans and additional costs:
Webflow:
It offers various pricing plans to cater to different needs:
Source: Webflow
Webflow Lite: This plan is suitable for individuals and freelancers who require basic website functionality. It includes hosting and the ability to create up to two projects.
Webflow Pro: The Pro plan offers additional features and increased project limits. It provides enhanced collaboration capabilities, CMS hosting, and the ability to create up to 10 projects.
Webflow Team: The Team plan is designed for businesses and agencies that require advanced team collaboration and management. It includes unlimited projects, enhanced client billing, and additional team member access.
Source: Webflow
Webflow also offers a custom Enterprise plan for large-scale projects with specific requirements.
Squarespace:
Squarespace offers a straightforward pricing structure:
Source: Squarespace
Personal: The Personal plan is suitable for individuals and small websites. It includes website building, hosting, and a free domain for the first year.
Business: The Business plan is ideal for small businesses and entrepreneurs. It includes advanced e-commerce features, marketing tools, and professional email from Google.
Basic Commerce: This plan is geared towards growing businesses. It offers additional e-commerce functionality, such as customer accounts and inventory management.
Advanced Commerce: The Advanced Commerce plan is designed for established businesses with high-volume sales. It provides advanced shipping and tax rules, as well as abandoned cart recovery.
Additional costs, such as domain name registration, premium templates, and third-party integrations, may apply to both Webflow and Squarespace. It’s important to consider these factors when comparing pricing.
2. Customer Support and Community
Both Webflow and Squarespace provide customer support options and community resources to assist users in their website-building journey.
Webflow:
Webflow offers customer support through various channels, including email support and a ticketing system. They also provide access to comprehensive documentation and video tutorials to help users navigate the platform. Additionally, Webflow has an active community forum where users can seek assistance, share ideas, and collaborate with other Webflow enthusiasts.
Source: Website Builder Expert
Squarespace:
Squarespace offers 24/7 customer support through live chat and email. They also provide an extensive knowledge base with step-by-step guides, FAQs, and video tutorials. Squarespace has a vibrant community forum where users can ask questions, share tips, and engage with other Squarespace users.
Both platforms prioritize customer support and provide valuable resources to assist users in troubleshooting issues and finding solutions.
Blogging Platforms
Both Webflow and Squarespace offer solid options for creating blogs.
Squarespace provides a user-friendly interface and pre-designed blog templates, making it easy to get started with blogging. It offers essential blogging features such as categories, tags, and social sharing integrations.
Webflow, on the other hand, offers more design flexibility and control over your blog’s appearance. If you prioritize unique and visually stunning blog layouts or if you have specific design requirements for your blog, Webflow can be a great choice. It also provides powerful content management capabilities, allowing you to manage and organize your blog content effectively.
Source: Webflow
Apps and Widgets
When it comes to apps and widgets, Webflow and Squarespace offer different approaches to extending the functionality of your website.
Webflow provides a robust ecosystem of integrations and allows you to leverage custom code to create custom apps and widgets. With Webflow’s CMS API and Zapier integration, you have the flexibility to connect your website with various third-party services and automate workflows. Furthermore, Webflow’s extensive knowledge base and active community provide resources and support for building and implementing custom apps and widgets.
Source: Webflow
On the other hand, Squarespace simplifies the process of adding apps and widgets by offering an integrated App Marketplace. This marketplace provides a curated selection of pre-built apps and widgets that you can easily install and configure with a few clicks. Squarespace’s emphasis on user-friendly integrations makes it convenient for individuals or small businesses seeking quick and hassle-free solutions.
Source: Squarespace
Pros and Cons of Webflow and Squarespace
Webflow Pros:
Design Flexibility: Webflow offers unparalleled design flexibility, allowing users to create highly customized and visually stunning websites. Its combination of a visual editor and code control empowers users to achieve precise design outcomes.
Powerful CMS: Webflow provides a robust content management system that enables users to manage and organize their website content with ease. It offers dynamic content capabilities, making it suitable for websites with extensive content needs.
Clean Code and SEO Optimization: Webflow generates clean and semantic HTML code, which contributes to better SEO performance. It provides tools for optimizing meta tags, URLs, and other SEO elements, helping websites rank higher in search engine results.
Extensive Integrations: Webflow integrates with various third-party services and tools, allowing users to extend the functionality of their websites. From marketing and analytics tools to e-commerce and CRM platforms, Webflow offers flexibility in integrating with essential services.
Squarespace Pros:
User-Friendly Interface: Squarespace offers a user-friendly interface that makes website creation and management accessible to users of all skill levels. Its intuitive design tools and drag-and-drop functionality simplify the process of building a website.
High-Quality Templates: Squarespace provides a collection of professionally designed templates that showcase contemporary aesthetics. These templates are visually appealing, enabling users to create polished and attractive websites without extensive design knowledge.
Seamless E-commerce Functionality: Squarespace excels in providing a comprehensive suite of e-commerce features. It offers tools for managing products, inventory, and orders, making it a suitable platform for creating and running online stores.
Reliable Hosting and Security: Squarespace handles hosting and ensures the security of websites, relieving users of the technical aspects associated with hosting and server management. This allows users to focus on creating and managing their websites without worrying about infrastructure.
Webflow Limitations:
Learning Curve: Due to its extensive customization capabilities and advanced features, Webflow has a steeper learning curve compared to more beginner-friendly platforms. Users with limited technical knowledge may require time and effort to fully grasp its functionalities.
Higher Cost: Webflow’s pricing plans can be relatively higher compared to some other website builders. While it offers extensive features and design control, the cost may be a consideration for users on a tight budget.
Squarespace Limitations:
Limited Customization: While Squarespace offers design flexibility within the boundaries of its templates, the level of customization is more limited compared to platforms like Webflow. Users seeking intricate design modifications may find the options somewhat restrictive.
Template Dependency: Squarespace heavily relies on its templates, and users may encounter limitations when trying to deviate significantly from the provided designs. Customizing templates beyond the available options may require advanced coding knowledge or additional development assistance.
Conclusion:
In conclusion, both Webflow and Squarespace are reputable website builders, each with its strengths and advantages. Readers need to evaluate their requirements, consider their priorities, and make an informed decision based on the comparison provided in this article.
Whichever platform you choose, both Webflow and Squarespace can help you create professional and visually appealing websites that contribute to your online success.
Are you trying to decide between Webflow vs. Shopify for your online business? We’ll examine in-depth comparisons to help you make an informed decision.
Webflow stands out with its unparalleled customization and design capabilities, allowing you to create stunning websites without coding knowledge. Shopify dominates the e-commerce world with its powerful tools and dedicated features for online stores.
But which will in line with your business needs to understand both the builders. So, you can pick the right one.
We will compare the two Webflow versus Shopify and find which platform wins in website creation and online selling. Make a confident choice that is suitable for your business goals.
Let’s begin the comparison between Webflow and Shopify!
Factors to Look While Selecting
Certain criteria is here to consider whenever you choose for your ecommerce needs:
Third-party integration and app ecosystem to increase functionality if required
Afforadability in terms of cost
SEO friendliness to rank your online store
Security to protect the data
Support system
User experience
Mobile-responsive or not
Features and customization options
Ecommerce design templates and layouts
Ease of use
Check out who wins the race.
What is Webflow?
Webflow is a powerful website builder that offers a comprehensive suite of tools for creating visually stunning and responsive websites. It combines the benefits of a content management system (CMS) with a flexible drag-and-drop editor. It allows users to design, build, and launch websites without coding expertise.
With Webflow, you have complete control over your website’s design. It offers a wide range of customizable templates and an intuitive visual editor that allows you to create and modify layouts, add elements, and style your site to match your brand aesthetics. Webflow provides the flexibility and creative freedom to designer, developer, or business owner.
Webflow also offers e-commerce functionality, allowing you to create and manage online stores. You can add products, set up payment gateways, manage inventory, and customize the shopping cart experience. In contrast, Webflow’s e-commerce capabilities are robust. It’s worth that it may be more suitable for smaller to mid-sized businesses with simpler product catalogs.
Source: Webflow
What is Shopify?
Shopify is one of the most popular and widely used e-commerce platforms available. It provides a complete solution for setting up and managing online stores, catering to businesses of all sizes. Shopify is renowned for its user-friendly interface, extensive feature set, and scalability.
With Shopify, you can quickly create a professional-looking online store without any coding knowledge. It offers a vast collection of responsive and customizable themes, allowing you to personalize the look and feel of your store to match your brand identity. Shopify also provides a user-friendly admin interface to efficiently manage your products, orders, inventory, and customer data.
One of Shopify’s key strengths is its robust e-commerce functionality. It supports many features, including flexible product variations, secure payment gateways, shipping options, and inventory management. Additionally, Shopify has a thriving app ecosystem, offering numerous integrations to enhance your store’s capabilities, such as email marketing, analytics, and customer support.
Shopify’s scalability suits businesses of all sizes, from startups to enterprise-level organizations. It can handle high-traffic volumes and large product catalogs, ensuring a smooth shopping experience for your customers, even during peak periods.
Source: Shopify
Which is More Customizable? Shopify vs. Webflow
Both Webflow and Shopify offer powerful tools to create visually appealing online stores. However, there are differences in the flexibility and customization options they provide.
Template Customization in Webflow
Webflow provides a wide selection of professionally designed templates. These templates serve as a starting point for your website and can be fully customized to match your brand aesthetics. Its intuitive visual editor can modify layouts, add or remove elements, change colors, fonts, etc.
The advantage of Webflow’s template customization lies in its flexibility. You can control every aspect of your website’s design to create unique and personalized experiences. You can customize the layout of individual pages, create dynamic animations, and fine-tune the responsiveness of your site across different devices. The ability to design pixel-perfect websites makes Webflow an ideal choice for designers or businesses with specific design requirements.
Theme Customization in Shopify
On the other hand, theme customization options in Shopify permit a straightforward and streamlined design approach for businesses. In comparison, the customization options are limited to Webflow. Shopify’s themes confirm a seamless customer shopping experience, keeping e-commerce in mind.
Both platforms offer a responsive design on various devices, such as desktops, tablets, and mobile phones.
E-commerce Capabilities
Let’s break down the e-commerce features of both platforms.
Product Management
Efficient product management is essential for running a successful online store. Let’s examine how Webflow and Shopify handle product management:
Webflow offers robust product management features allowing you to create, organize, and showcase your products easily. You can add product descriptions, multiple product images, variants (such as size or color options), inventory tracking, and more. Webflow also supports custom fields, making handling different types of products flexible.
Shopify excels in product management, providing a comprehensive set of tools. You can create product listings with detailed descriptions, multiple images, SKUs, inventory management, and product variants. Shopify also lets you set up collections and categories to organize your products efficiently. With Shopify’s centralized dashboard, you can easily manage your inventory, track sales, and handle fulfillment processes.
Payment Gateways and Checkout Process
Let’s explore how Webflow and Shopify handle payment gateways and the checkout process.
Webflow integrates with Stripe and PayPal to accept credit cards and other forms of online payments. You have a secure and streamlined checkout process. But the available money processing options may be more limited compared to Shopify.
You can access different payment gateways with Shopify, including its built-in payment solution, Shopify Payments. This integration enables you to accept credit card payments with competitive transaction fees.
Additionally, Shopify integrates with PayPal, Stripe, and Amazon Pay. These third-party payment processing allow you to choose the most suitable option for your business. Shopify’s checkout process is optimized for conversions, providing customers with a smooth and trusted experience.
SEO Optimization
Webflow provides a range of SEO tools and features that help optimize your website for search engines. You can customize meta tags, URLs, alt tags for images, and headings to ensure your content is well-structured and optimized. Webflow also generates XML sitemaps automatically, making it easier for search engines to crawl and index your site.
Shopify is well-known for its strong SEO capabilities. It offers built-in SEO features that allow you to optimize meta tags, headings, URLs, and alt tags for images. Shopify automatically generates a sitemap.xml file, making it easier for search engines to discover and index your site.
Additionally, Shopify provides SEO-friendly templates and allows you to customize essential SEO elements to improve your store’s visibility in search engine results.
Both Webflow and Shopify offer solid SEO optimization features. However, Shopify’s dedicated focus on e-commerce and its comprehensive SEO tools make it an excellent choice for businesses aiming to improve their search engine rankings.
What are the Pricing and Plans
Now, compare the cost.
Webflow Pricing
With Webflow, you can start with their free plan, allowing you to experiment and build an essential website. However, the free plan has limitations, such as a cap on the number of pages and the inclusion of Webflow branding.
Webflow also offers site plans and e-commerce plans.
Site plans suit individuals or businesses looking to launch a single website, offering additional features like custom domain hosting and increased page limits. The pricing for site plans varies based on the level of functionality required.
For businesses looking to set up an online store, Webflow provides e-commerce plans with specialized e-commerce functionalities such as inventory management and secure checkout.
Source: Webflow
Shopify Pricing
On the other hand, Shopify gives a range of pricing plans designed to accommodate businesses of all sizes. The Basic Shopify plan provides essential features for starting an online store, while the Shopify plan offers additional features like gift cards and abandoned cart recovery.
The Advanced Shopify plan caters to businesses with high-volume sales and complex needs, providing advanced report builder functionality and support for international domains. For enterprise-level companies, Shopify Plus offers advanced features and scalability.
Both Webflow and Shopify offer pricing plans that allow businesses to choose the option that best aligns with their requirements and budget, ensuring scalability as their online presence grows.
Source: Shopify
Help and Customer Support
Regarding customer support, Shopify takes the lead with its extensive assistance options.
They offer a comprehensive support system, including:
24/7 phone support
Social media support
Live chat support
A community forum
email support
A help center
Video tutorials
Specialized support through Shopify Experts
Source: Shopify
On the other hand, while Webflow may seem less impressive regarding customer support, it does provide valuable resources. Webflow compensates with its helpful educational resources and active user community.
Source: Shopify
Scalability and Growth Potential
Your product marketing goes well when you have platform support features to market yourself. But again, it all relies on the company’s goals.
Webflow can handle the growth of small to medium-sized businesses. However, you may need to assess whether it can support your future goals if excelling or scale your operations.
Shopify is known for its scalability to suit businesses of all sizes. In both cases, Shopify may be the preferred choice.
Source: Shopify
Pros and Cons Comparison
It will give you an idea of the solid and weak sides.
Here’s a brief look:
Webflow Advantages
Design Flexibility: Webflow provides exceptional design flexibility for creating visually stunning and highly customizable websites to your specific design requirements.
Intuitive Visual Editor: visual editor makes it easy for designers and developers to build and customize websites without extensive coding knowledge.
Powerful E-commerce Functionality: e-commerce features enable you to set up and manage online stores efficiently, including inventory management, secure checkout, and payment integration.
Responsive and SEO-friendly: Websites are automatically optimized for responsiveness in Webflow. They have built-in SEO tools to help improve search engine rankings.
Webflow Disadvantages
Learning Curve: The advanced features and customization options of Webflow may have a steeper learning curve for beginners compared to other platforms.
Limited Third-Party Integrations: Webflow has a more limited selection of third-party integrations than other online platforms.
Shopify Benefits
Ease of Use: Shopify offers a user-friendly interface, making it accessible for beginners to set up and manage their online stores without technical expertise.
Vast App Ecosystem: Shopify’s extensive app ecosystem gives numerous integrations and extensions for your store’s functionality and tailors it to your particular business needs.
Robust E-commerce Features: It has many e-commerce features, including inventory management, order tracking, abandoned cart recovery, and multi-channel selling options for businesses of all sizes.
Strong SEO Capabilities: This e-platform has built-in SEO features, making it easier to optimize your store for search engines and improve your visibility in search results.
Shopify Downsides
Theme Customization Limitations: Shopify’s themes provide a solid foundation for your store’s design but are restricted compared to platforms like Webflow.
Transaction Fees: If you choose not to use Shopify Payments, which can add to your overall costs, Shopify charges transaction fees for external payment gateways
Conclusion
Both platforms bring impressive functionalities to the table in the epic battle of Webflow vs. Shopify, but the ultimate choice depends on your specific needs.
If customization and design capabilities are your top priority, Webflow emerges as the winner. With its No Code approach, Webflow empowers you to create a professional website that perfectly aligns with your vision.
On the other hand, if your main focus is core e-commerce and product marketing capabilities, Shopify takes the lead. It offers a robust suite of tools to optimize your online selling experience, making it the go-to choice for many store owners.
Ultimately, it all concerns your unique requirements, resources, and aspirations.
In today’s digital age, where attention spans are short and website visitors expect fast-loading pages, image optimization plays a crucial role in web design. Images are an integral part of any website, as they enhance visual appeal, convey messages, and engage users. However, if not properly optimized, images can negatively impact website performance, leading to slower page load times and a subpar user experience.
When it comes to webflow image optimization, the significance is even more pronounced. Webflow, a popular web design platform, empowers designers and developers to create stunning and interactive websites without the need for extensive coding. With its intuitive interface and comprehensive features, Webflow has gained a reputation for delivering visually impressive websites.
The goal of webflow image optimization is to reduce the file size of images without compromising their quality. By doing so, website visitors can enjoy a seamless browsing experience, with images loading quickly and efficiently. Additionally, optimized images contribute to improved search engine optimization (SEO) and better overall website rankings.
What is a Webflow?
Webflow is a powerful web design platform that provides a comprehensive solution for creating visually stunning and responsive websites. Unlike traditional website builders, Webflow offers a unique combination of design and development capabilities, making it a popular choice among designers and developers alike.
With Webflow, users can build websites without writing code, thanks to its intuitive visual editor. It allows you to design and customize every aspect of your website, from layout and typography to animations and interactions. This level of control enables designers to unleash their creativity and bring their vision to life.
Highlight The Features
These features are particularly valuable for developers who want to have fine-grained control over the codebase, ensuring optimized performance and flexibility.
Responsive Web Design
Webflow is built with responsive design in mind, allowing you to create websites that automatically adapt and look great on various devices and screen sizes. Its responsive design tools and breakpoints enable you to customize the layout and appearance for different viewports, ensuring a seamless user experience.
CMS Capabilities
Webflow offers a robust content management system (CMS) that allows you to manage and update website content easily. You can create dynamic content structures, add and edit content in a user-friendly interface, and connect your content to different parts of your website. This feature is especially beneficial for websites that require frequent content updates, such as blogs or portfolio sites.
Interactions and Animations
Webflow provides powerful interactions and an animation toolset that enables you to create engaging and interactive elements on your website. You can add animations, transitions, and scroll effects without the need for external plugins or complex coding. This feature allows you to enhance user engagement and create a memorable browsing experience.
E-commerce Functionality
Webflow offers built-in e-commerce capabilities, allowing you to create online stores and sell products directly from your website. You can set up product catalogs, customize product pages, manage inventory, and process payments seamlessly. This integrated e-commerce functionality simplifies the process of building and managing an online store.
Collaboration and Hosting
Webflow provides collaboration features that facilitate teamwork among designers, developers, and clients. You can invite team members to collaborate on projects, assign roles and permissions, and leave comments for feedback. Additionally, Webflow offers secure and reliable hosting, ensuring that your website is fast and accessible to visitors worldwide.
Image optimization refers to the process of reducing the file size of images while maintaining their visual quality. It involves various techniques and tools to minimize the file size, such as compression, resizing, and format optimization. The primary goal of image optimization is to improve website performance, specifically in terms of page load speed and user experience.
In web development, images often account for a significant portion of a website’s file size. Large and unoptimized images can slow down page loading times, leading to a negative impact on user experience. Slow-loading websites not only frustrate visitors but also tend to have higher bounce rates, lower conversions, and diminished search engine rankings.
The purpose of image optimization is to construct a high-quality image with a lower file size. Three main factors recreate a role here:
“Research from Moz shows that Google may specifically measure time to the first byte when it considers page speed. A slow page means search engines crawl fewer pages with their crawl budget, which can negatively affect your indexing.”
Source: Moz
Impact of Optimized Images
When images are optimized, their file sizes are significantly reduced, leading to faster loading times. This means that visitors can access the website content more quickly, resulting in a smoother and more enjoyable browsing experience.
Slow-loading websites frustrate users and often lead to high bounce rates, as impatient visitors are more likely to abandon a site that takes too long to load. On the other hand, optimized images ensure that web pages load swiftly, capturing and retaining user attention. Studies have shown that even a one-second delay in page load time can result in decreased conversions and user satisfaction.
In addition to improving page load speed, optimized images also have a positive impact on bandwidth usage. Smaller file sizes consume fewer data, which is particularly crucial for users with limited internet connectivity or mobile data plans. By optimizing images, you not only improve the experience for all users but also cater to those with slower connections, expanding your website’s reach.
Moreover, optimized images contribute to a better mobile browsing experience. Mobile devices often have limited processing power and smaller screens, making the optimization of images even more critical. By reducing the file sizes, optimized images load faster on mobile devices, preventing delays and ensuring a seamless user experience on smartphones and tablets.
Ways To Optimize Images In Webflow
Let’s explore the ways to enhance your Webflow image optimization and take your website to the next level!
Utilizing Web Flow’s Built-In Image Optimization Features
Webflow offers built-in image optimization features that make it convenient for users to optimize their images directly within the platform. When you upload images to Webflow, it automatically compresses them to reduce file sizes without sacrificing quality. This feature ensures that your images are optimized for web use, leading to improved page load speed and better overall performance.
Webflow’s image optimization process applies various compression techniques, such as:
clearing excessive metadata
decreasing color deep
utilizing efficient reduction algorithms.
By utilizing Webflow’s built-in image optimization features, you can save time and effort, as the platform handles the optimization process for you. It simplifies the workflow and allows you to focus on creating engaging content and designing visually appealing websites without compromising performance.
Exploring Third-Party Image Optimization Tools And Plugins
While Webflow provides native image optimization capabilities, you may also explore third-party tools and plugins to further enhance your image optimization efforts. These tools offer additional features and customization options to fine-tune the optimization process based on your specific needs.
TinyPNG
One popular third-party image optimization tool is TinyPNG. It utilizes advanced compression algorithms to reduce the file size of PNG and JPEG images while preserving visual quality. By using TinyPNG, you can manually optimize your images before uploading them to Webflow, ensuring maximum compression and performance.
Source: TinyPNG
Optily
Other image optimization plugins and tools, such as Optily and AI Optimize Image, offer advanced optimization techniques, including artificial intelligence-based algorithms that analyze and optimize images for the best results. These tools often provide more control over the optimization process, allowing you to adjust settings such as compression levels and image formats.
Source: Optily
Benefits Of Using Image Optimization APIs Like TinyPNG
Firstly, it allows for seamless integration with your existing tools and processes. You can automate the image optimization process, saving time and effort by directly integrating the API into your image upload or content management workflow.
Secondly, image optimization APIs often offer more advanced optimization algorithms and techniques. They can analyze and process images in real time, delivering highly optimized results. APIs like TinyPNG have dedicated servers and infrastructure optimized for image processing, ensuring fast and efficient optimization.
Thirdly, image optimization APIs handle the technical aspects of image compression, ensuring optimal results without the need for manual intervention. They take care of tasks such as selecting the appropriate compression settings, optimizing file formats, and generating optimized image variants for different devices and screen sizes.
Best Practices for Webflow Image Optimization
Remember, image optimization is a continuous process. Regularly audit and optimize your images to ensure they align with the evolving needs of your website and its visitors. By implementing these best practices, you can create visually stunning, fast-loading websites that leave a lasting impression on your audience.
Choosing The Right Image Formats For Specific Use Cases
When it comes to image optimization in Webflow, selecting the appropriate image formats for specific use cases is crucial. Each format has its strengths and best practices that can significantly impact the performance and visual quality of your website.
Joint Photographic Experts Group
JPEG (Joint Photographic Experts Group) is ideal for photographs and complex images with many colors and gradients. It offers a good balance between image quality and file size compression.
Portable Network Graphics
PNG (Portable Network Graphics), on the other hand, is well-suited for images with transparency or sharp edges, such as logos or graphics. It provides lossless compression, maintaining high quality but resulting in larger file sizes.
Scalable Vector Graphics
SVG (Scalable Vector Graphics) is a format commonly used for icons, logos, and vector-based graphics. Unlike raster formats like JPEG and PNG, SVG files are resolution-independent and can be scaled without losing quality. This makes SVG an excellent choice for responsive web design, as it ensures sharp and clear images on various devices and screen sizes.
Image Size And Resolution For Better Performance
Another essential aspect of image optimization in Webflow is ensuring optimal image size and resolution. Large images can significantly impact page load speed, leading to a negative user experience. By resizing images to the required dimensions and reducing their file sizes, you can improve overall website performance.
Start by analyzing the context in which the image will be displayed. Determine the maximum dimensions required and adjust the image size accordingly. Avoid using oversized images and scale them down to the appropriate resolution to reduce file size.
Compression is also crucial in optimizing image size. Use tools like Webflow’s built-in compression features or third-party services to compress images without compromising visual quality. Striking the right balance between image size and quality is key to achieving faster loading times and a smoother browsing experience.
Implementing Alt Tags
Alt tags, or alternative text, play a vital role in image optimization for both accessibility and SEO purposes. Alt tags provide a text description of the image, allowing visually impaired users to understand the content through screen readers. They also serve as fallback content if the image fails to load, enhancing accessibility for all users.
In addition to accessibility benefits, alt tags are crucial for SEO optimization. Search engines rely on alt tags to understand the content and context of images, improving the chances of your website appearing in relevant image search results. Ensure that alt tags accurately describe the image, incorporating relevant keywords when appropriate.
Leveraging Lazy Loading
Lazy loading is a technique that defers the loading of images until they are about to enter the viewport, significantly improving page load speed. Rather than loading all images on a page simultaneously, lazy loading loads images progressively as users scroll, reducing the initial load time.
Webflow provides native support for lazy loading through its interactions and animations toolset. By applying lazy loading to images, you can ensure that only the necessary images are loaded, enhancing the overall page load speed and optimizing the user experience. This technique is particularly beneficial for websites with extensive image content or long-scrolling pages.
Utilizing CDN
A Content Delivery Network (CDN) is a network of servers distributed globally, allowing for efficient content delivery to users from the nearest server location. By leveraging a CDN, you can reduce latency and improve website performance, including image loading times.
Webflow provides seamless integration with a built-in CDN, ensuring that your website’s images and other content are delivered efficiently to users worldwide through a network of optimized servers. By hosting your images on a CDN, you can take advantage of faster loading times and improved user experience.
Techniques To Make Images Responsive In Webflow
Webflow provides several techniques to make images responsive and adapt to different screen sizes. These techniques ensure that your images look great and load efficiently, regardless of the device being used.
Using percentage-based dimensions: Instead of specifying fixed pixel dimensions for images, you can set their width and height using percentages. This allows the images to scale proportionally based on the size of the parent container or the viewport, ensuring responsiveness.
Applying fluid container elements: Webflow offers container elements with fluid width settings. By placing your images inside these containers, the images will automatically adjust their size based on the container’s width, adapting to different screen sizes.
Utilizing CSS breakpoints: CSS breakpoints allow you to define different styles for different screen sizes. In Webflow, you can set breakpoints and apply custom styles to images at specific viewport widths. This enables you to optimize image sizes, and layouts, or even use different images altogether for various devices.
Using Webflow’s responsive image feature: Webflow provides a native responsive image component. By adding the responsive image element to your design, you can easily upload multiple versions of the same image optimized for different screen sizes. Webflow will automatically serve the appropriate version based on the user’s device, ensuring optimal image quality and performance.
Benefits of Different Images For Mobile Devices
Mobile devices have specific characteristics and limitations that necessitate considering different images tailored for mobile screens. By optimizing images specifically for mobile devices, you can further enhance the user experience and performance of your website.
Reduced file sizes: Mobile networks often have slower speeds compared to broadband connections. By optimizing images for mobile, you can further compress the file sizes, reducing the time it takes for them to load on mobile devices.
Smaller dimensions: Mobile screens are typically smaller than desktop screens. Therefore, using smaller image dimensions for mobile devices can help conserve valuable screen real estate and ensure that the images fit well within the layout.
Alternative image formats: Depending on the device’s capabilities, you may consider using different image formats specifically for mobile devices. For example, using WebP or JPEG 2000 formats can provide better compression and faster loading times on certain mobile browsers.
Conclusion
To achieve the best results with Webflow image optimization, we encourage readers to implement the discussed practices. By incorporating these techniques, such as choosing the right image formats, optimizing image size and resolution, implementing alt tags, utilizing lazy loading, and leveraging CDNs, readers can significantly enhance their website’s performance, user experience, and accessibility.
The WordPress home page is the visitors’ first page when they land on your website. As it provides an overview of your site’s content, it’s essential to customize it to create a strong first impression and improve the user experience.
This article covers several ways to edit and customize your WordPress home page. We’ll explore using page builders, themes, and plugins to achieve your desired look and feel. We’ll also provide tips for optimizing your home page for SEO. By the end of this article, you’ll know to create a unique and personalized home page that sets your brand apart.
Set Up a Home Page in WordPress
To change the home page in WordPress, follow these simple steps:
Log in to the WordPress dashboard and navigate to “Settings > Reading“
Under “Your homepage displays“, select “A static page“
From the “Homepage” drop-down menu, choose the page you want to set as your home page
Click “Save Changes“
Once you have saved the changes, the selected page will become your new home page.
How to Edit the WordPress Home Page
There are various ways to customize and edit the WordPress home page. Here are three common methods:
1. Using a Page Builder Plugin
Page builder plugins provide a visual way of editing the home page. These plugins offer features and tools that allow you to create custom layouts, add content, and change the design of your home page.
To use a page builder plugin, install and activate it in the WordPress dashboard. You can then create a new page or edit an existing one and use the plugin’s drag-and-drop interface to add content elements. You can also customize the styling of each element using the built-in options.
Various plugins are available but Elementor is a popular one, user-friendly and easy to use to create a custom homepage.
Using Elementor to Edit Homepage
If you want to edit your home page in WordPress using Elementor, you can follow these steps:
Install and activate the Elementor plugin on your WordPress site.
Create a new page or edit an existing one.
Click the “Edit with Elementor” button to open the Elementor editor.
Use the drag-and-drop interface to add widgets and elements to your page and create the layout you want.
Customize the appearance of your elements by adjusting the colors, fonts, and styles as needed.
Preview your changes, and when you’re happy with them, save your updated home page.
Popular Page Builder Plugins
Several page builder plugins are available for WordPress, each with its features and tools. Here are some popular options:
Elementor
Beaver Builder
Visual Composer
Divi
SiteOrigin
Advantages of Using a Page Builder
No coding skills required: You can create custom layouts and designs without any coding knowledge.
Visual editing: Page builders offer real-time previews, making it simple to refine your design.
Pre-designed templates: You can choose from pre-designed templates to speed up your workflow.
Flexibility: You can create any layout or design you want.
Creating Custom Layouts
Using a page builder, you can create custom layouts using a drag-and-drop interface. Content elements like images, text boxes, videos, and buttons can be added and arranged in any order you like, allowing you to create a layout that aligns with your brand and business needs.
Adding and Editing Content
Apart from layouts, a page builder enables you to add and edit content on your home page. You can add text, images, videos, and other elements and customize their design and style to match your brand.
Customizing Design and Style
A page builder also lets you customize the design and style of your home page. You can select from various design options, including fonts, colors, backgrounds, and animations, and customize them to suit your brand. This allows you to create a cohesive and professional-looking design that effectively engages visitors and conveys your message.
2. Customizing the Theme
Customizing the theme is another way to edit the home page. WordPress has numerous themes that can be customized to fit your needs. Some of the popular themes include Astra, Avada, Divi, and OceanWP. These themes come with customization options that allow you to change the layout, colors, fonts, and other design elements of your home page.
To customize a theme, navigate to Appearance > Customize in the WordPress dashboard. You can select the home page from the available pages and customize its design and layout. You can preview the changes in real time and save them once you’re satisfied.
3. Editing the CSS Code
For advanced users, editing the CSS code is a viable option. CSS (Cascading Style Sheets) is the language used to style web pages. In WordPress, you can edit the CSS code of your home page to change its layout, colors, fonts, and other design elements.
To edit the CSS code, navigate to Appearance > Customize > Additional CSS in the WordPress dashboard. You can add your custom CSS code to modify the design of your home page. You can also use CSS frameworks such as Bootstrap or Foundation to create responsive designs that work on all devices.
4. Editing Your Homepage with WordPress/Block Editor
The default editor in WordPress, Gutenberg, is a block-based editor that enables users to create and modify content using individual content blocks. These blocks can consist of images, text, videos, tables, and more. Gutenberg was introduced in WordPress 5.0 and has been the default editor since then.
Method to Modify Homepage
To change your WordPress home page using the Gutenberg editor, adhere to these procedures:
Log in to your WordPress dashboard and click on “Pages > All Pages.”
Hover over the page you want to modify and click on “Edit.”
The Gutenberg editor will open, allowing you to start modifying the content blocks on your home page.
To add a new content block, click on the “Add Block” button and select the block type you want to add.
To modify an existing block, click on the block and apply the desired changes.
Once you’ve completed modifying, click on “Update” to save your changes.
The Gutenberg editor is user-friendly and provides a wide range of content blocks that can be tailored to create an exclusive and visually appealing home page. By utilizing the editor, you can easily modify your home page without any technical expertise or coding skills.
Frequently Asked Questions
How can I add new content to the WordPress home page?
To add new content to the WordPress home page, you can use widgets, create custom content sections with a page builder, add new blog posts or pages to the home page, and consider adding multimedia content like videos or images.
How can I optimize the WordPress home page for SEO?
To optimize the WordPress home page for SEO, use keywords in your page titles and headings, write descriptive meta descriptions, optimize images with alt tags and captions, use internal linking to other relevant pages on your website, and consider adding structured data markup to your home page.
How can I create a custom home page in WordPress?
To create a custom home page in WordPress, you can create a new page, set it as the front page in the WordPress settings, use a page builder to create a custom layout, add content and widgets to the page, and customize the design and style.
Conclusion
Editing your WordPress website’s homepage is a crucial aspect of website management. Whether you’re using Elementor or the default editor, you need to focus on the design, layout, and content to make it appealing and informative to your visitors.
While editing your homepage, it’s also essential to consider the user experience, page load times, and search engine optimization. By following established practices and optimizing your website’s performance, you can meet your objectives and attract more visitors to your site.
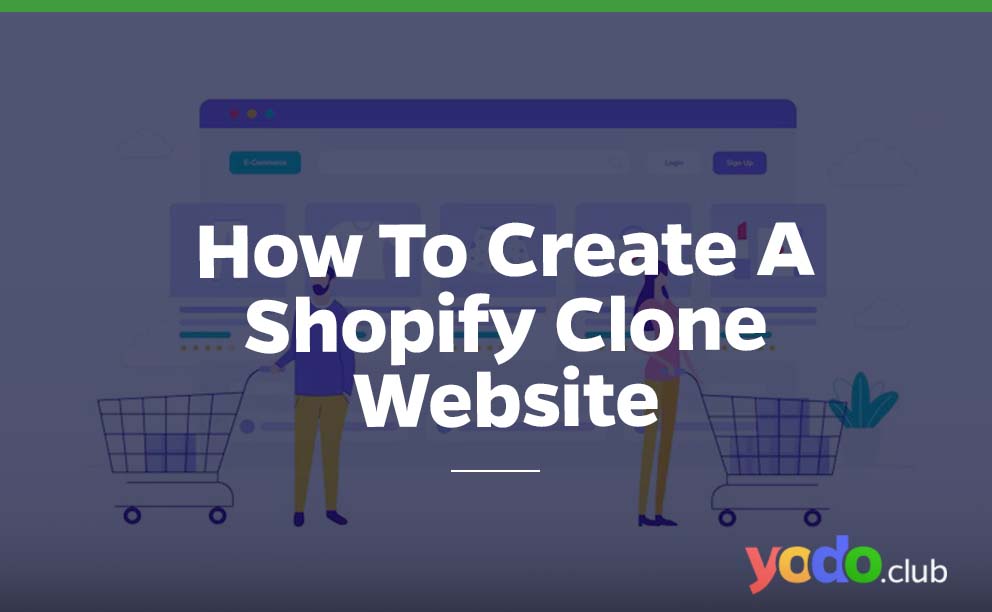


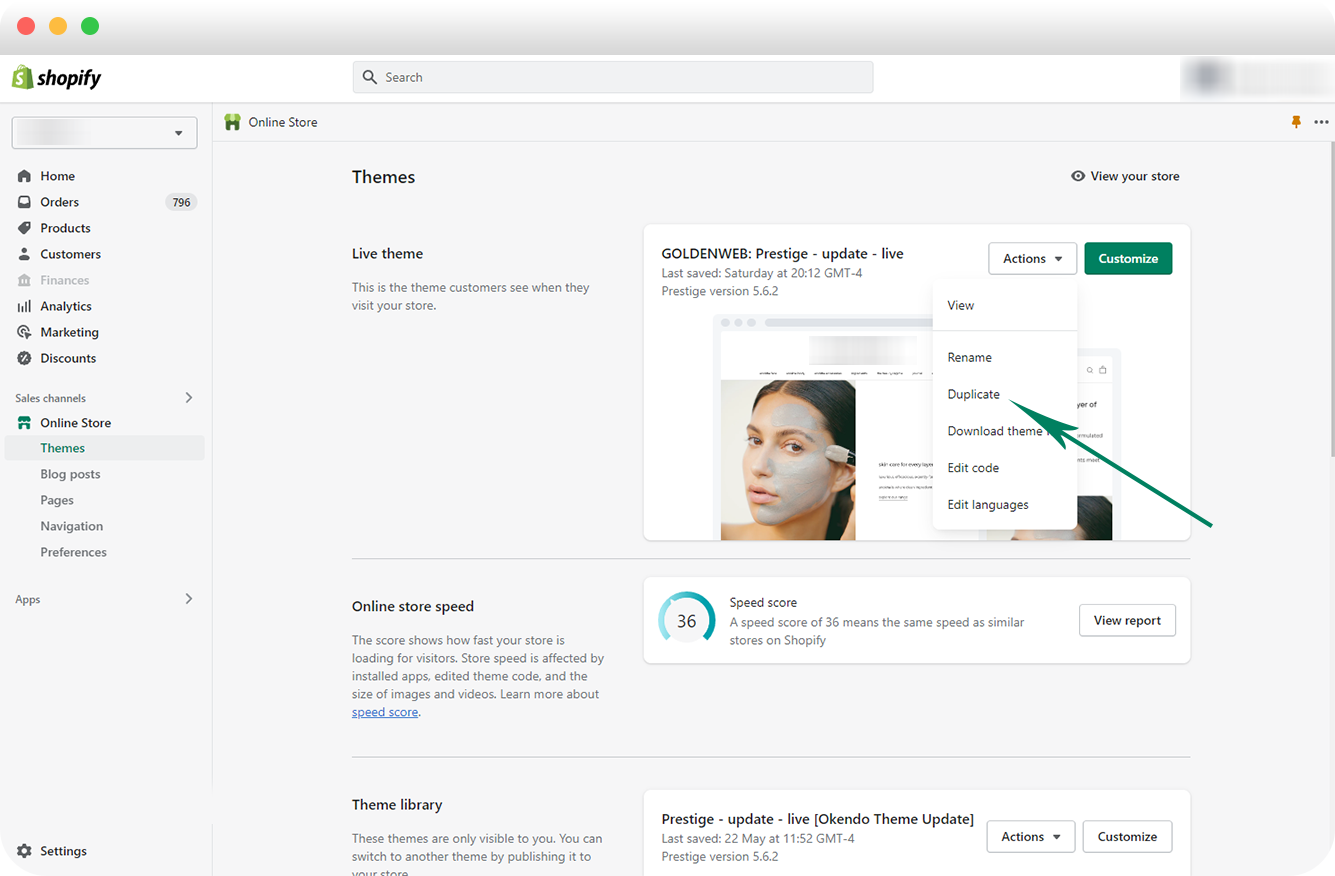
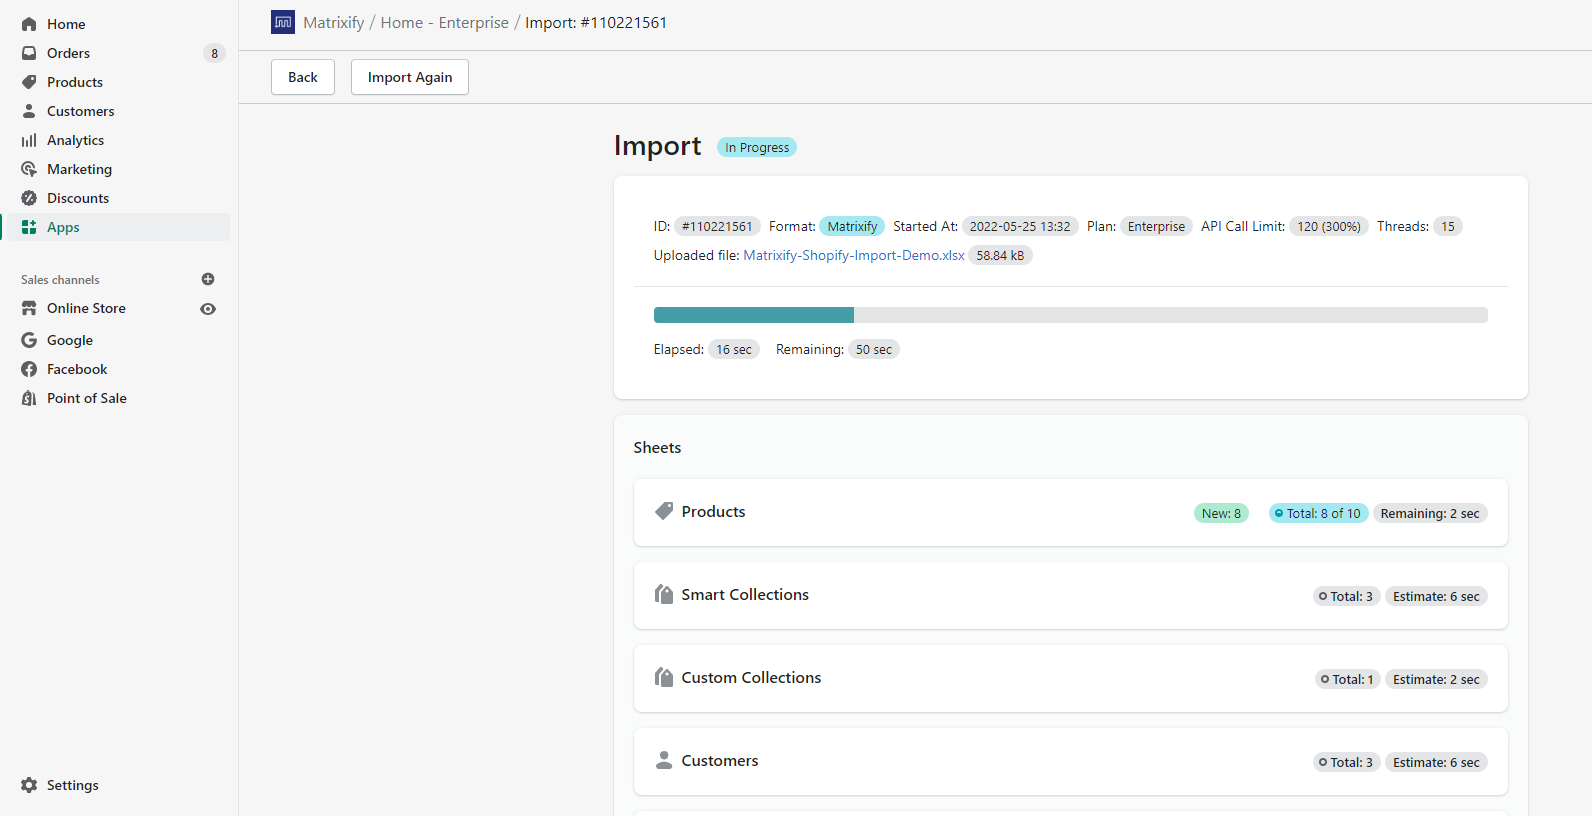
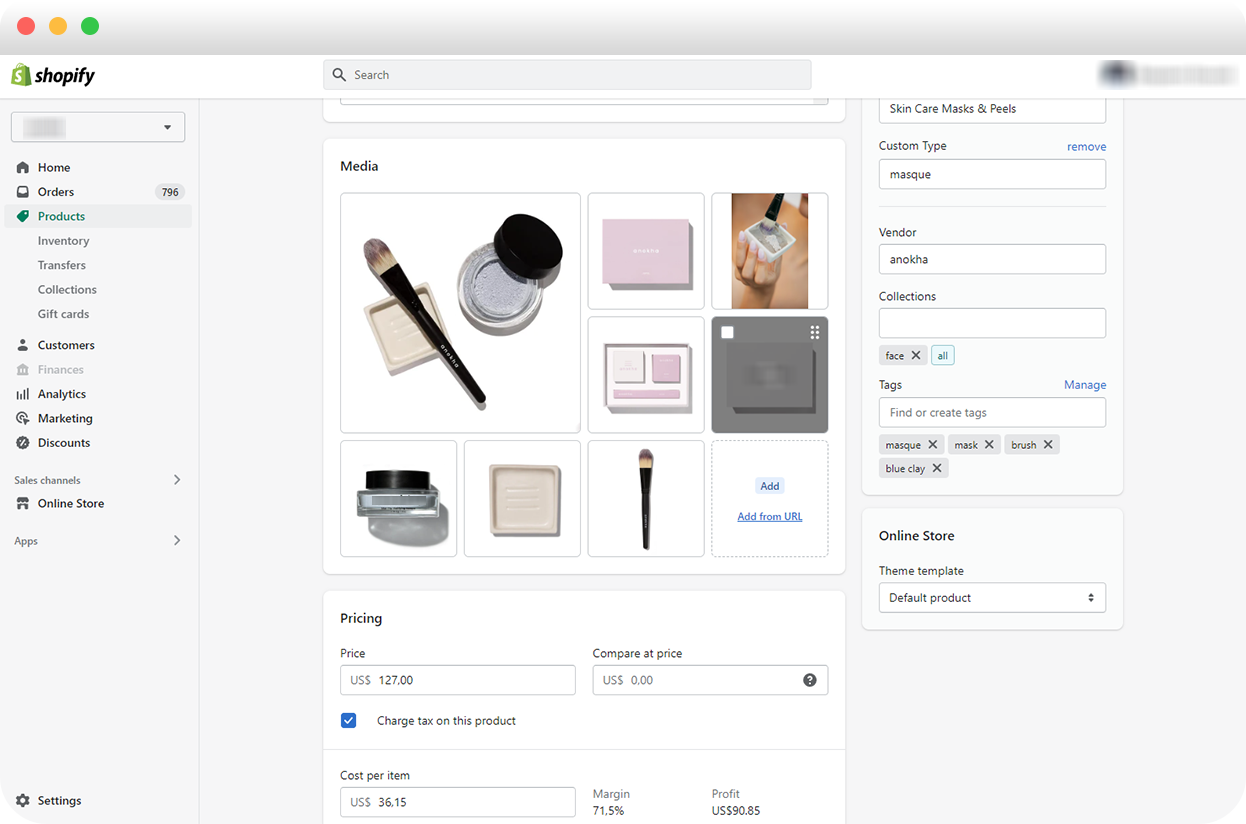
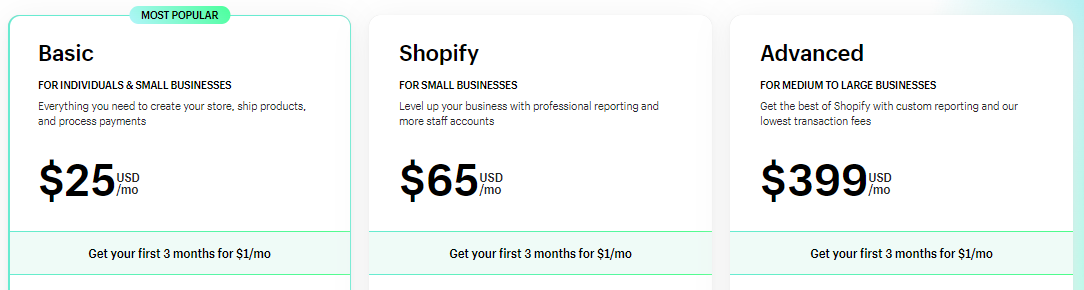
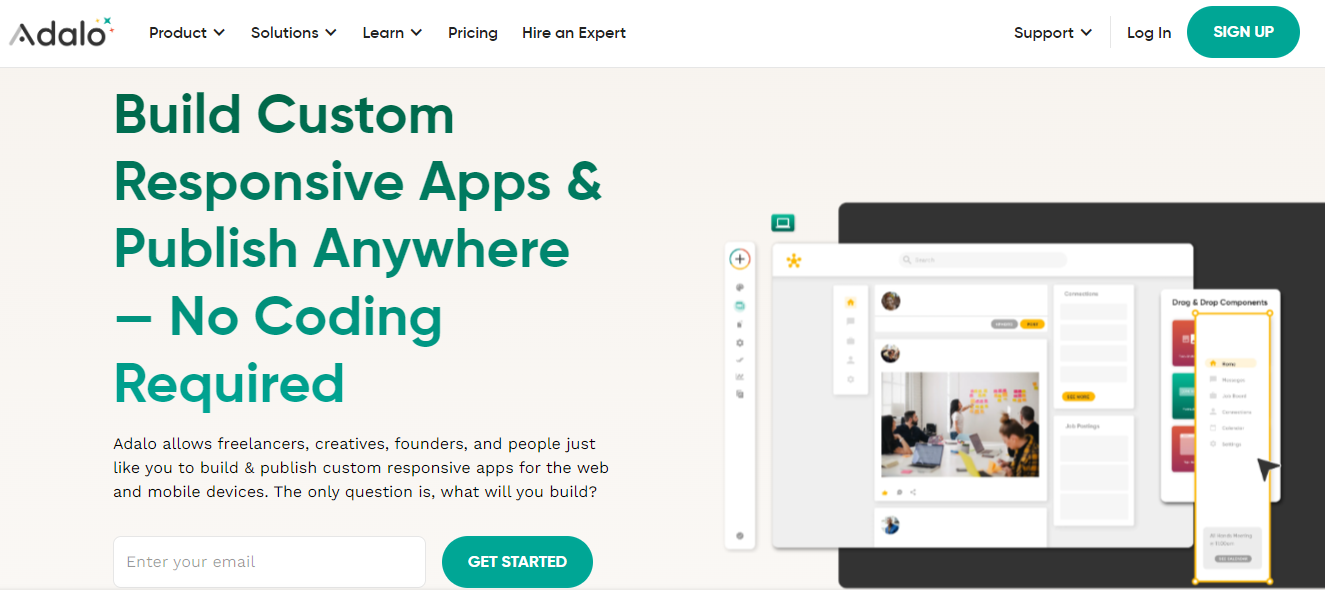
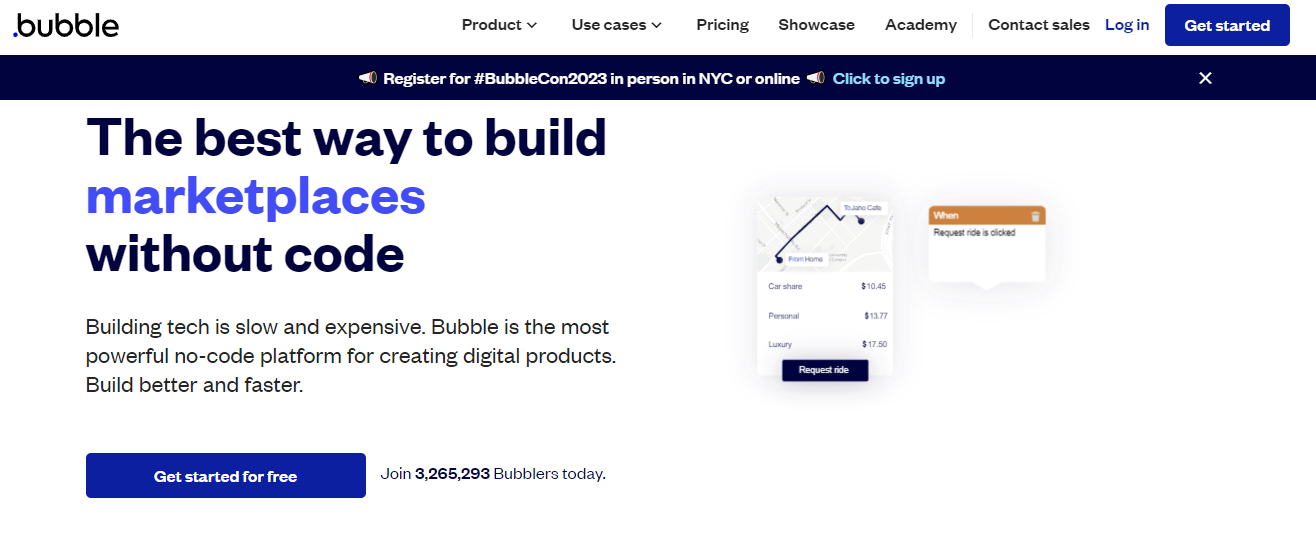
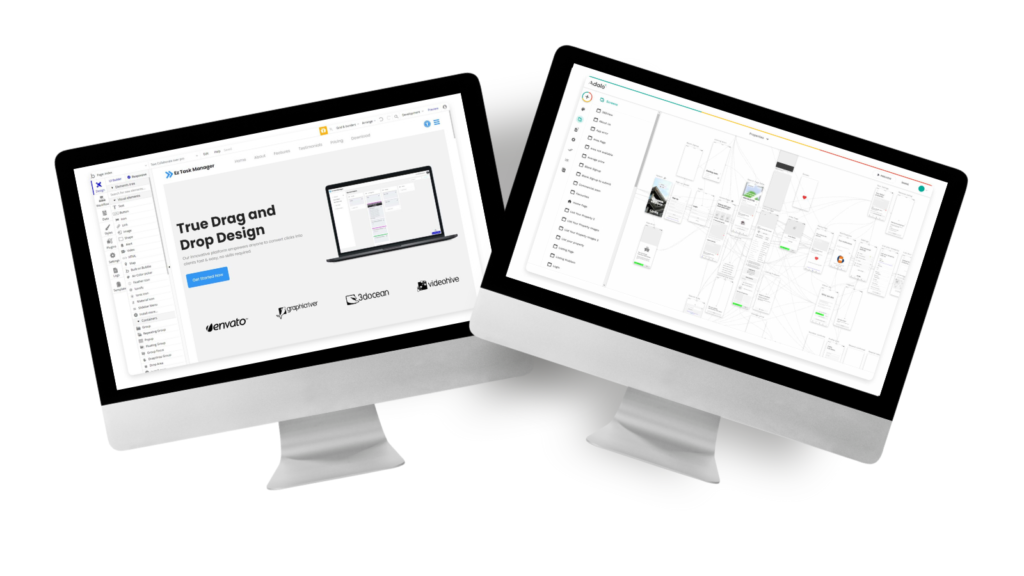

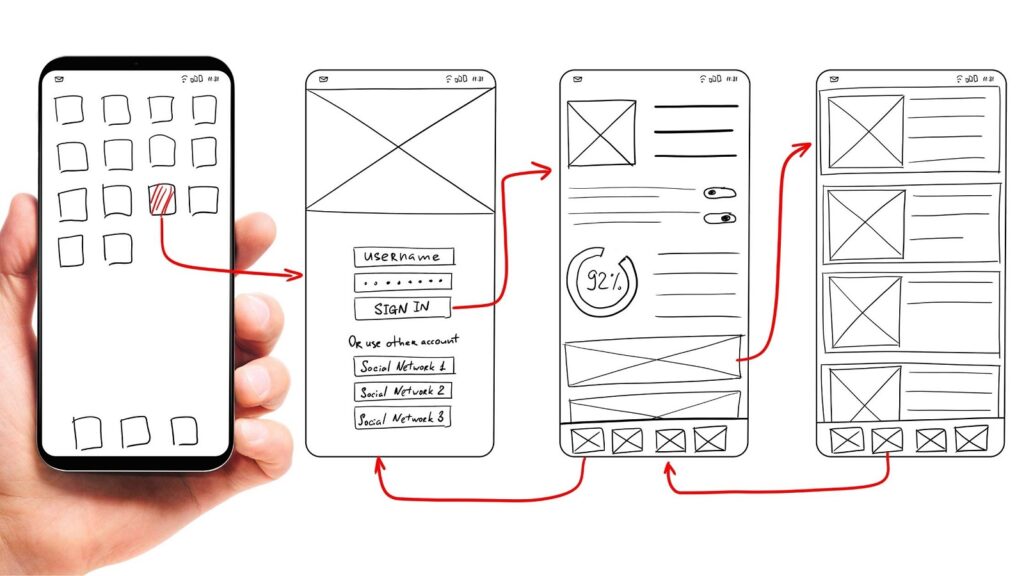

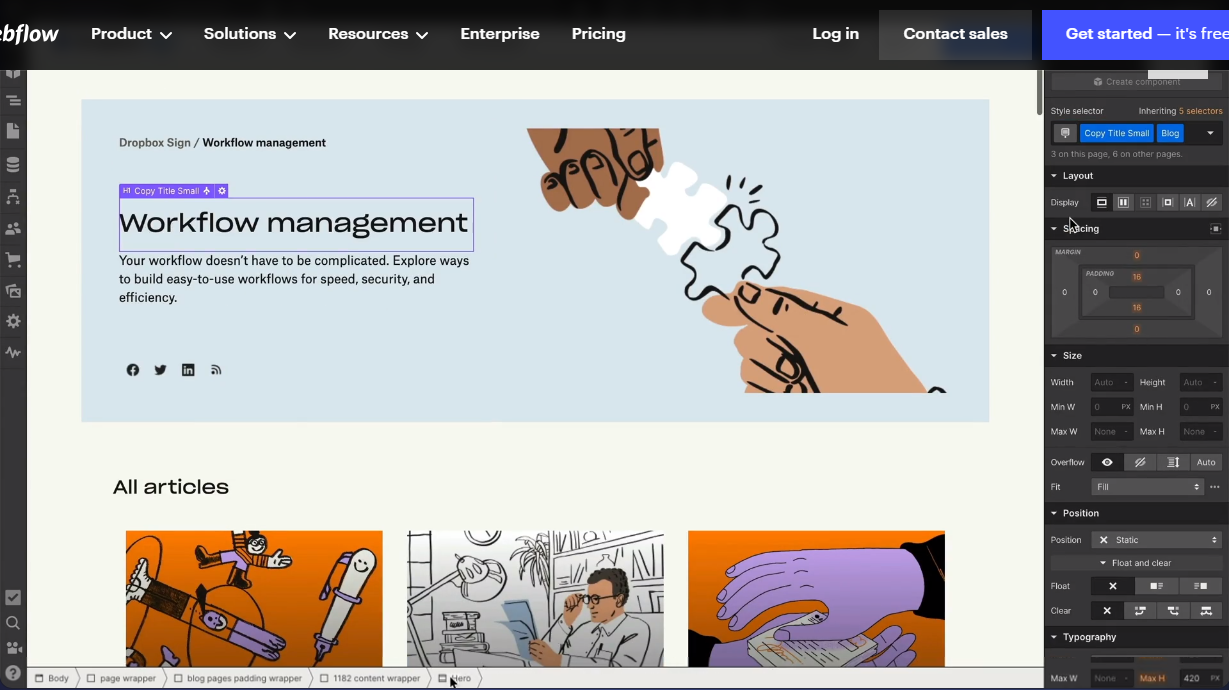
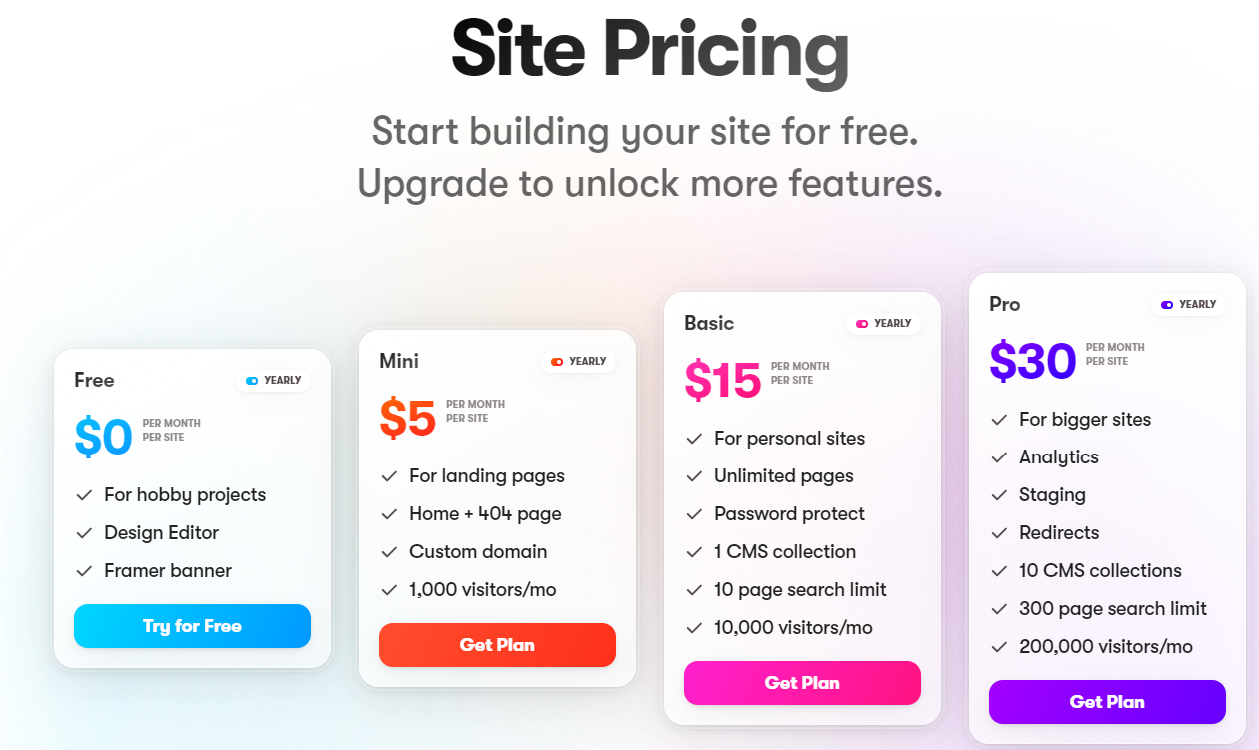
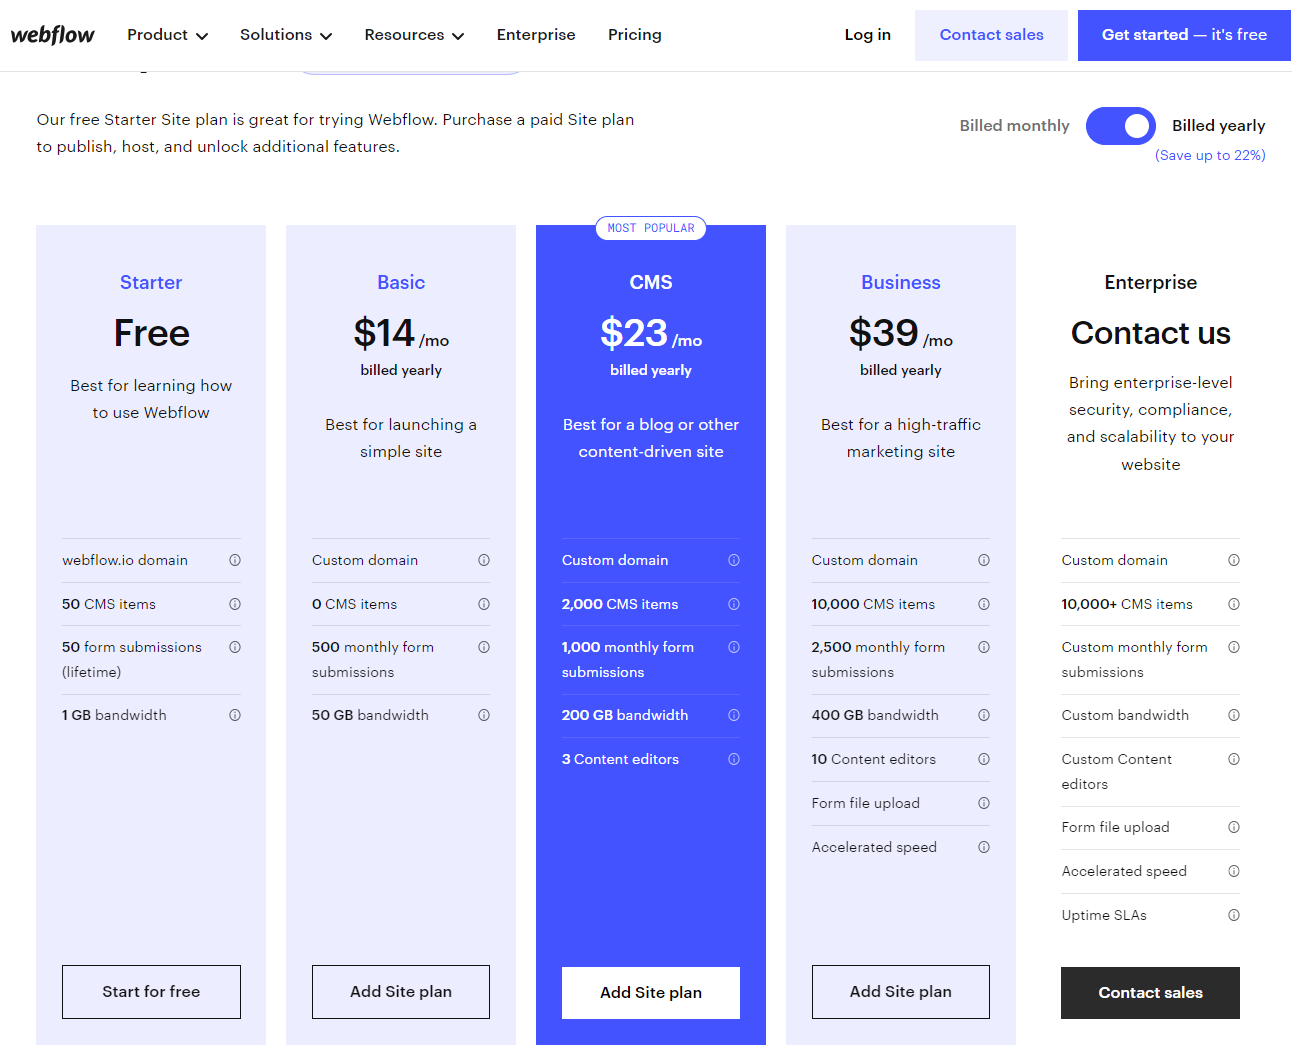
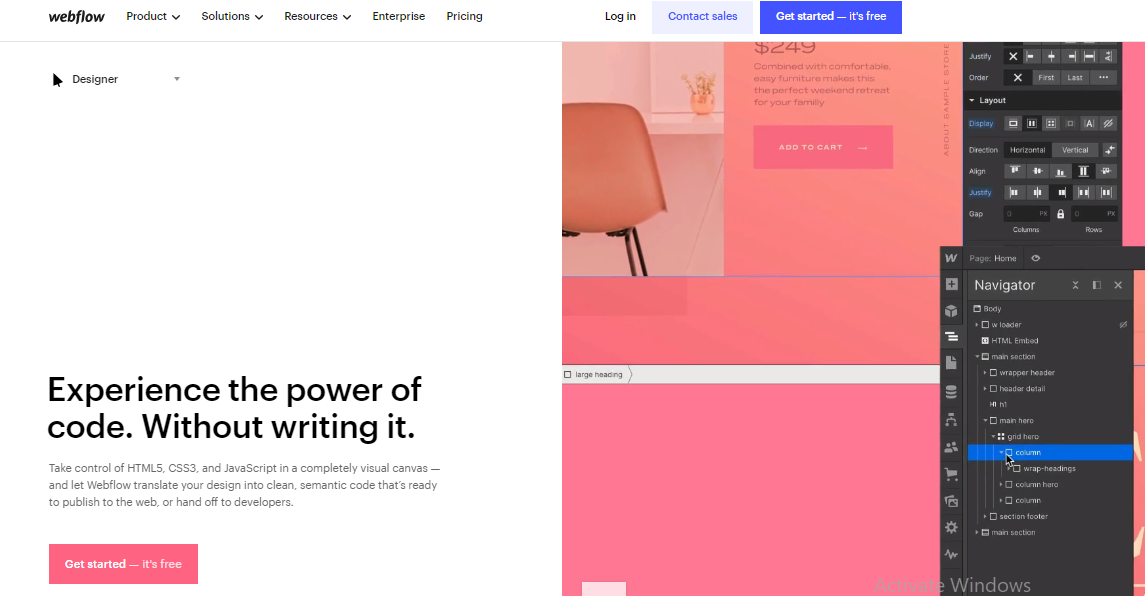
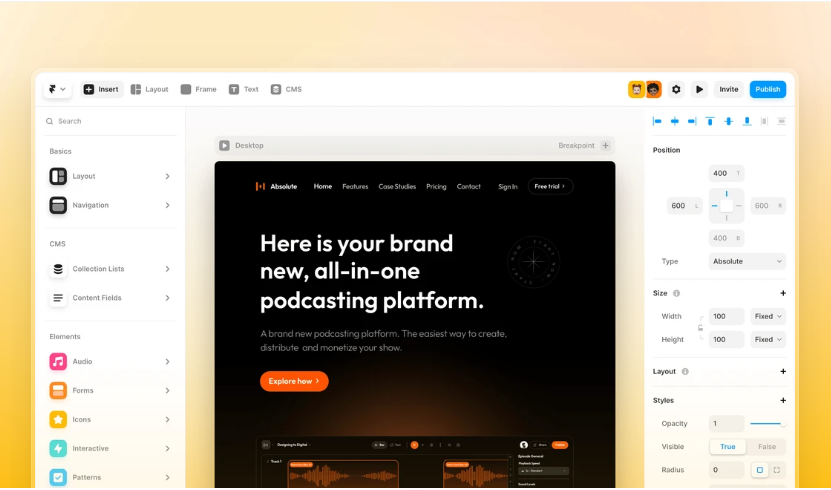
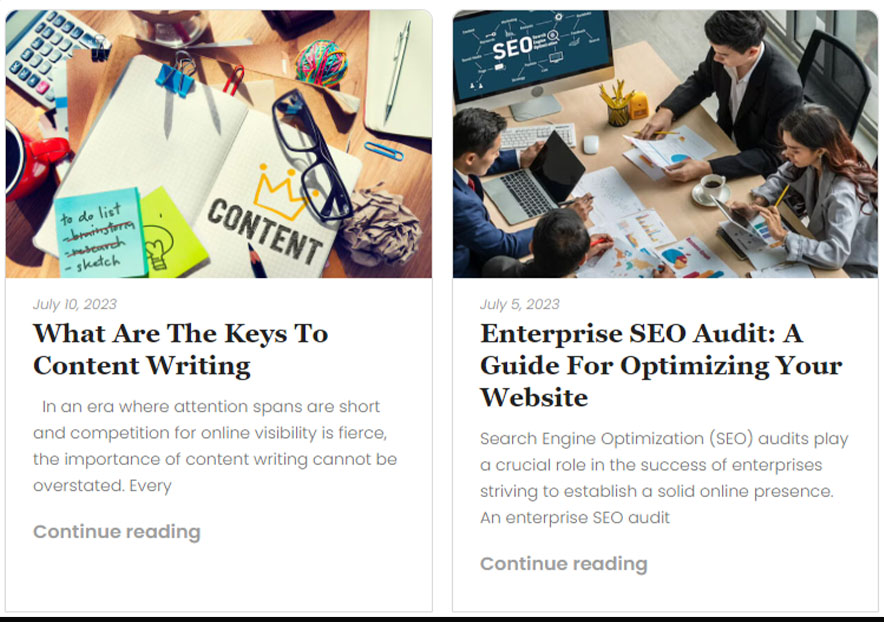

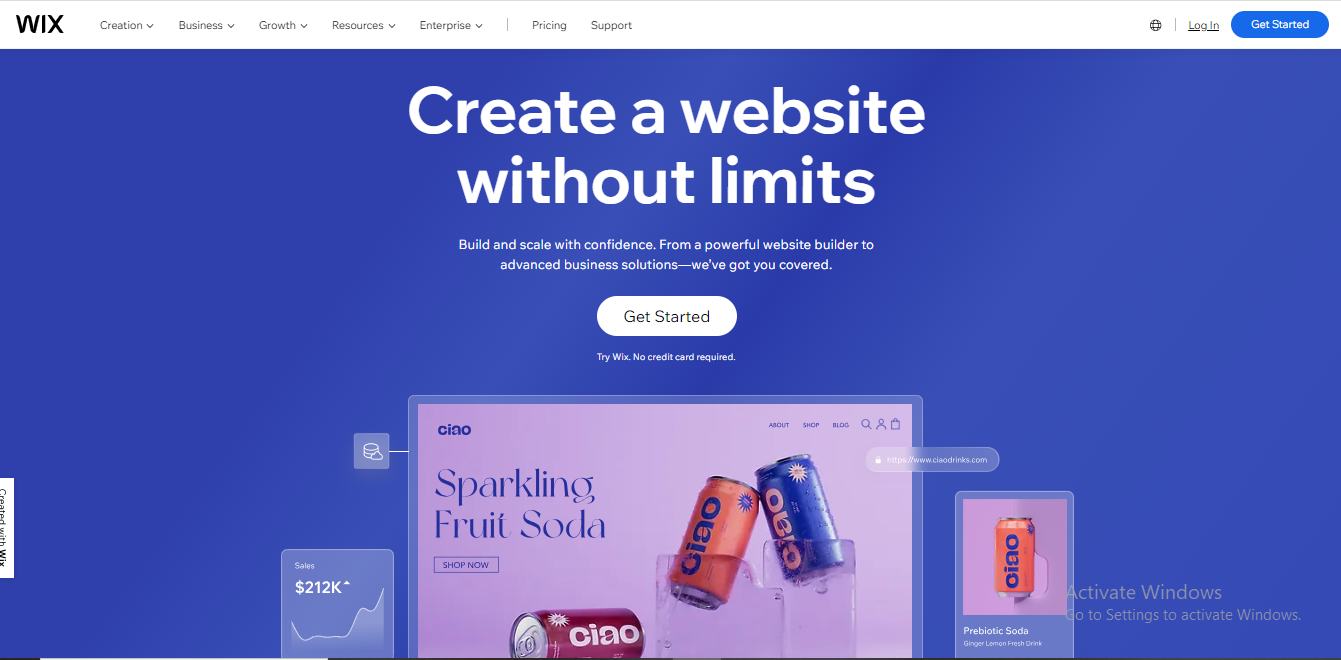
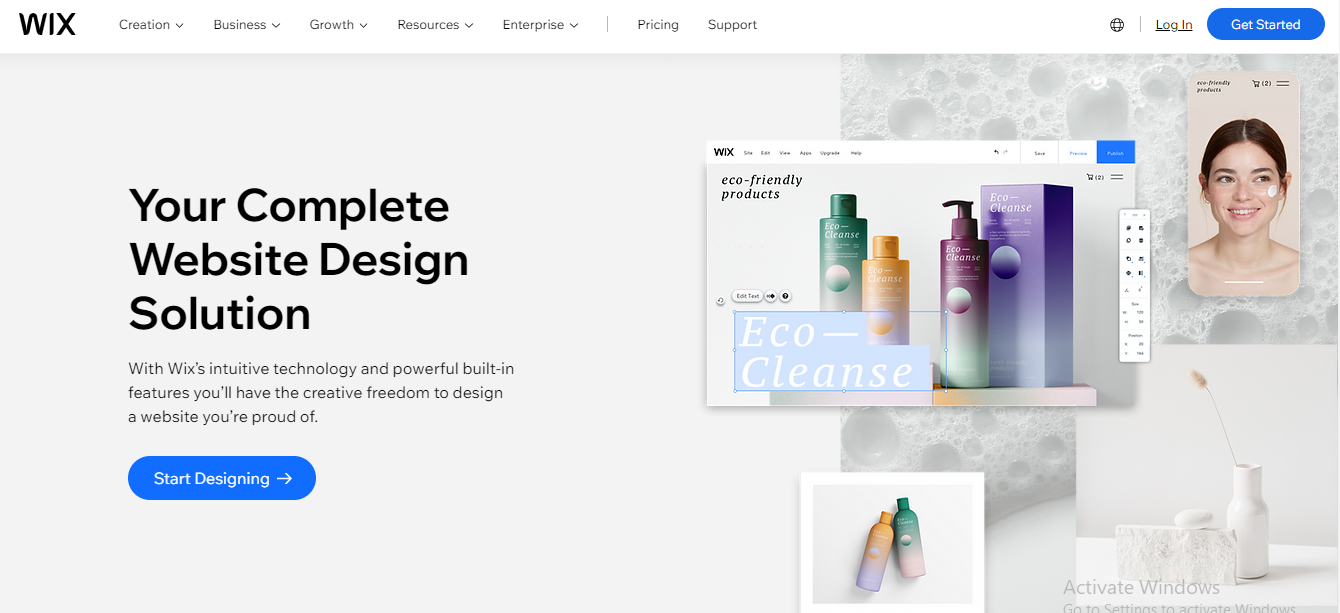
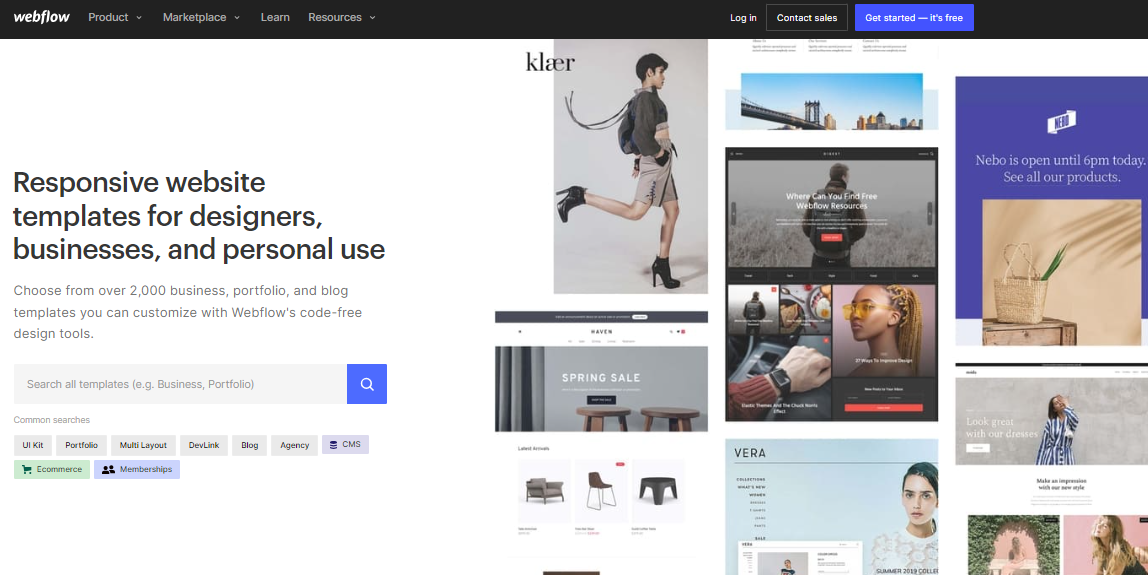
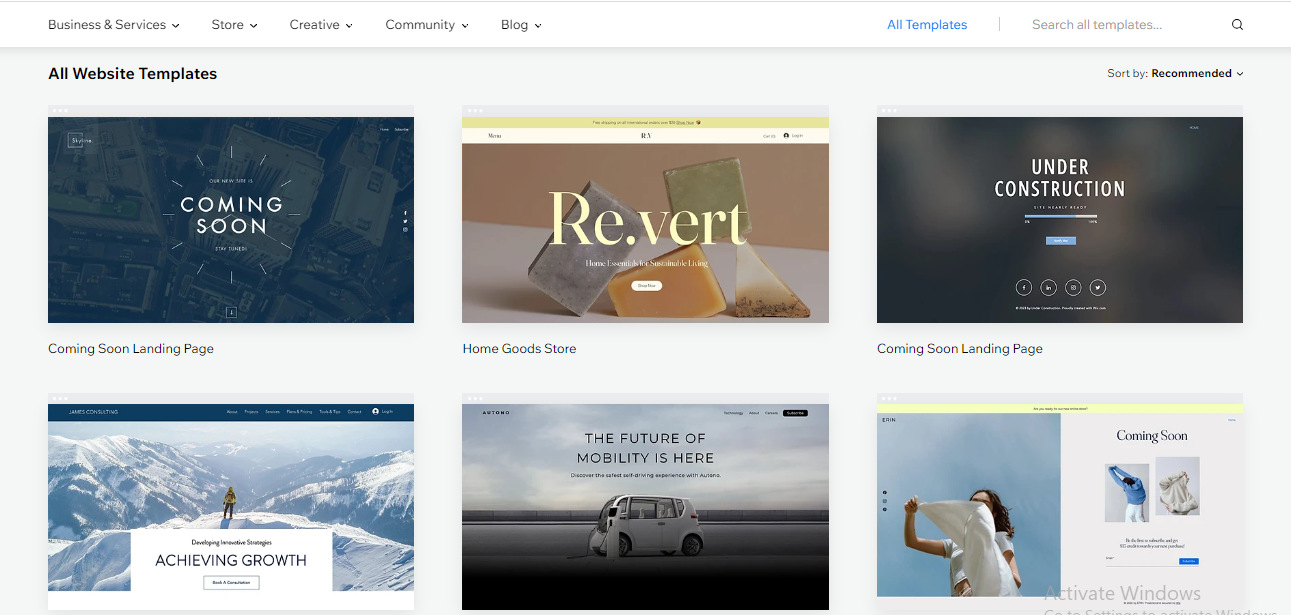


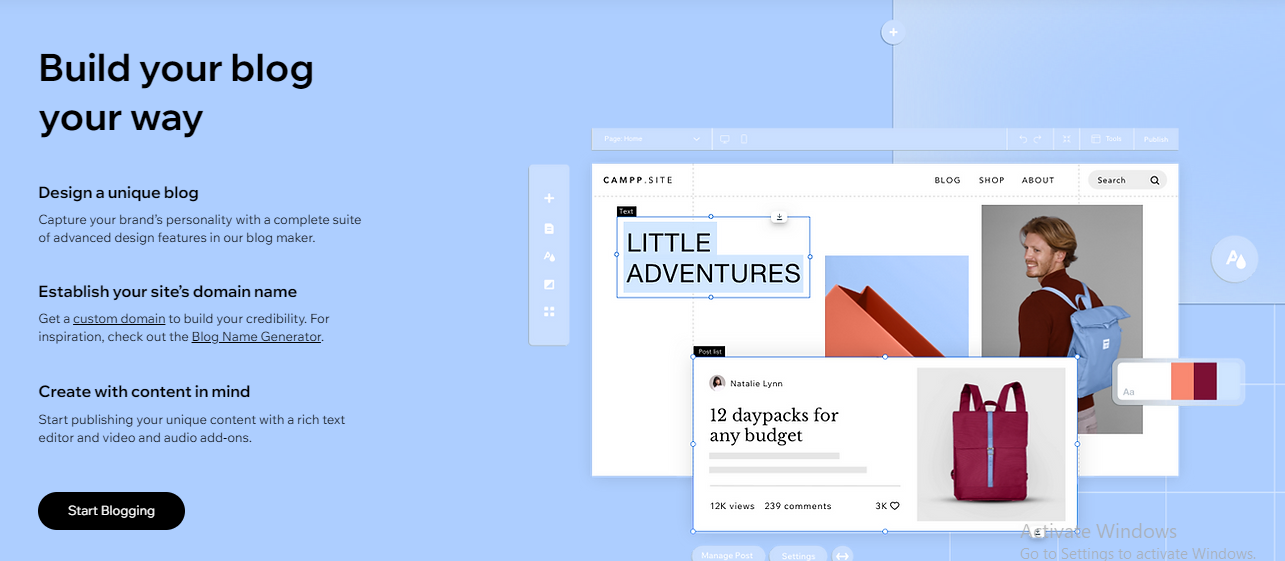

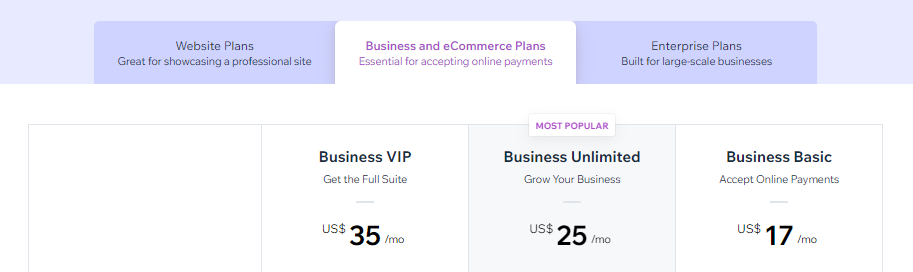
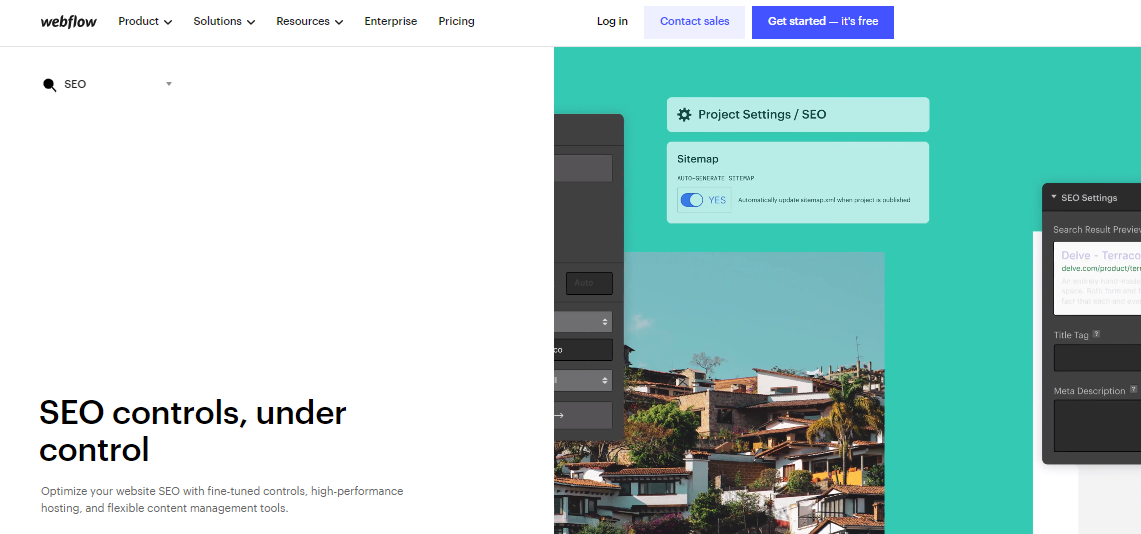
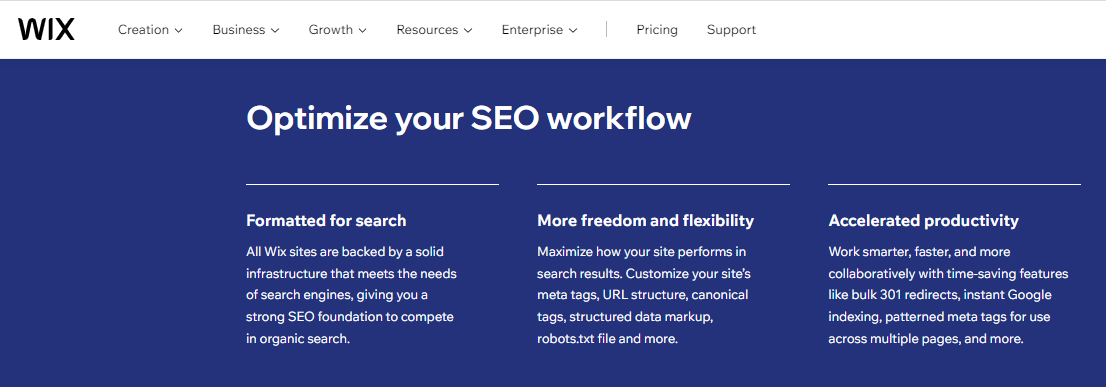
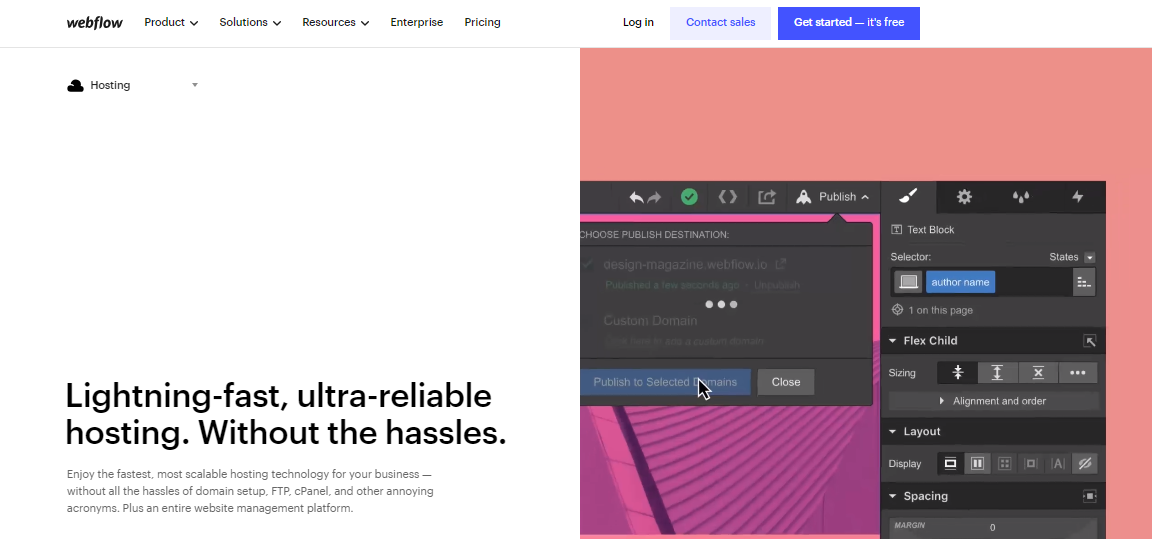

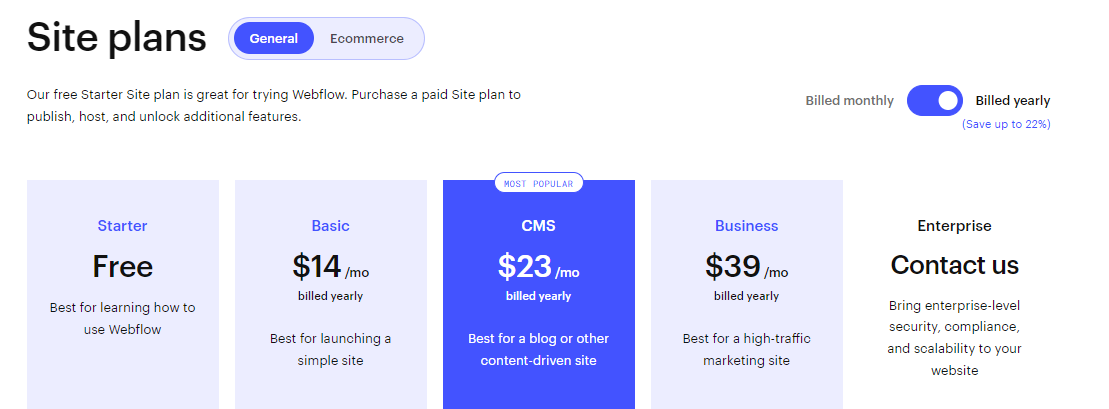
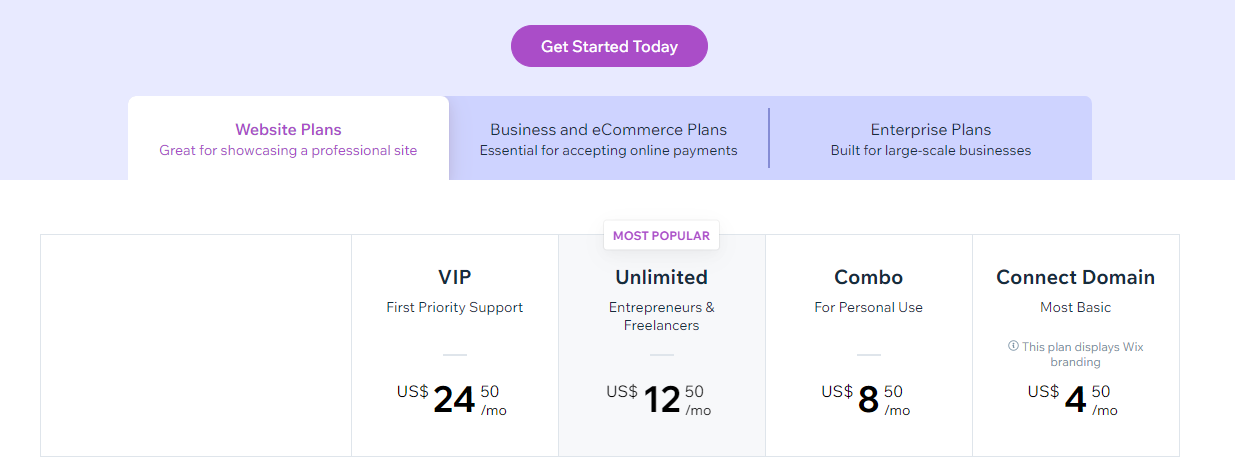
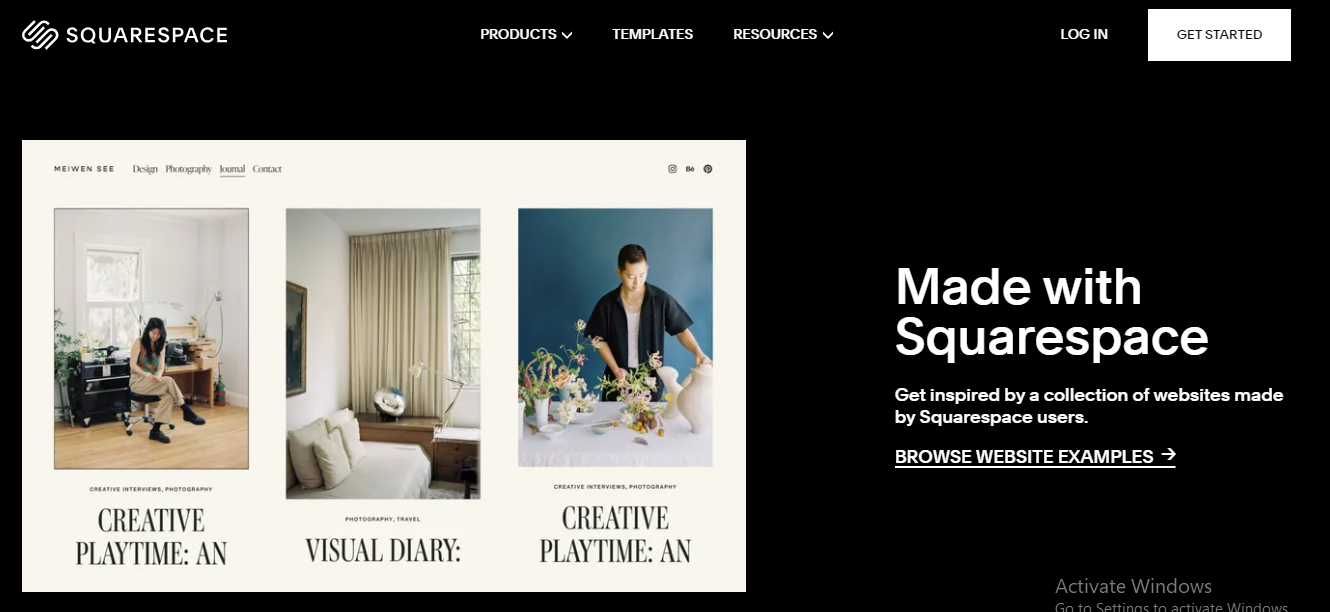


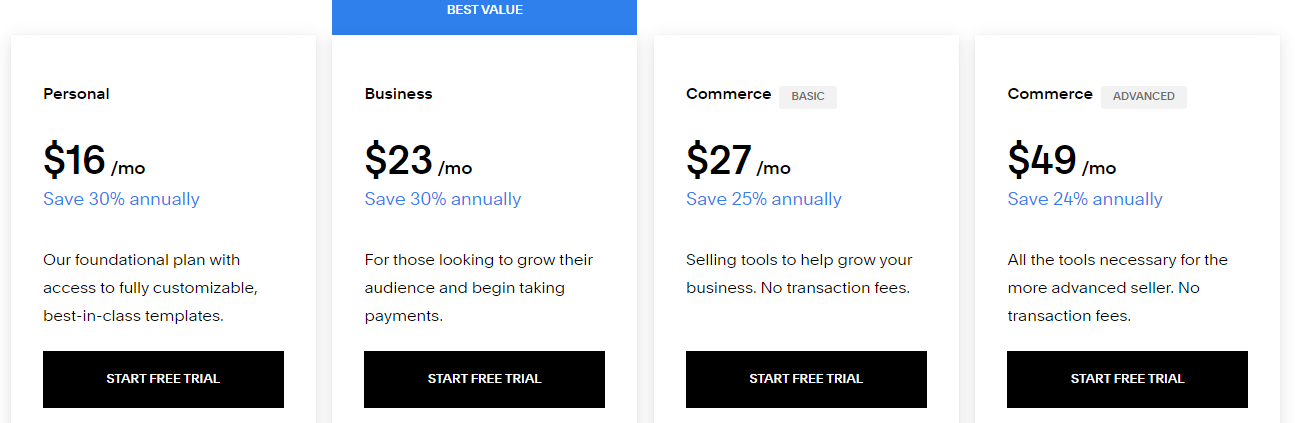
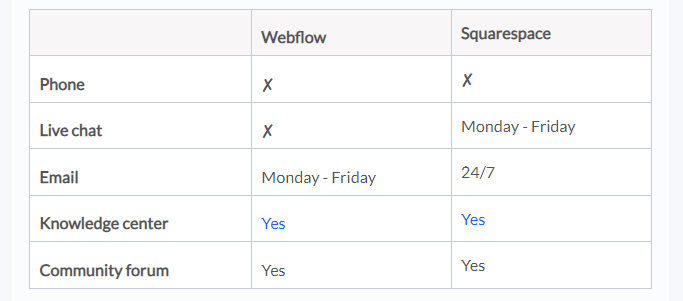
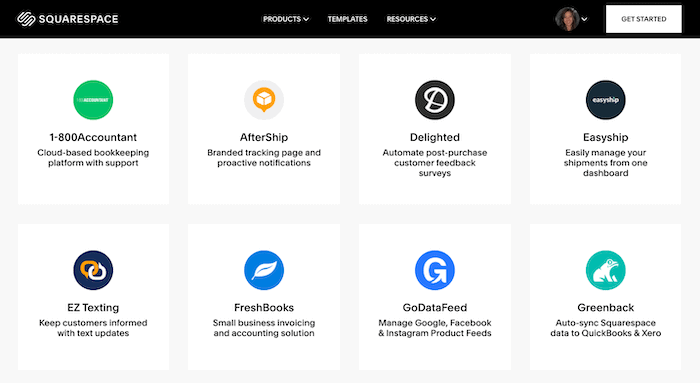
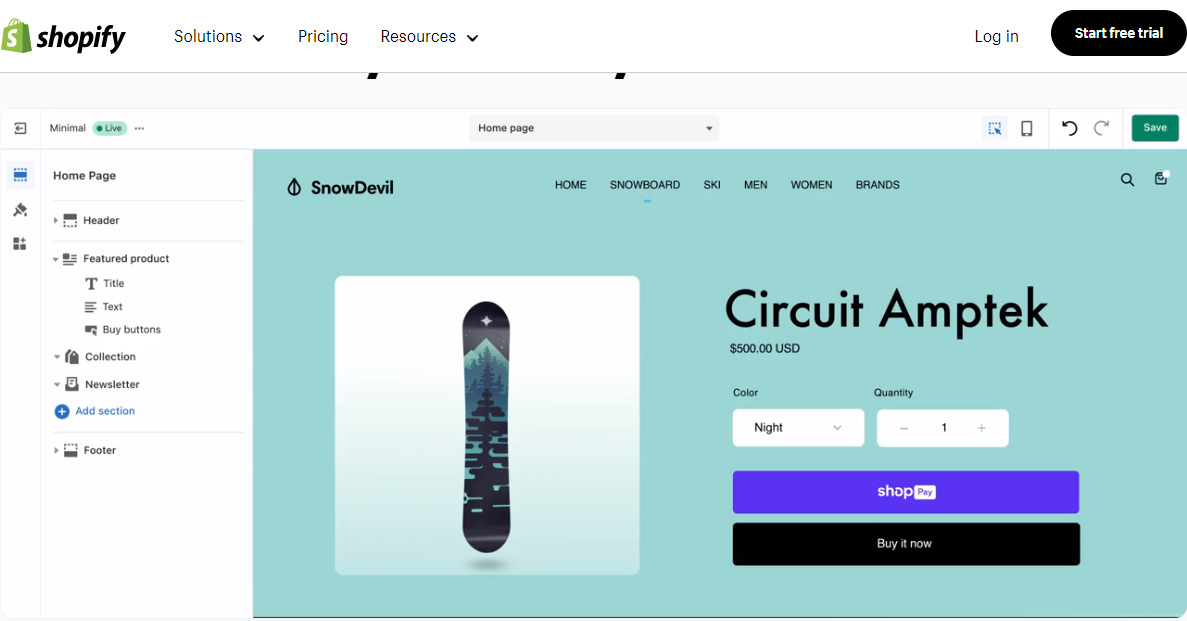
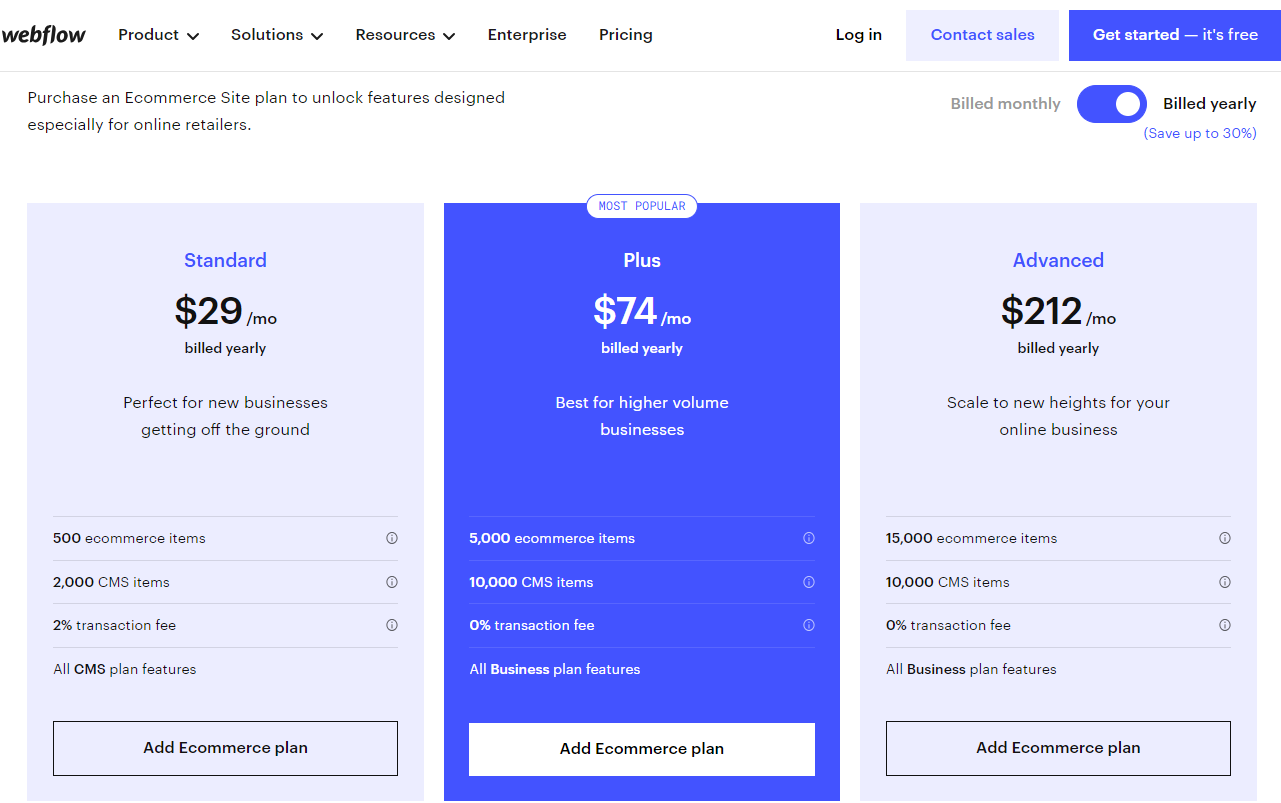
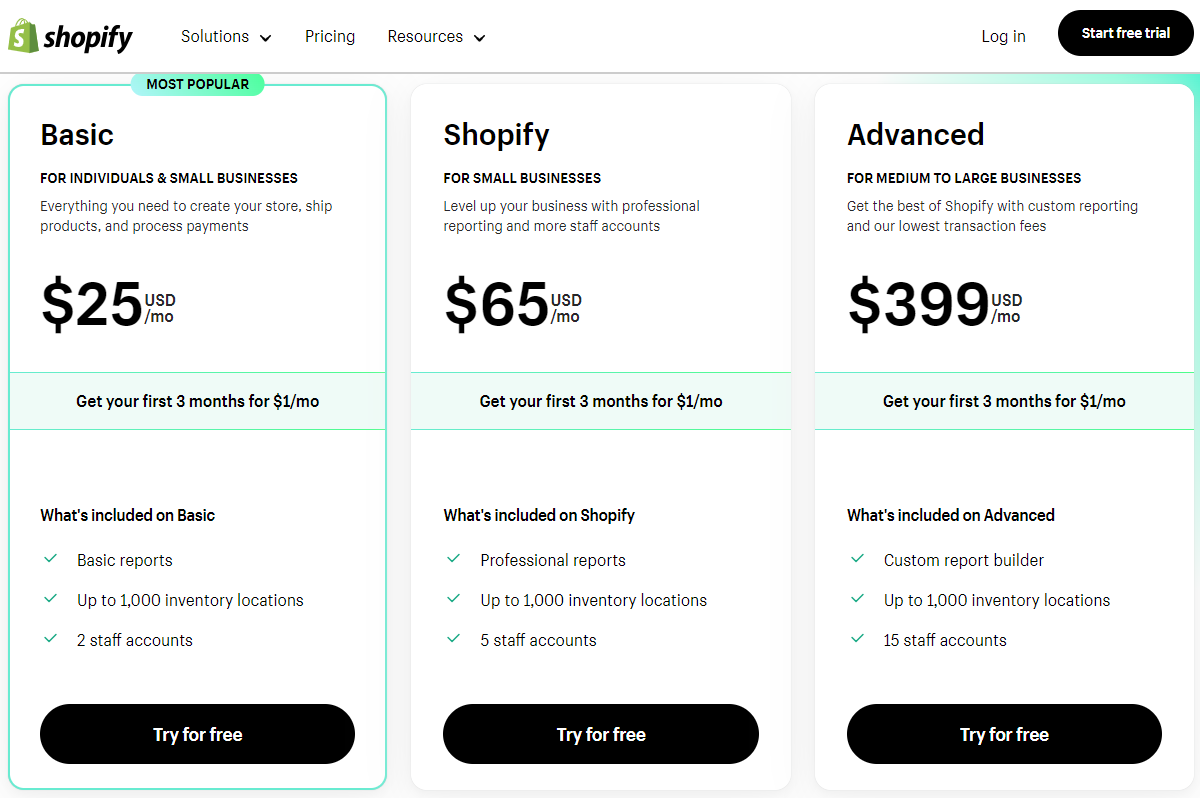


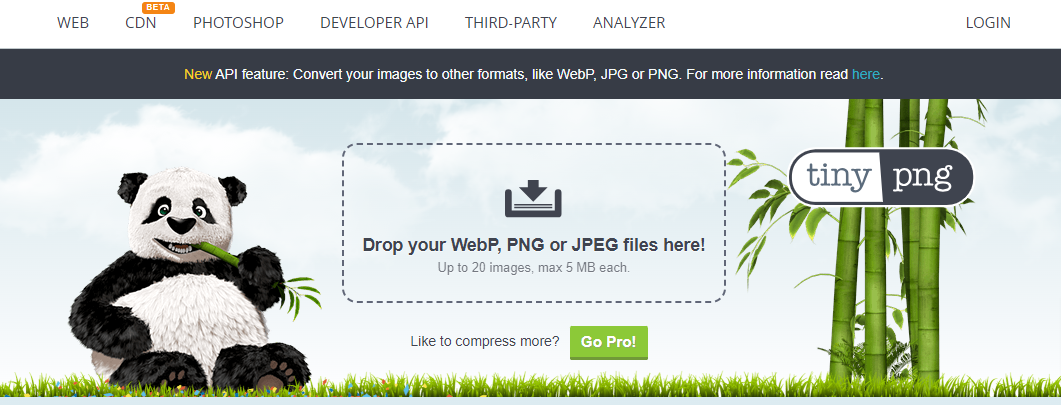


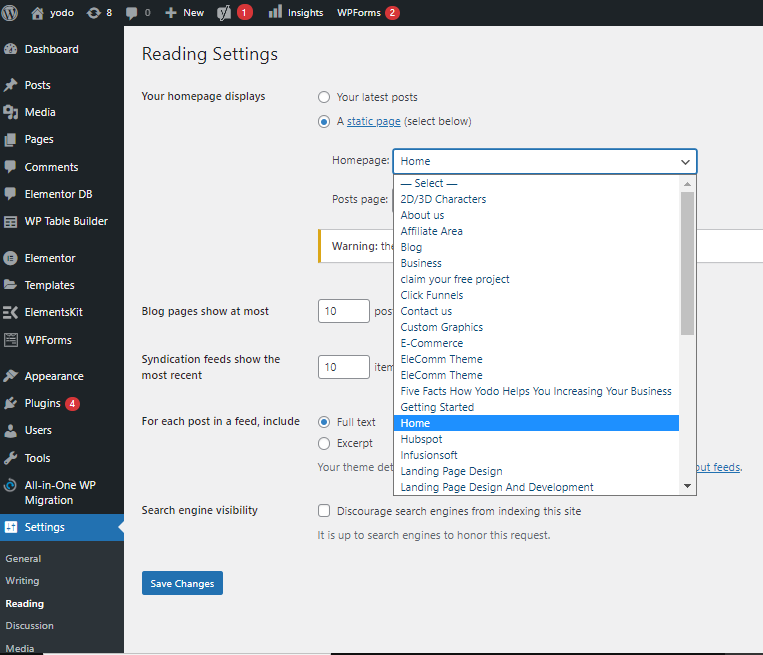
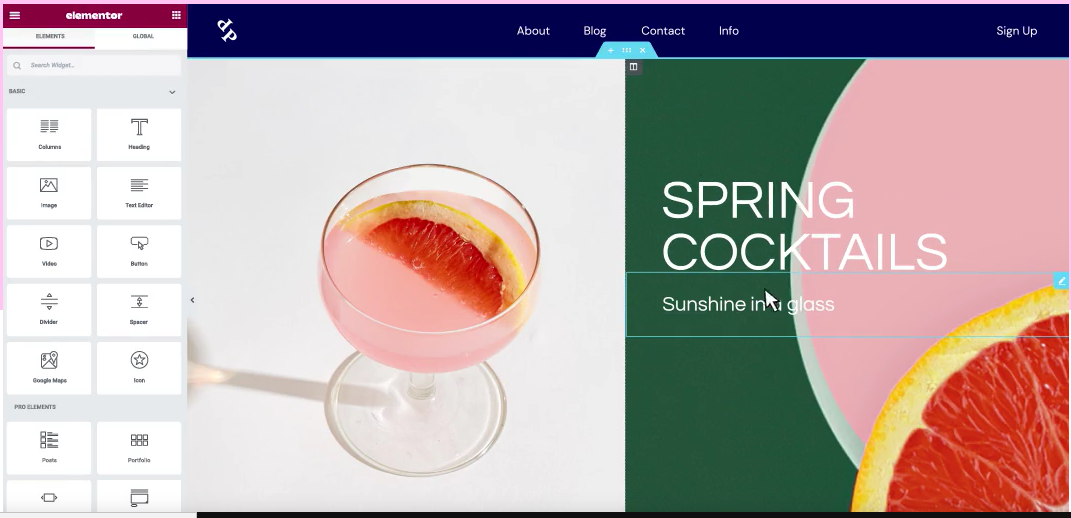


 & Passion.