
Is your blog ready to run? Just wait for a second. Before you run a blog post, taking a few steps to set up your WordPress blog will make it attractive.
Table of Contents
Set Up A WordPress Blog
Follow the steps one by one.
Change The Title And Tagline Of The Site
The Site Title or Blog Title can be anything. By changing the Site Title, the URL of your blog remains the same. However, it will be different from the WordPress blog you set up or username. You can change it to the need of the content or what best suits it.
The Site Title shows the name of your company or organization, a brief description, or maybe both.
There are different locations where the Site Title appears, which include:
-
- The title bar of the web browser
- The header of the themes
- Blog menu of the Admin bar (top right)
- The main menu of the Admin bar (top left)
- Your homepage of the WordPress site
Tagline comes next, and it describes what your blog is about that must be appealing or eye-catching.
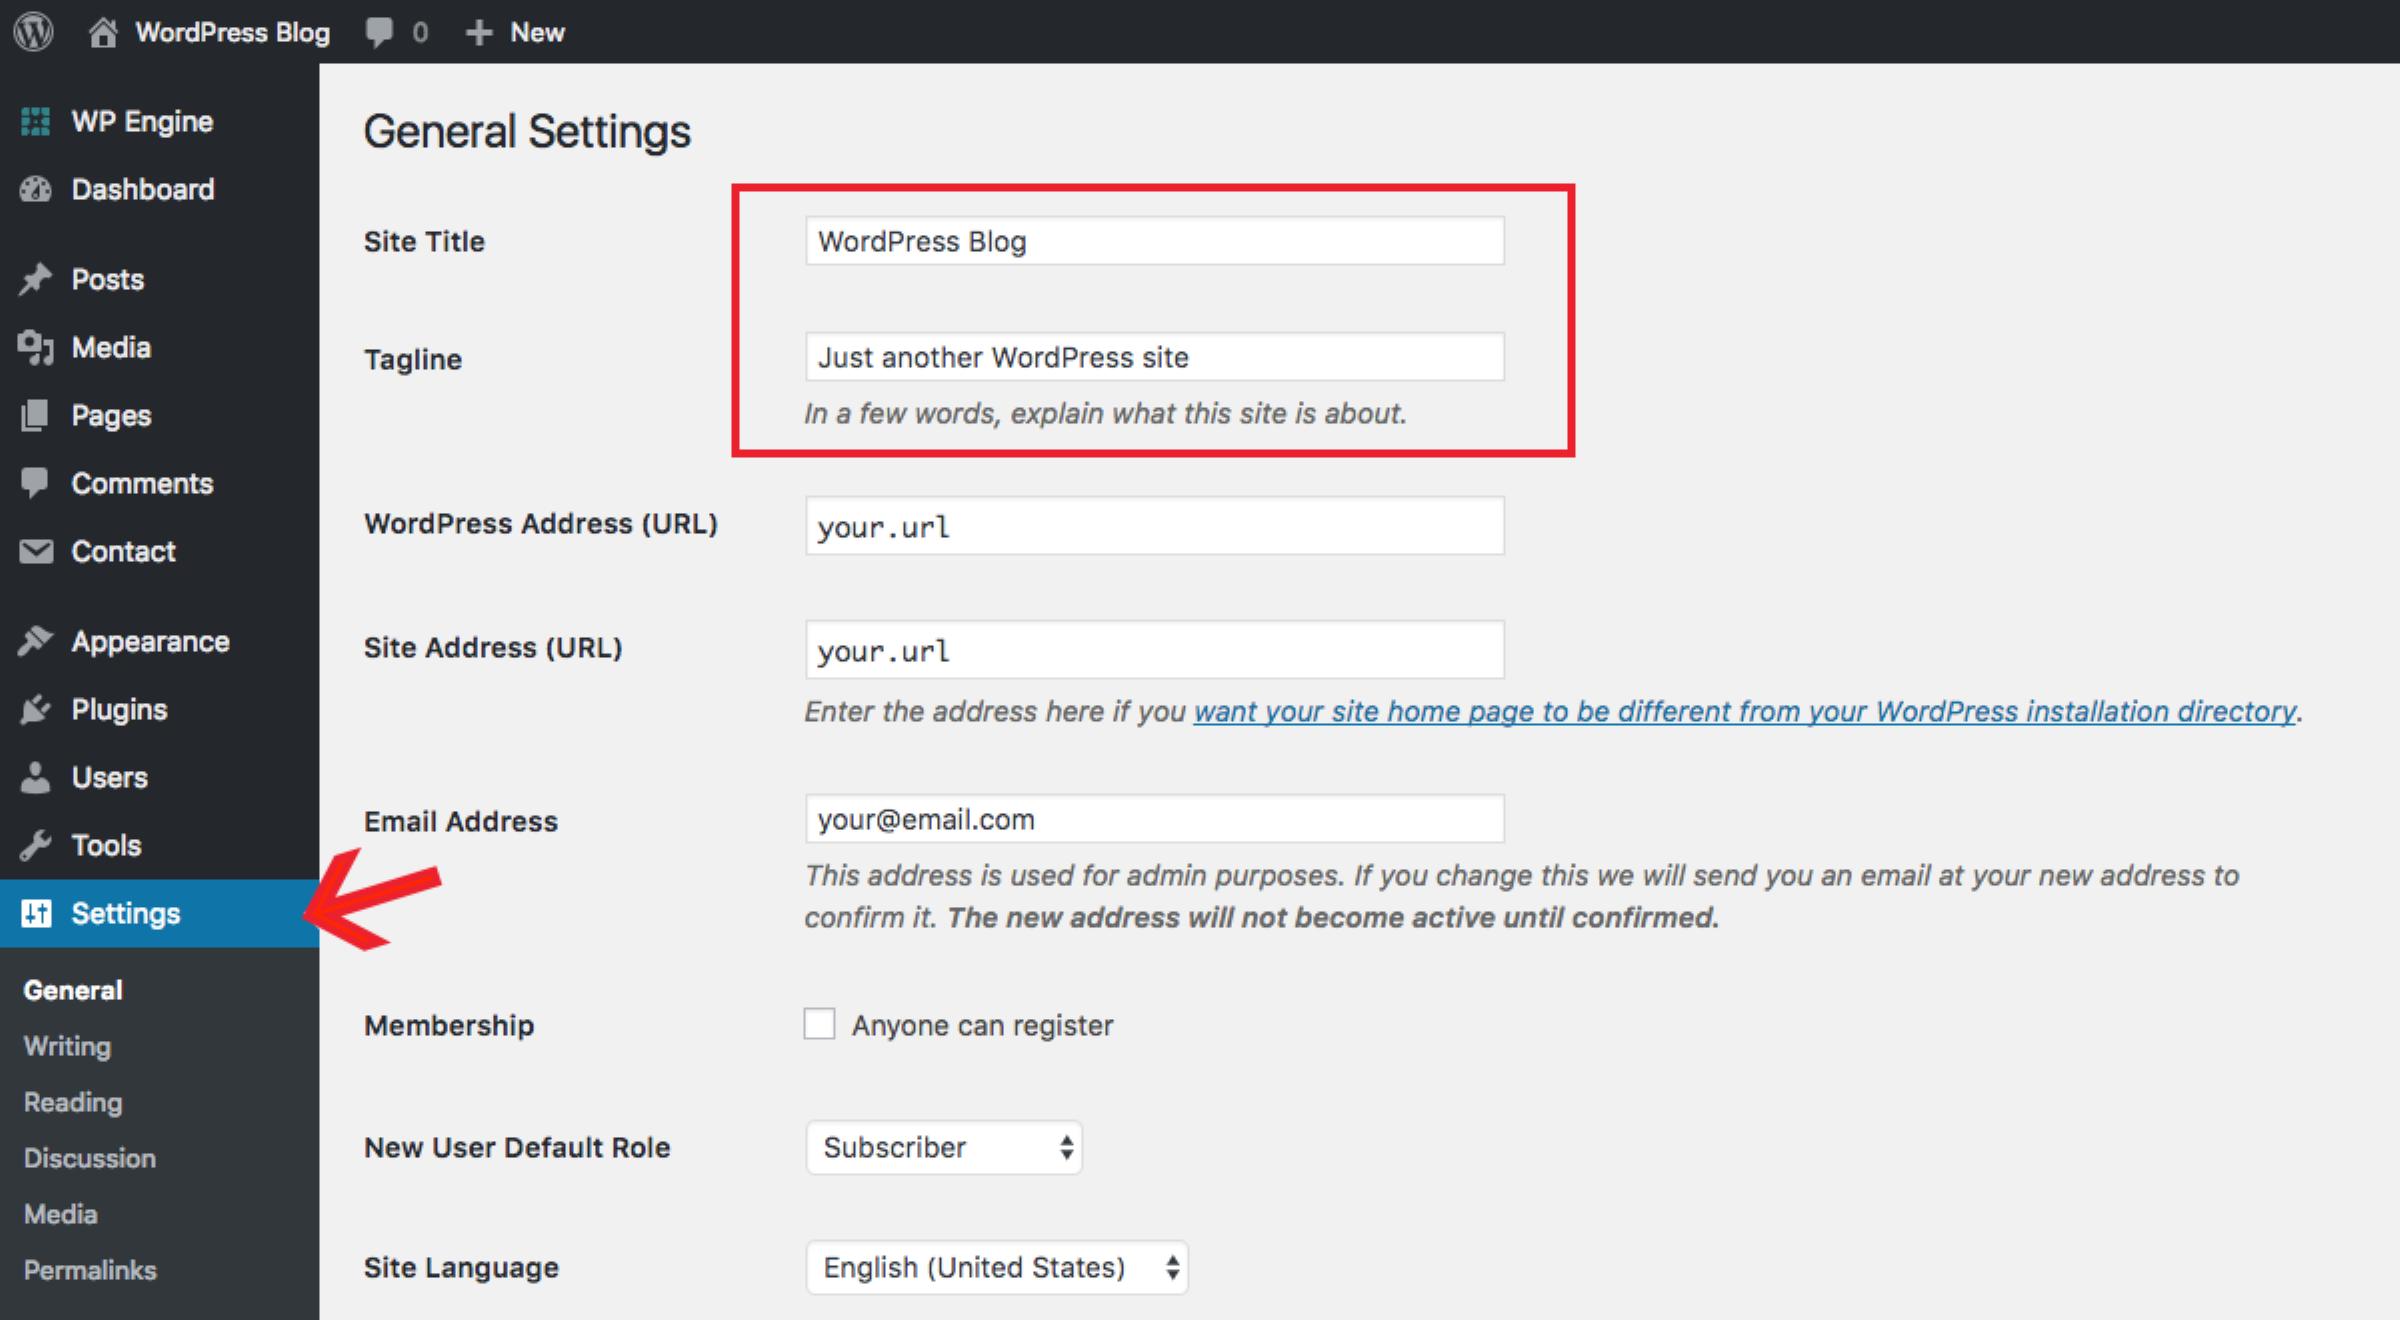
Setting The Language
You can change the language to appear in the Theme text for your blog visitors.
And how can you make all these changes?
Go to General Settings, which allows you to change the site title, tagline, and language.
To do the change:
-
- Open your Site.
- Go to the General Setting page.
- Select the General setting tab.
Change The Privacy Policy
The Privacy Policy allows you to hide or unhide your site.
-
- Go to the Settings page.
- Select the Privacy tab.
You can select any option, Hidden, Private, or Public, as you want. There is also a Privacy Setting support page where you can find further details.
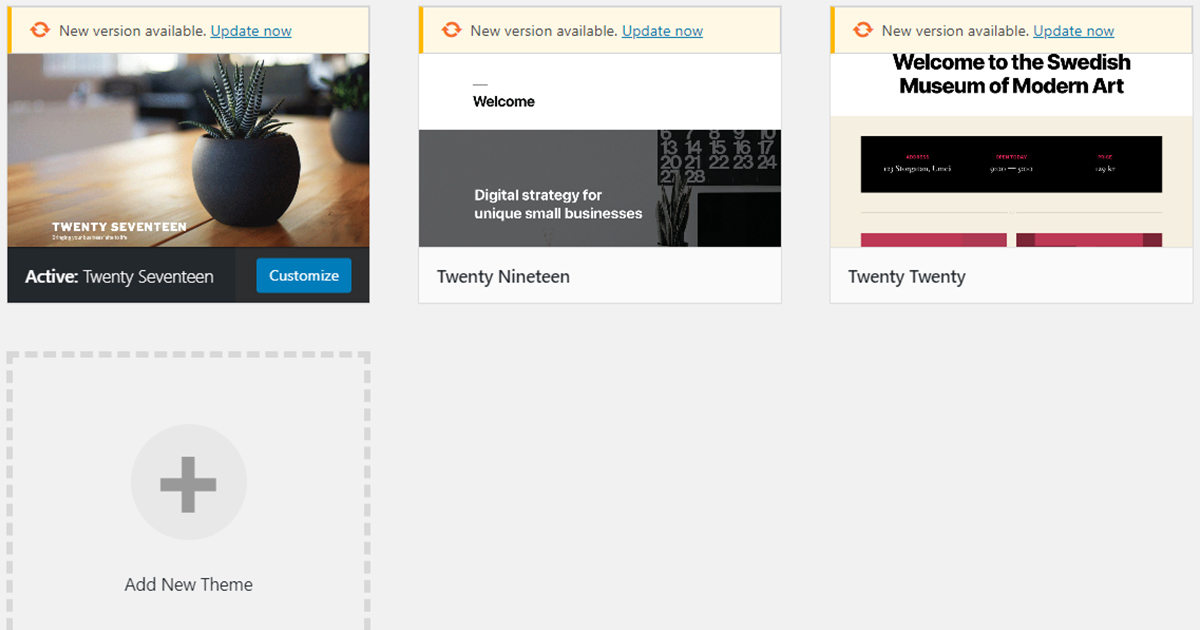
Select The Theme
Without themes, your blog looks gloomy and dull, so you need to make it appealing and calm to feel. Everything is designed to show the message of what you want to convey and make your homepage attractive. They have different features to set on the website; therefore, it is the best way to preview before applying what they offer on the blog or site.
The Theme is the Appearance of how your blog looks and feels. The idea defines where you place the menus and widgets. It has a default setting for color and fonts.
What have you to do:
-
- Open your blog.
- Go to the Appearance in the dashboard.
- Click on the themes.
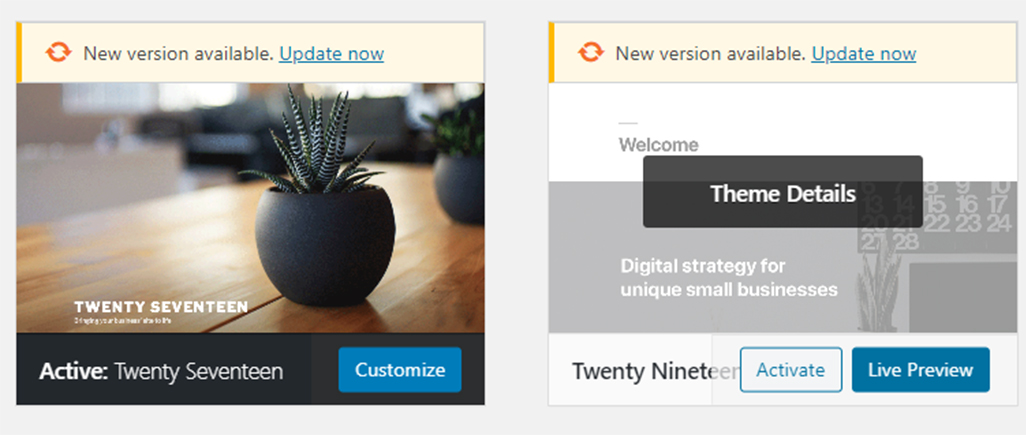
When you go to the theme option, you will find the Activate or Live Preview.
Live Preview
In Live Preview, you can check the Theme before applying it to how the WordPress blog will look.
Activate A Theme
This activation option works when you click on it will activate the blog without altering the changes on the blog or site. WordPress has an accessible theme directory, and premium themes are also available with advanced features.
You can filter the free themes that are available for all the sites.
You can search for the premium themes or purchase them for the blog or site with unlimited access to all premium themes.
Adding A New Theme
You can also add them by:
-
- First, click on the themes on the dashboard.
- Then, go to Add New.
A grid will appear showing a different theme view from where you can install them immediately or preview them before applying them on the blog. If you want a new theme, you can go to the search bar and narrow down your search. There are additional options:
-
- Featured
- Popular
- Latest: The latest and advanced ideas.
- Favorites: The ideas are marked as a favorite in WordPress.org; you can put the username to get that Theme.
- Feature filter with three categories:
Subject: Blog, e-commerce, education, holiday or news
Features: Accessibility, custom headers, footers, post formats, or more.
Layout: Grid, number of columns or sidebars in the Theme
You can also install them if they are not available in WordPress.
While applying a theme, a few things need framing to the theme features because of the difference in the locations.
Adding The Widgets
Widgets help in the customization of the blog content that you can add left, or right sidebars, or footers.
-
- Open the blog or site.
- Go to the Appearance on the dashboard.
- Click on the Widgets, and a box will open, showing available widgets.
- Select the widget and click Add the widget.
When you finish adding the widgets, you can change the position for how you want to display them.
You can also delete or remove them by clicking on the widgets.
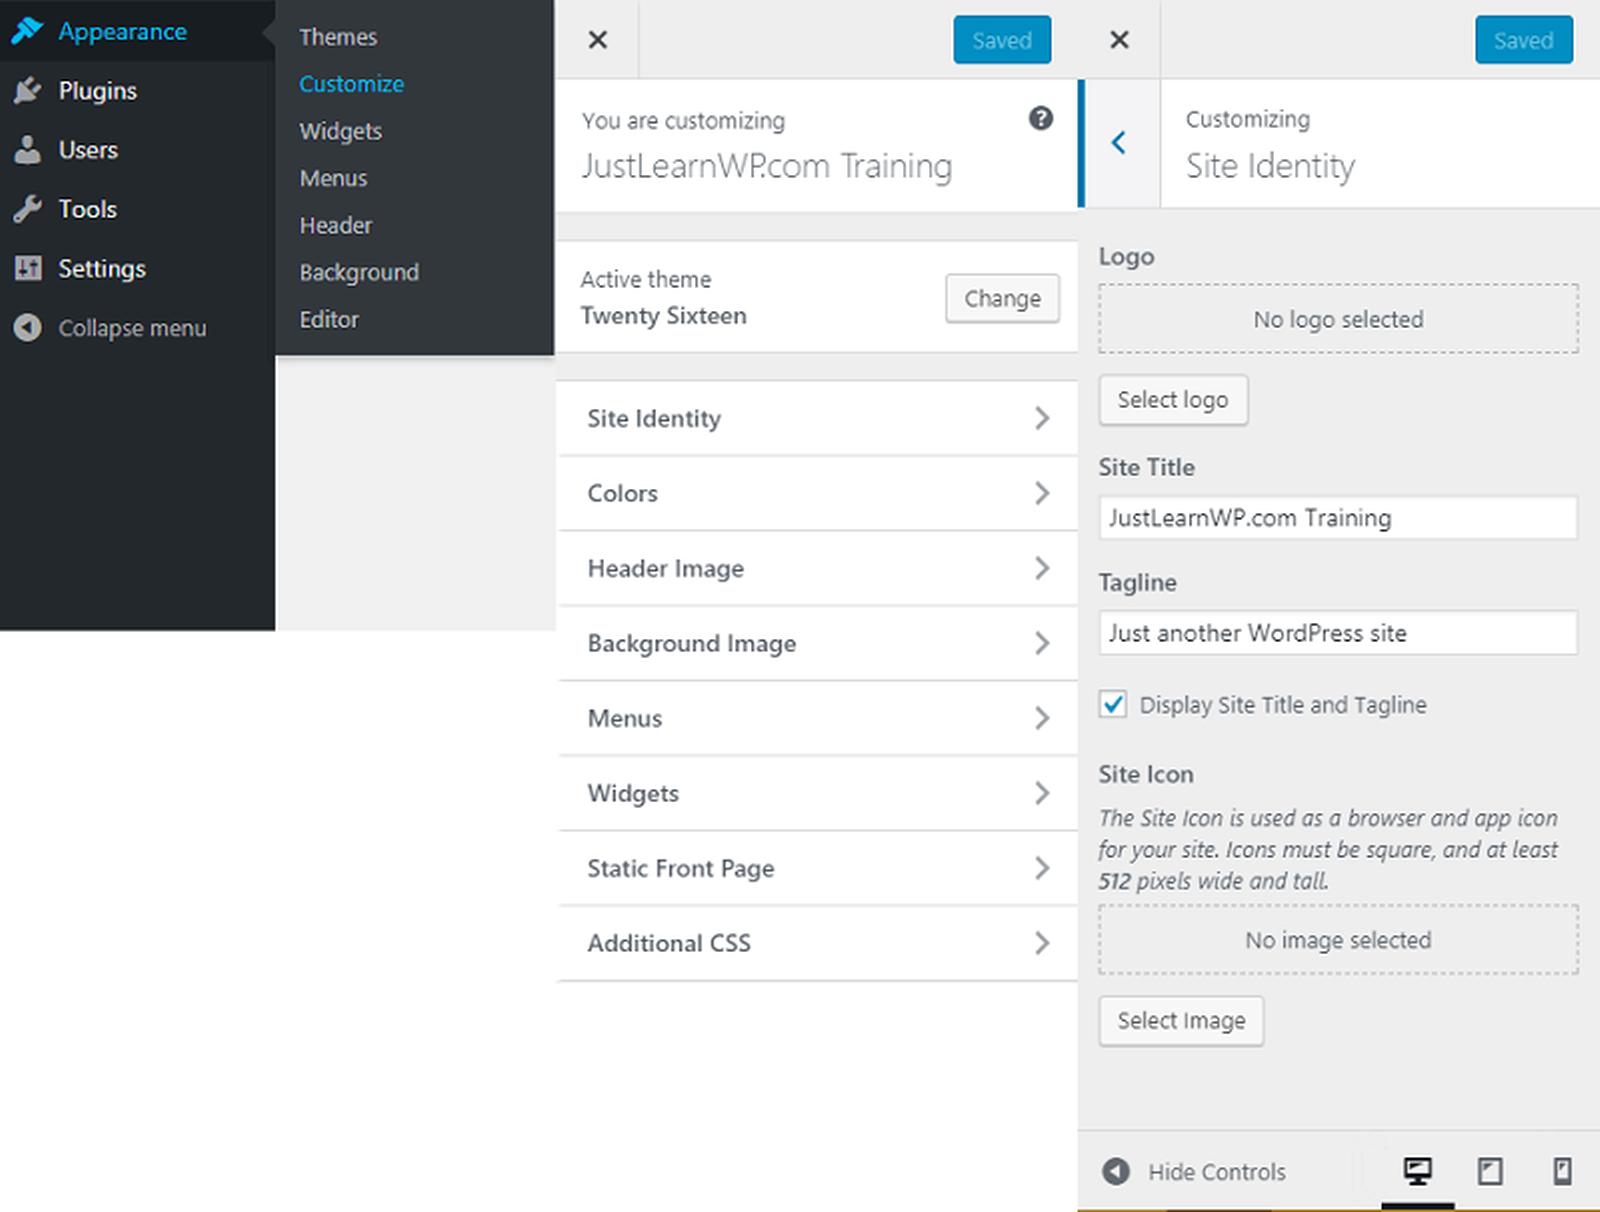
Customization Of The Blog
The Customizer helps you go to the next level to the Theme, where you can change the site identity, colors, menus, homepage settings, CSS, and theme options.
-
- Open the site or blog.
- Go to the Appearance on the dashboard.
- Click on the Customize.
To navigate from Customizer.
-
- Click on the X icon to move from the Customizer.
- Clicking on the publish button in blue color will publish the draft.
Customizing also helps to change the active Theme.
At the bottom of the Customizer, there appear to hide control buttons from which you can hide it and preview your site or blog on a desktop, mobile device, or tablet.
Site Identity
Here, you can change or set your blog as:
Logo
You can change or remove the logo, and it will appear where the Theme supports the logo.
Site Title
You can see it in the header.
Tagline
The tagline is the description of your blog or site and appears below the site title.
Site icons
Site icons are about what to show in the browser, bookmarks, and WordPress mobile apps.
Colors
Every Theme is different and supports different colors. So what you can do is you can choose the color scheme.
Header Media
You can select a model if your Theme supports a header image on the blog or site.
Click on the Add new image.
This box includes information about the header setting of the Theme.
Additional CSS
CSS is the abbreviation of Cascading Style Sheet, a markup language that controls the HTML webpage.
When you install custom themes and plugins, then it is called additional CSS.
Menus and Widgets Set Up On A WordPress Blog
You can access these two options in two ways:
-
- Go to the dashboard of your site or blog.
- Select the Menus or Widget options.
The other way is:
-
- Go to the dashboard of your site or blog.
- Select the Customize.
Set-Up Menus To A WordPress Blog
These are the navigation buttons to display the content at the header. You can create lists such as About the page, our services, our work, and more. Also, you can change the position of the menu items.
Since the themes are different, the Theme defines the location of menus.
Homepage Settings To Set Up A WordPress Blog
The homepage shows the content that the visitors look at when they access the blog or site.
Your homepage displays two settings:
-
- Your latest post
- A static page
The website, by default, shows the Your latest posts on the blog or the homepage site.
When you set a static page, you have to create two types of pages; a Homepage and a Post page which will display the post if you have the blog posts.
Wrap Up
These simple steps not only help the WordPress blog set up but also allow customization making your blog appealing. Once you have set up a WordPress blog, you can make changes when needed. In addition, you can run your blog posts to get internet traffic.

 & Passion.